Pretty Crochet Girl’s Dress Free Pattern.
For ages 3–4 (4–5) 5–6 years
You will need:
- Violet yarn (100% mercerized cotton, 282 m/50 g) — 300(350)450 g green, 50 g white
- Crochet hook size 2 mm
Attention!
Before starting, make a gauge swatch.
- Chain 29.
- Row 1: ch 3, 29 dc.
- Row 2: ch 3, 4 dc, ch 2, 16 dc, ch 2, 5 dc.
- Row 3: ch 3, 1 dc, ch 2, 4 dc, ch 2, 10 dc, ch 2, 4 dc, ch 2, 2 dc.
- Row 4: ch 3, 4 dc, ch 2, 16 dc, ch 2, 5 dc.
- Row 5: ch 3, 29 dc.
- Row 6: ch 3, 13 dc, ch 2, 14 dc.
- Row 7: ch 3, 10 dc, ch 2, 4 dc, ch 2, 11 dc.
- Row 8: ch 3, 13 dc, ch 2, 14 dc.
Wash the swatch, dry flat, then measure to determine stitch and row gauge.
Gauge: 31 stitches × 15 rows = 10 × 10 cm
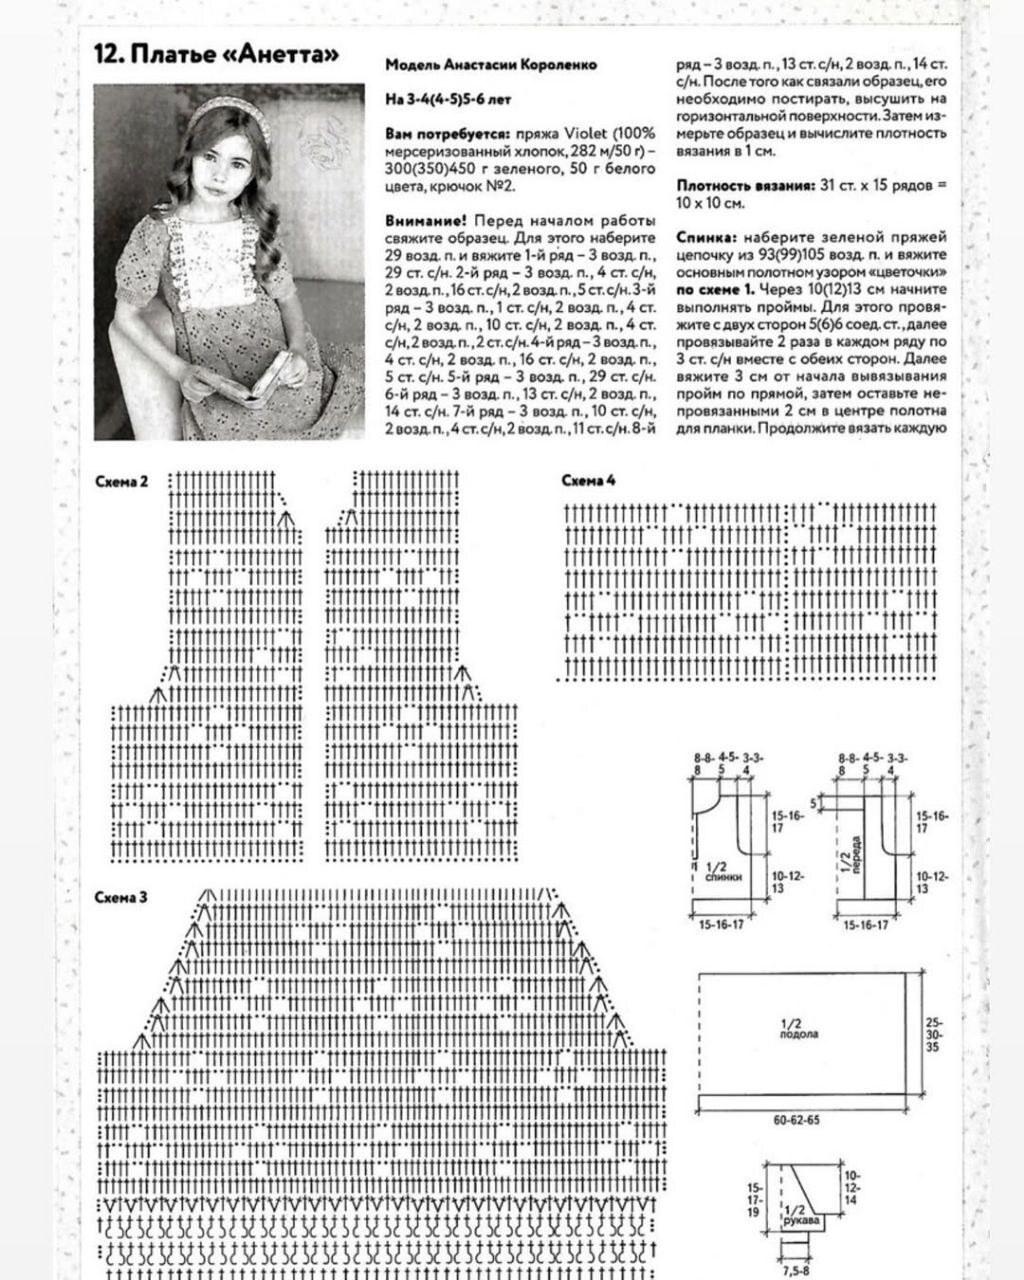
Back
With green yarn, chain 93(99)105. Work the “flowers” pattern from Chart 1.
After 10(12)13 cm, begin armholes:
- On both sides, work 5(6)6 slip sts.
- Then, 2 times in each row, work 3 dc together at both edges.
- Continue straight for 3 cm from start of armholes.
- Leave the center 2 cm unworked for the button band.
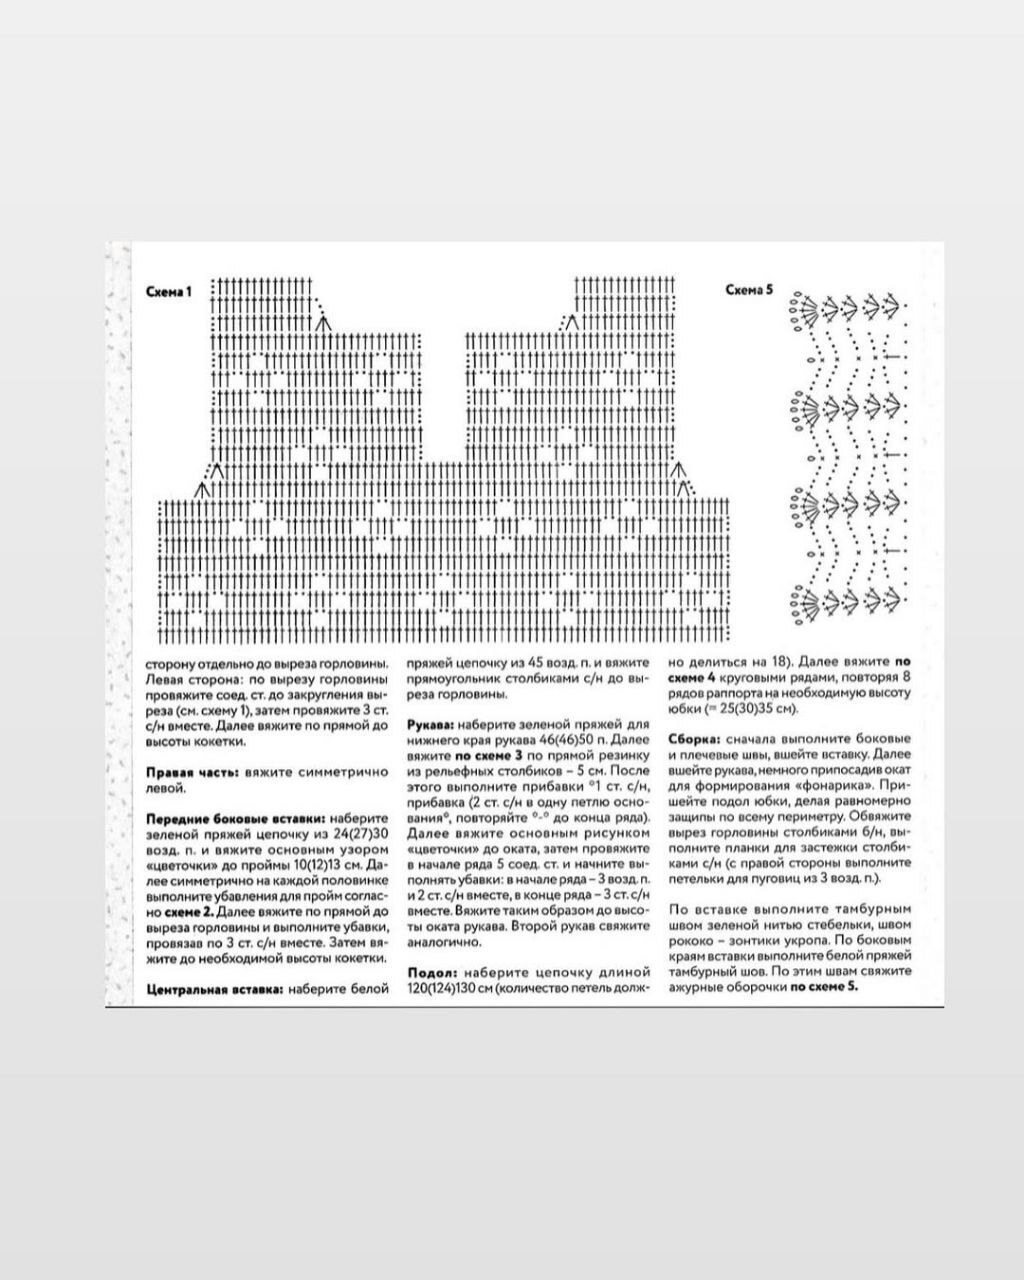
- Work each side separately to shape the neckline.
Left side: along neckline edge, work slip stitches to curve the neckline (see Chart 1), then crochet 3 dc together. Continue straight to yoke height.
Right side: work symmetrically.
Front Side Panels
With green yarn, chain 24(27)30. Work the “flowers” pattern until armhole height 10(12)13 cm.
For each panel, shape the armhole decreases as in Chart 2.
Continue straight to neckline, then decrease at neckline edge by working 3 dc together.
Work to yoke height.
Center Panel
With white yarn, chain 45. Work a rectangle in dc up to neckline height.
Sleeves
With green yarn, chain 46(46)50 for sleeve edge.
Work ribbing with front/back post double crochet (Chart 3) for 5 cm.
Then increase: 1 dc, 1 increase (2 dc in one stitch), repeat across row.
Continue in “flowers” pattern until sleeve cap.
Cap shaping:
- At beginning of row, work 5 slip sts.
- Then at start of row: ch 3 + 2 dc together; at end of row: 3 dc together.
- Continue shaping until sleeve cap height is reached.
Make the second sleeve the same way.
Skirt Hem
Chain 120(124)130 (multiple of 18).
Work Chart 4 in rounds, repeating the 8-row pattern to desired skirt length: 25(30)35 cm.
Assembly
- Sew side and shoulder seams.
- Insert and sew the white center panel.
- Sew sleeves, easing in sleeve cap to form a puff.
- Attach the skirt hem, making even tucks around the edge.
- Work neckline edging in hdc.
- Work front bands in dc (on the right band, make button loops with ch 3).
Decoration:
- On the center panel, embroider stems in chain stitch with green thread, and dill flowers in rococo stitch.
- Along the sides of the panel, embroider chain stitch with white yarn.
- Along these seams, crochet lace ruffles following Chart 5.
Diagrams:
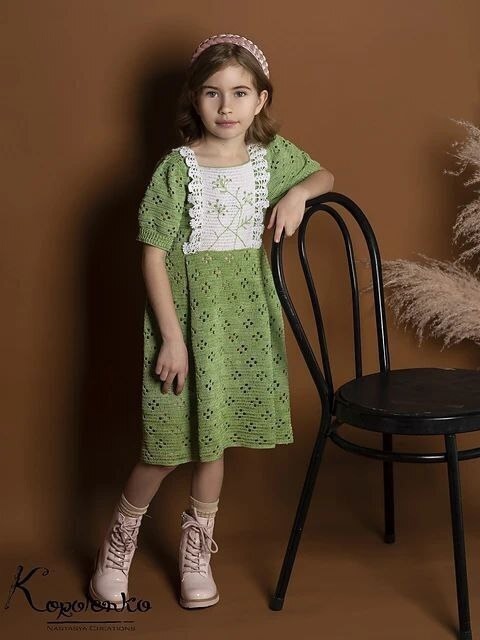
This beautiful girl’s crochet dress pattern by Anastasia Korolenko is a delicate, airy design worked in mercerized cotton, perfect for ages 3–6 years. The dress combines classic stitches, decorative motifs, and fine detailing to create a garment that feels both traditional and playful, ideal for special occasions, family gatherings, or simply as a handmade wardrobe treasure.
The dress is made with Violet yarn (100% mercerized cotton, 282 m/50 g), worked with a 2 mm crochet hook. The main color is green, accented with white in the central panel, and embroidered embellishments add extra charm.
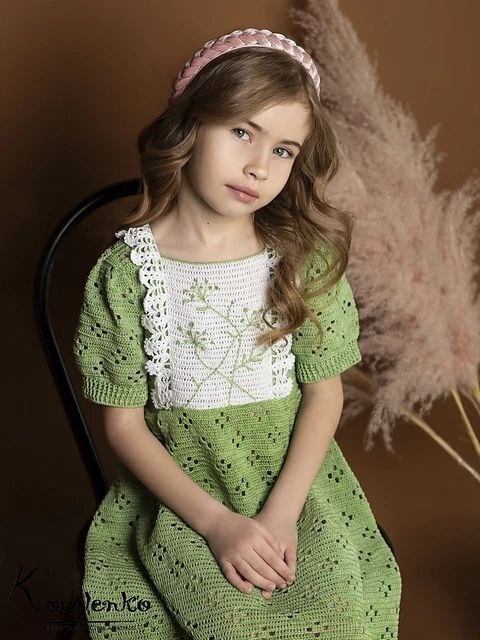
The construction is modular and carefully thought out. The back and front panels are worked in a floral crochet stitch, forming the body of the dress. Shaping is included for the armholes and neckline, ensuring a comfortable and well-fitted yoke. The front is designed with two green side panels and a striking central insert in white, worked in simple double crochet for contrast. Along the edges of this insert, delicate embroidery is added: green stems in chain stitch and little rococo-style dill flowers. White chain embroidery further decorates the borders, and finally, light lace ruffles are crocheted along these seams, giving the front panel a refined, decorative finish.
The sleeves are worked with ribbed cuffs made of post stitches for a snug and flexible fit, transitioning into the same floral stitch used in the body. The shaping of the sleeve caps creates a slightly gathered “puff sleeve” effect, adding volume and a girlish, fairy-tale style to the dress.
The skirt portion is attached separately. It begins with a long foundation chain, worked in the round, and features an elegant lace pattern repeated in 8-row segments. The length of the skirt can be adjusted depending on size, from 25 to 35 cm, allowing you to create a shorter tunic-style piece or a fuller dress. The skirt is joined to the bodice with small, even tucks around the waistline, giving natural shaping and a soft flare.
Finishing touches include a button placket at the back neckline, worked in double crochet. Small loops are formed on one side with chains to create neat buttonholes. The neckline itself is edged with half double crochet stitches for strength and polish.
The result is a light, breathable dress that feels soft against the skin but holds its shape beautifully thanks to the mercerized cotton. It’s both elegant and durable — a handmade heirloom piece that can be passed down or treasured as part of a little girl’s childhood wardrobe.
Vestido de Crochet para Niña – Patrón en Algodón Mercerizado
Descripción
Este encantador patrón de vestido de crochet para niña de Anastasia Korolenko está diseñado para edades de 3 a 6 años. Se trabaja con hilo de algodón mercerizado fino, lo que le da un acabado delicado, fresco y elegante, ideal para días especiales, reuniones familiares o como prenda hecha a mano para el día a día.
El vestido combina paneles laterales en verde con un panel central en blanco, decorado con bordados de tallos y flores en punto rococó, y finalizado con volantes de encaje en los bordes. Las mangas de tipo farol añaden un aire romántico y el faldón en punto calado trabajado en redondo aporta ligereza y movimiento. El cierre en la espalda con botones lo hace práctico y cómodo de llevar.
Un proyecto ideal para quienes buscan un diseño infantil que una comodidad y estilo, con el atractivo de los detalles hechos a mano que convierten este vestido en una pieza única y atemporal.
Patrón Completo en Español
Modelo: Anastasia Korolenko
Tallas: 3–4 (4–5) 5–6 años
Materiales
- Hilo Violet (100% algodón mercerizado, 282 m/50 g):
- 300(350)450 g en verde
- 50 g en blanco
- Aguja de crochet Nº 2 mm
- Botones para la espalda
Muestra (gauge)
31 puntos × 15 filas = 10 × 10 cm en punto alto.
Antes de comenzar, teje una muestra siguiendo este esquema:
- Teje una cadeneta de 29 puntos.
- R1: 3 cad, 29 p. altos.
- R2: 3 cad, 4 p. altos, 2 cad, 16 p. altos, 2 cad, 5 p. altos.
- R3: 3 cad, 1 p. alto, 2 cad, 4 p. altos, 2 cad, 10 p. altos, 2 cad, 4 p. altos, 2 cad, 2 p. altos.
- R4: 3 cad, 4 p. altos, 2 cad, 16 p. altos, 2 cad, 5 p. altos.
- R5: 3 cad, 29 p. altos.
- R6: 3 cad, 13 p. altos, 2 cad, 14 p. altos.
- R7: 3 cad, 10 p. altos, 2 cad, 4 p. altos, 2 cad, 11 p. altos.
- R8: 3 cad, 13 p. altos, 2 cad, 14 p. altos.
Lava y seca la muestra en superficie plana, después mide la densidad.
Espalda
- Con hilo verde, teje una cadeneta de 93(99)105 p.
- Trabaja el punto “florecitas” siguiendo el diagrama 1.
- A los 10(12)13 cm comienza las sisas:
- en cada lado, teje 5(6)6 p. deslizados,
- luego en cada fila disminuye 2 veces 3 p. altos juntos en ambos lados.
- Teje recto 3 cm desde el inicio de la sisa.
- Deja sin tejer los 2 cm centrales para la abertura de la espalda.
- Continúa cada lado por separado formando el escote.
Lado izquierdo: trabaja p. deslizados en el borde del escote hasta formar la curva (según diagrama 1), después teje 3 p. altos juntos. Continúa recto hasta la altura de la canesú.
Lado derecho: tejer de forma simétrica.
Paneles delanteros laterales
- Con hilo verde, monta una cadeneta de 24(27)30 p.
- Trabaja con el punto “florecitas” hasta 10(12)13 cm de altura.
- Forma las sisas según el diagrama 2, trabajando disminuciones en cada lado.
- Continúa recto hasta el escote y disminuye 3 p. altos juntos.
- Teje hasta alcanzar la altura de la canesú.
Panel central delantero
- Con hilo blanco, monta 45 cad.
- Teje en punto alto recto hasta llegar a la altura del escote.
Mangas
- Con hilo verde, monta 46(46)50 cad. para el borde inferior.
- Trabaja en resorte de puntos altos en relieve (según diagrama 3) durante 5 cm.
- Aumenta: 1 p. alto, 1 aumento (2 p. altos en el mismo p. de base) y repite hasta terminar la vuelta.
- Trabaja el punto “florecitas” hasta llegar a la copa de la manga.
- Forma la copa:
- inicio de vuelta: 5 p. deslizados, después 3 cad + 2 p. altos juntos;
- final de vuelta: 3 p. altos juntos.
- Continúa hasta completar la altura de la copa.
- Teje la segunda manga igual.
Faldón
- Con hilo verde, monta una cadeneta de 120(124)130 p. (múltiplo de 18).
- Trabaja en redondo siguiendo el diagrama 4, repitiendo el motivo de 8 filas hasta alcanzar el largo deseado: 25(30)35 cm.
Armado y Acabado
- Une costuras laterales y de hombros.
- Cose el panel central blanco en el delantero.
- Coloca y cose las mangas, frunciendo ligeramente la copa para formar efecto globo.
- Une el faldón a la parte superior, distribuyendo pequeños pliegues de manera uniforme.
- Borda sobre el panel central:
- tallos verdes con punto cadeneta,
- sombrillas de eneldo con punto rococó.
- En los bordes laterales del panel central, borda en blanco con punto cadeneta.
- Sobre estas líneas, teje volantes calados siguiendo el diagrama 5.
- Trabaja el escote con una vuelta de medio punto alto.
- Haz las vistas para la abertura trasera en punto alto; en el lado derecho forma ojales con 3 cad.
Вязаное крючком платье для девочки из мерсеризованного хлопка
Описание
Это очаровательное платье крючком для девочки по модели Анастасии Короленко рассчитано на возраст от 3 до 6 лет. Лёгкий и нежный хлопок мерсеризованный придаёт изделию аккуратный блеск и держит форму, делая платье удобным, дышащим и элегантным.
Платье состоит из зелёных боковых деталей и белой центральной вставки, украшенной вышивкой: зелёные стебельки и цветы в технике рококо. Края вставки обвязаны белыми тамбурными стежками и дополнены кружевными оборками. Рукава-фонарики придают платью праздничный и романтичный вид, а ажурный подол, связанный по кругу, делает силуэт лёгким и воздушным. Застёжка на пуговицы по спинке делает модель практичной.
Это отличный проект для тех, кто ищет детский наряд с сочетанием удобства и декоративности: платье прекрасно подойдёт для торжества, фотосессии или в качестве эксклюзивной ручной работы в повседневном гардеробе.
Полное описание модели
Автор модели: Анастасия Короленко
Размеры: на 3–4 (4–5) 5–6 лет
Материалы
- Пряжа Violet (100% мерсеризованный хлопок, 282 м/50 г):
- 300(350)450 г зелёного цвета
- 50 г белого цвета
- Крючок № 2
- Пуговицы для застёжки
Плотность вязания
31 п. × 15 рядов = 10 × 10 см (узор ст. с/н).
Перед началом работы выполните образец:
- Связать цепочку из 29 возд. п.
- 1-й р.: 3 возд. п., 29 ст. с/н.
- 2-й р.: 3 возд. п., 4 ст. с/н, 2 возд. п., 16 ст. с/н, 2 возд. п., 5 ст. с/н.
- 3-й р.: 3 возд. п., 1 ст. с/н, 2 возд. п., 4 ст. с/н, 2 возд. п., 10 ст. с/н, 2 возд. п., 4 ст. с/н, 2 возд. п., 2 ст. с/н.
- 4-й р.: 3 возд. п., 4 ст. с/н, 2 возд. п., 16 ст. с/н, 2 возд. п., 5 ст. с/н.
- 5-й р.: 3 возд. п., 29 ст. с/н.
- 6-й р.: 3 возд. п., 13 ст. с/н, 2 возд. п., 14 ст. с/н.
- 7-й р.: 3 возд. п., 10 ст. с/н, 2 возд. п., 4 ст. с/н, 2 возд. п., 11 ст. с/н.
- 8-й р.: 3 возд. п., 13 ст. с/н, 2 возд. п., 14 ст. с/н.
Образец постирать, высушить на горизонтальной поверхности, измерить плотность.
Спинка
- Зелёной нитью набрать 93(99)105 возд. п.
- Вязать узором «цветочки» по схеме 1.
- Через 10(12)13 см выполнить проймы:
- с обеих сторон провязать по 5(6)6 соед. ст.;
- затем по 2 раза в каждом ряду провязать по 3 ст. с/н вместе.
- Далее вязать прямо 3 см.
- В центре оставить 2 см непровязанными для планки застёжки.
- Продолжить каждую часть отдельно, формируя горловину.
Левая часть: по линии горловины провязать соед. ст. до закругления (см. схему 1), затем 3 ст. с/н вместе. Вязать прямо до высоты кокетки.
Правая часть: выполнить симметрично.
Передние боковые вставки
- Зелёной нитью набрать 24(27)30 возд. п.
- Вязать узором «цветочки» до высоты 10(12)13 см.
- Формировать пройму по схеме 2.
- Далее вязать прямо до горловины. Выполнить убавку по 3 ст. с/н вместе.
- Вязать до высоты кокетки.
Центральная вставка
- Белой нитью набрать цепочку из 45 возд. п.
- Вязать прямоугольник ст. с/н до линии горловины.
Рукава
- Зелёной нитью набрать 46(46)50 возд. п. для нижнего края.
- Вязать резинку рельефными ст. с/н по схеме 3, высотой 5 см.
- Далее выполнить прибавки: 1 ст. с/н, 1 прибавка (2 ст. с/н в 1 п. основания) повторять до конца ряда.
- Вязать узором «цветочки» до линии оката.
Формирование оката:
- в начале ряда провязать 5 соед. ст.;
- затем: 3 возд. п. + 2 ст. с/н вместе;
- в конце ряда: 3 ст. с/н вместе.
- Продолжать до высоты оката.
- Второй рукав выполнить аналогично.
Подол
- Набрать цепочку из 120(124)130 возд. п. (число п. кратно 18).
- Вязать по схеме 4 круговыми рядами, повторяя 8 рядов раппорта до длины 25(30)35 см.
Сборка и отделка
- Выполнить боковые и плечевые швы.
- Вшить центральную белую вставку.
- Вшить рукава, слегка припосаживая окат для формы «фонарика».
- Присоединить подол, распределяя равномерные защипы по талии.
- По белой вставке вышить:
- стебельки зелёной нитью тамбурным швом,
- «зонтики укропа» швом рококо.
- По боковым краям вставки выполнить белой нитью тамбурный шов.
- По этим линиям связать кружевные оборки по схеме 5.
- Обвязать горловину ст. с/н или полустолбиками с/н.
- Выполнить планки застёжки ст. с/н; на правой стороне сделать петли для пуговиц из 3 возд. п.