Long Boho Vest Free Crochet Pattern.
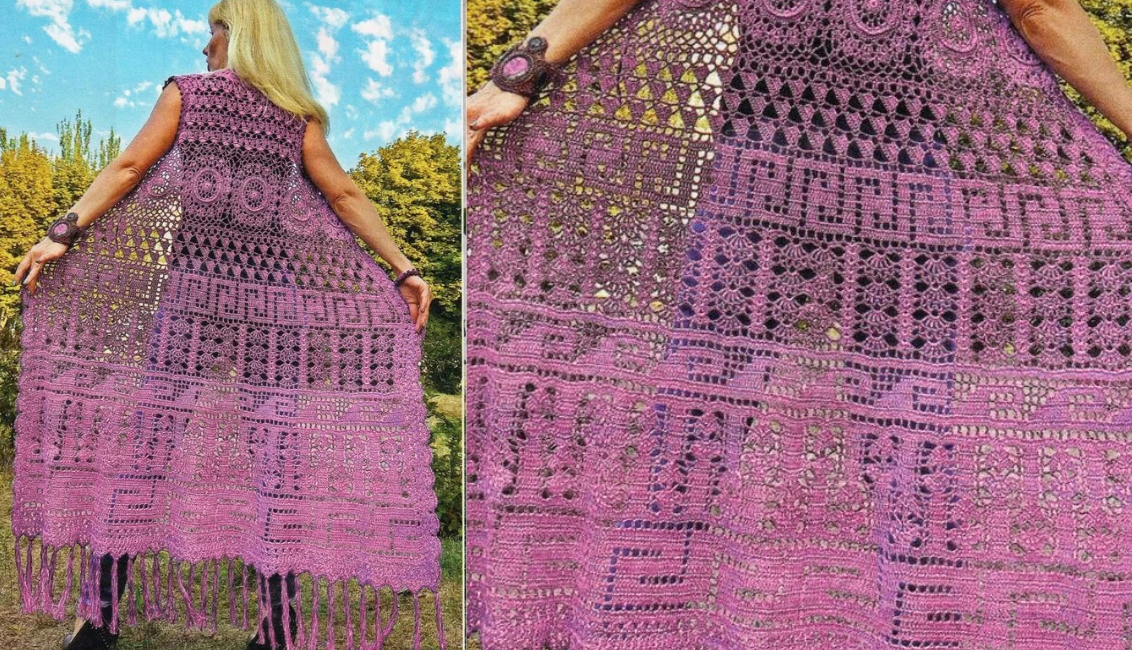
Light, breezy, and effortlessly chic — this long crochet vest is the perfect layering piece for warm weather. Designed by Vita Salenkova, it combines delicate round motifs, filet lace, and airy stitches to create a garment that’s as stylish as it is fun to make.
The construction begins with a strip of joined motifs, which forms the foundation of the design. From there, the vest grows both upward and downward, shaping the armholes, neckline, and hem with beautiful lace patterns. The mix of textures gives the piece a flowing drape, while the cotton yarn keeps it cool and comfortable.
Whether you style it over a simple dress, a summer tank, or even swimwear, this vest adds a touch of handmade elegance to any outfit. Perfect for crocheters who love motif work and lace stitches, it’s a project that will quickly become a favorite in your handmade wardrobe.
Size: XS–S
You will need:
- Yarn (100% cotton, 250 m / 50 g) – 600 g
- Crochet hook No. 3
Instructions:
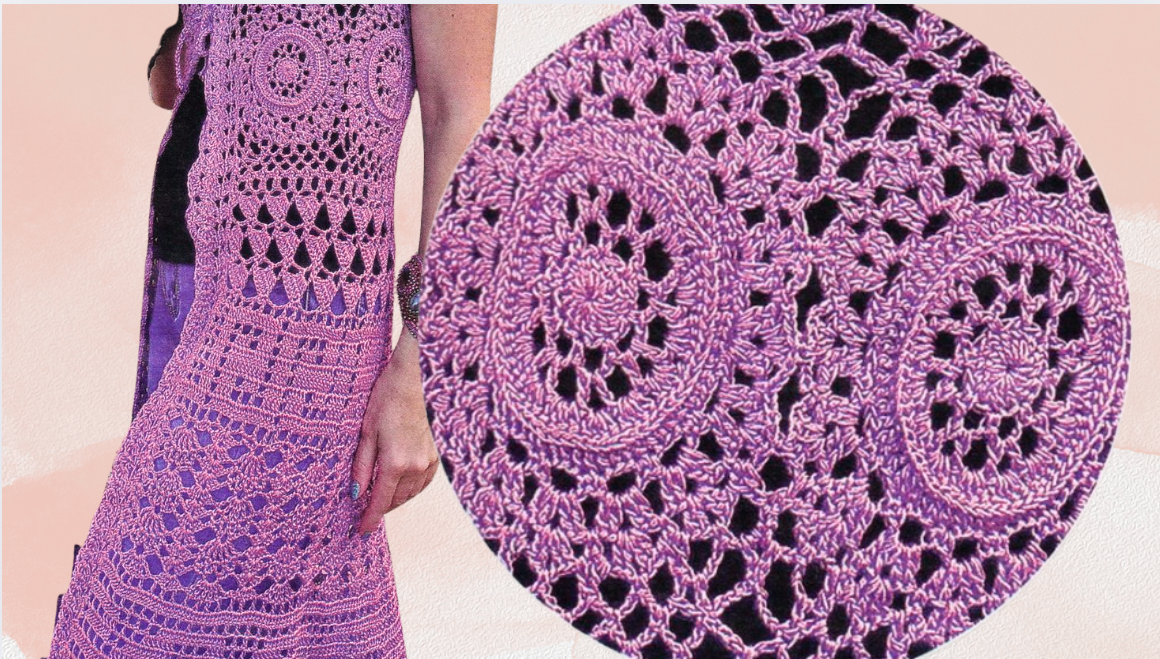
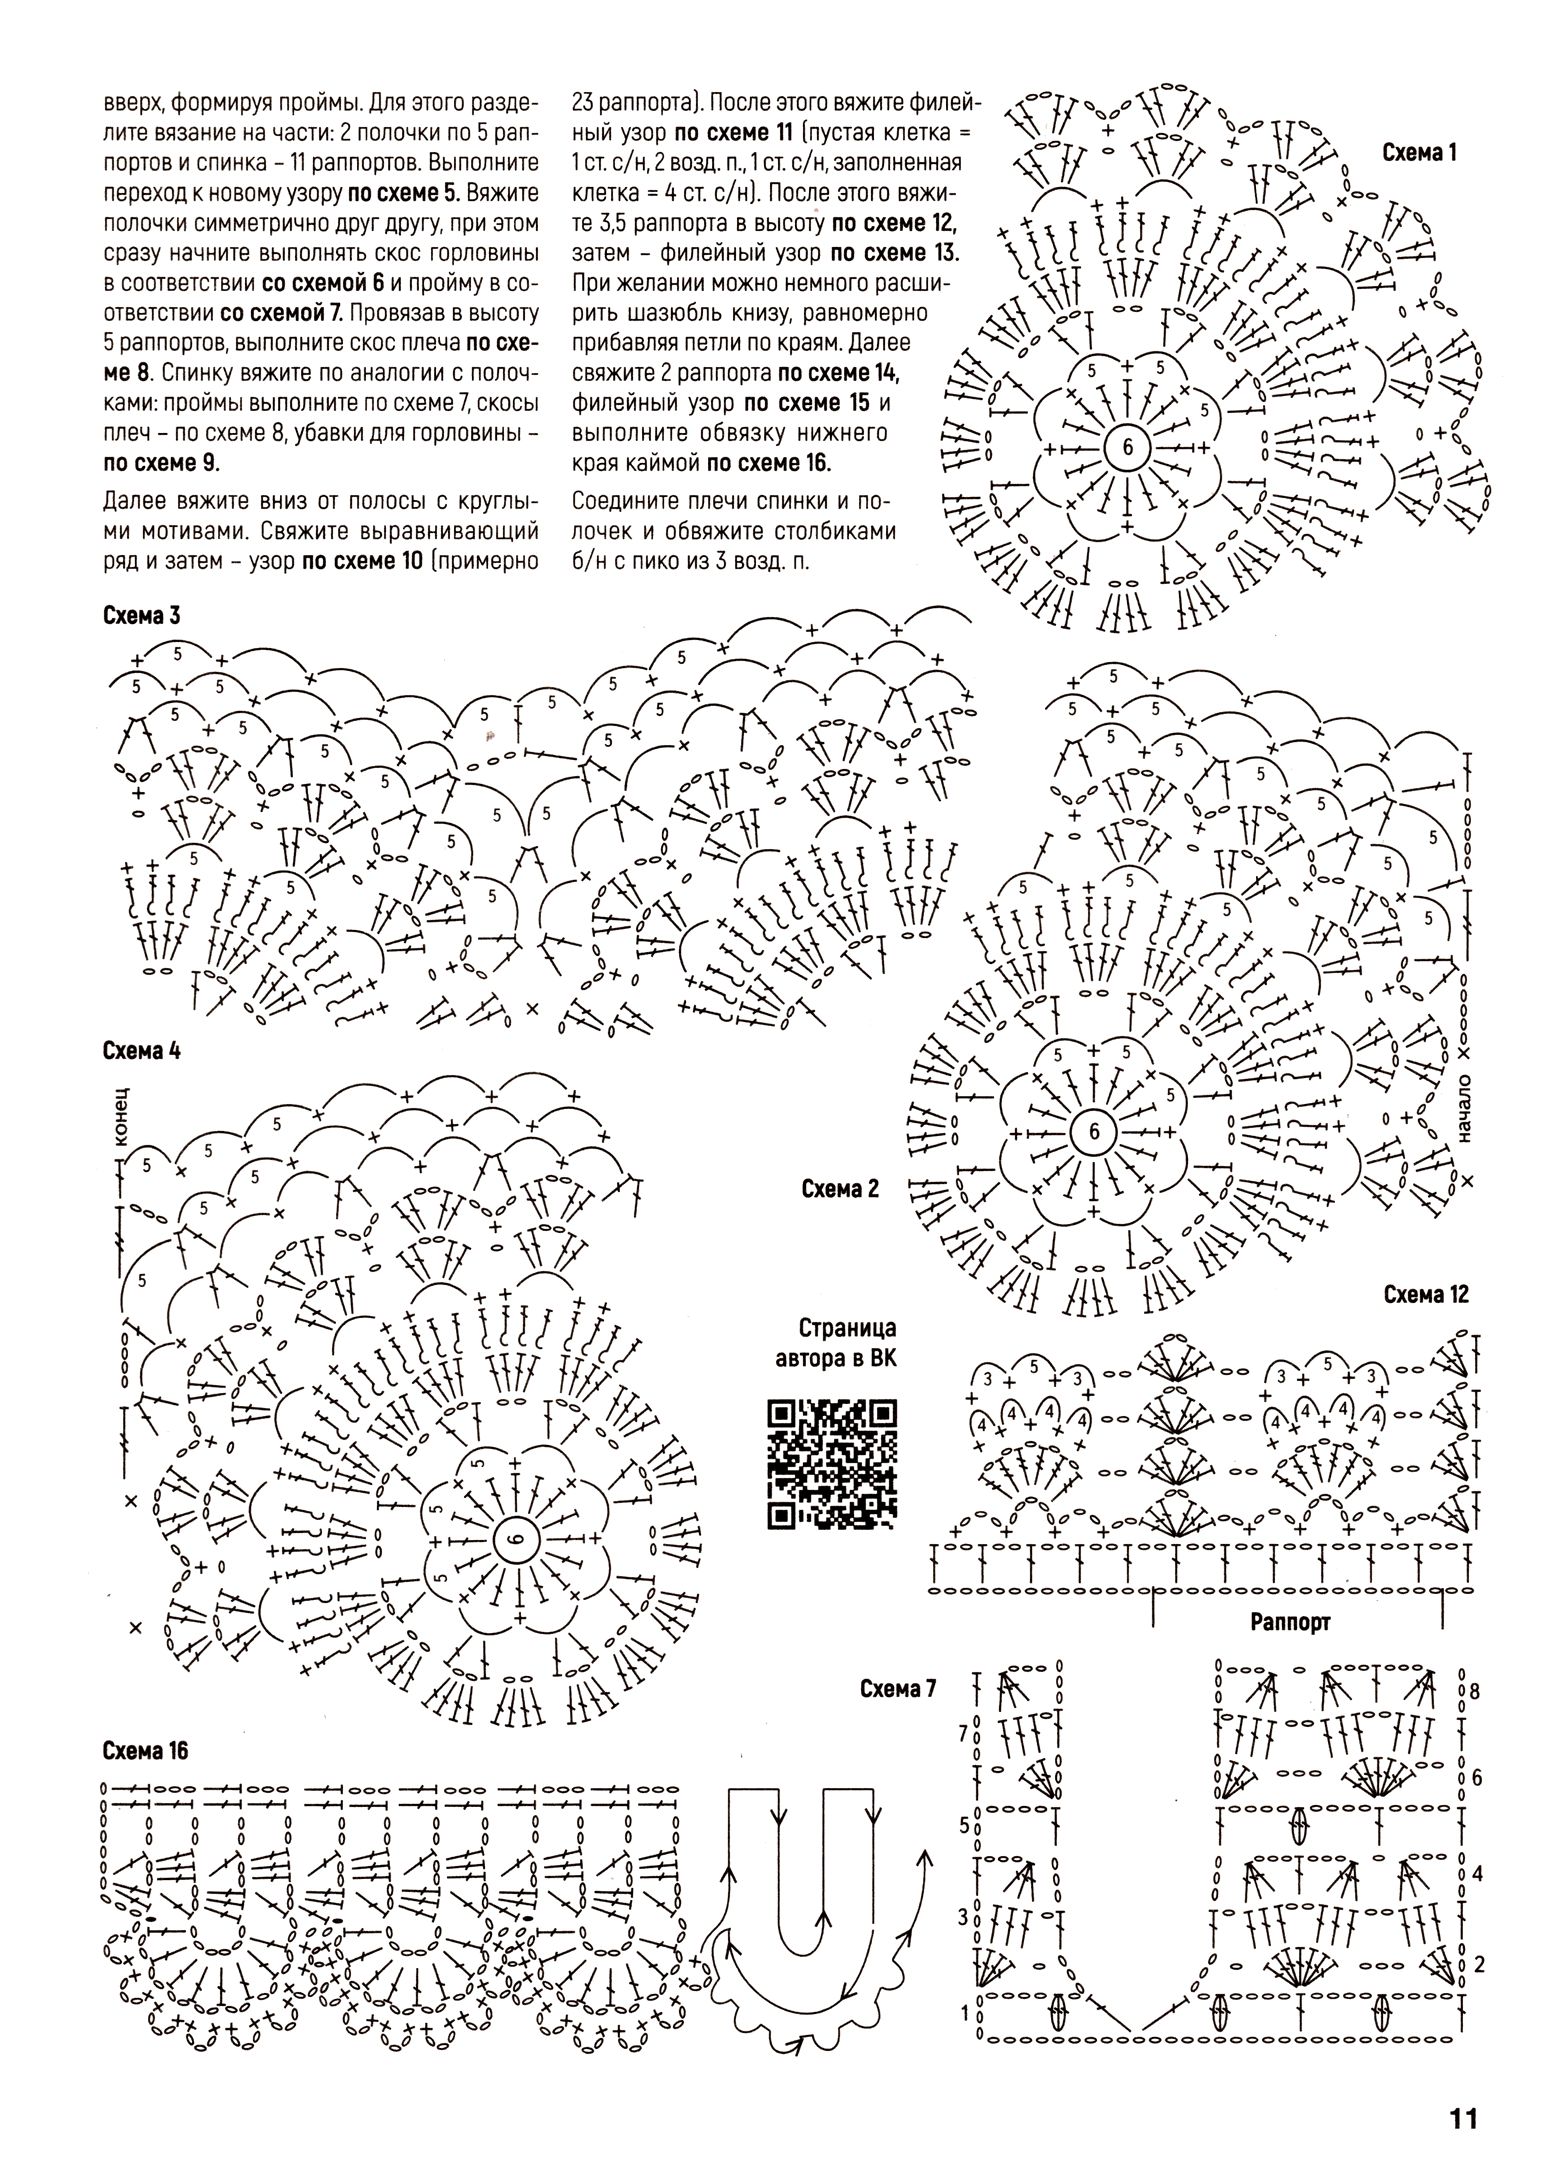
- Crochet 6 round motifs following Chart 1. Work the first motif completely, then join each subsequent motif to the previous one in the final round at 3 points of the fan tops.
- Edge the resulting strip:
- From the right edge (right front) – work according to Chart 2
- Along the top and bottom edges of the strip – work according to Chart 3
- From the left edge – work according to Chart 4
- Next, continue crocheting upward from the strip, shaping the armholes. To do this, divide the work into sections:
- 2 fronts (5 repeats each)
- Back (11 repeats)
- Transition to the new stitch pattern according to Chart 5.
- Work the fronts symmetrically. At the same time:
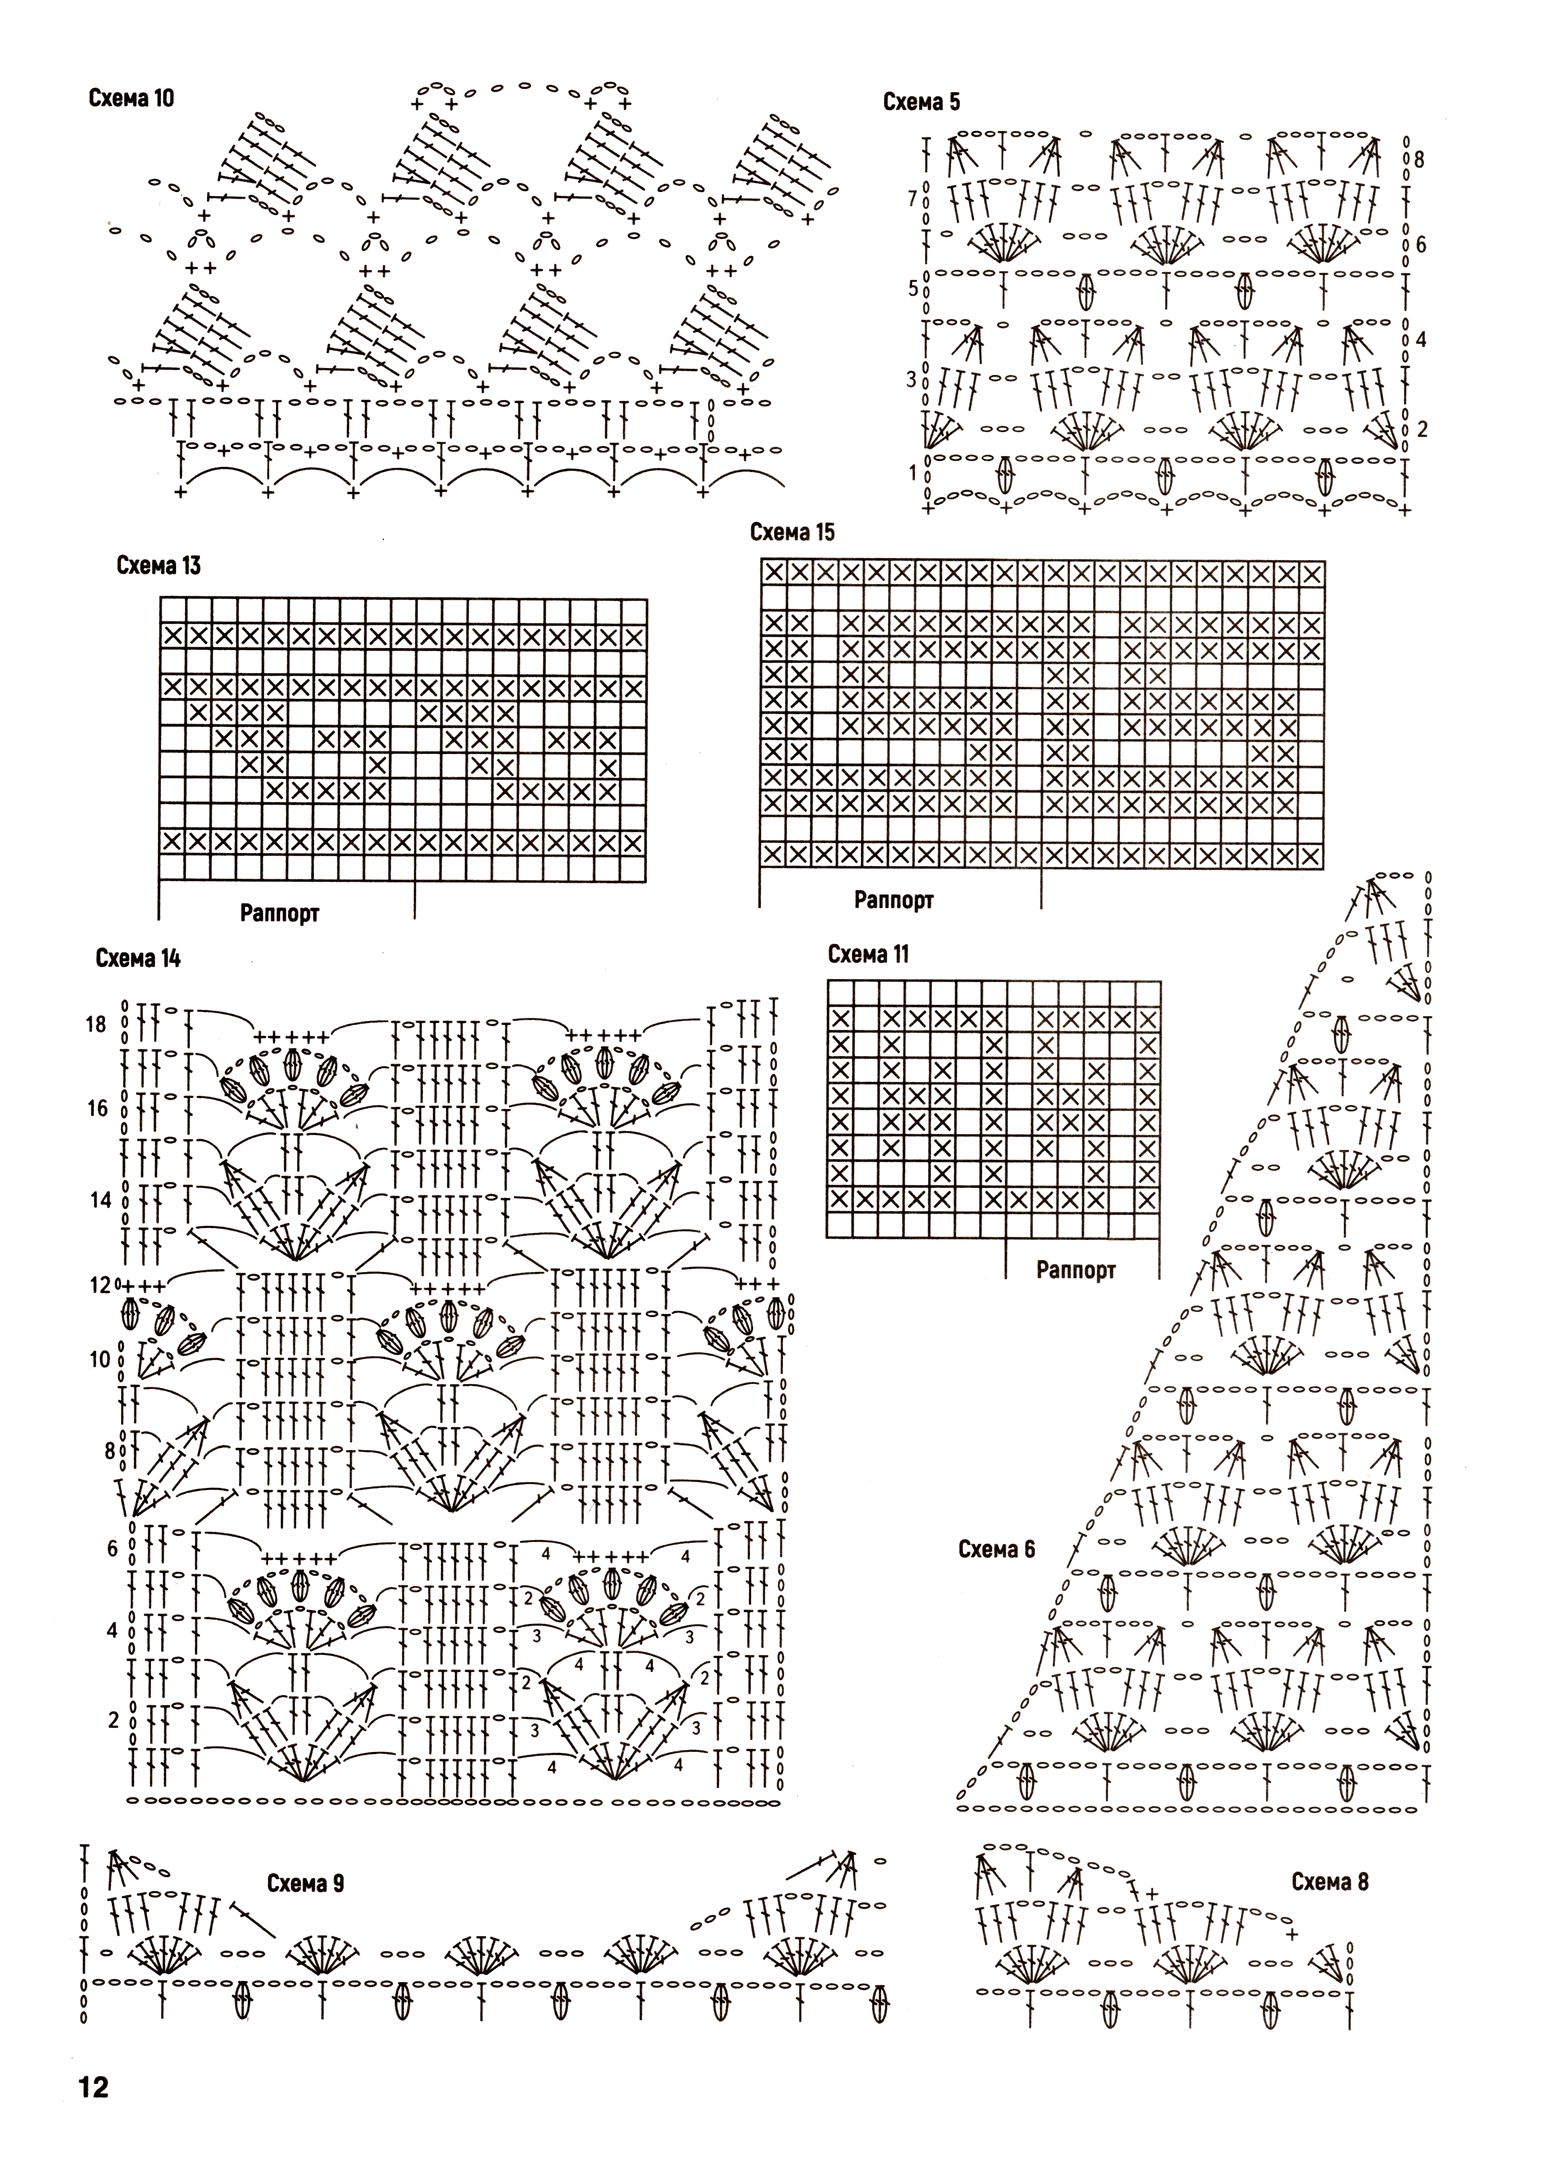
- Begin shaping the neckline according to Chart 6
- Work the armhole according to Chart 7
- After completing 5 pattern repeats in height, shape the shoulder slope according to Chart 8.
- For the back, work similarly to the fronts:
- Armholes according to Chart 7
- Shoulder slopes according to Chart 8
- Neckline decreases according to Chart 9
Lower Part:
- From the strip with round motifs, continue working downward.
- Crochet one straightening row, then the pattern according to Chart 10 (approx. 23 repeats).
- Work the filet pattern according to Chart 11:
- Empty square = 1 dc, ch 1, 1 dc
- Filled square = 4 dc
- Then work 3.5 repeats in height from Chart 12, followed by the filet pattern from Chart 13.
- If desired, slightly widen the long crochet vest toward the hem by evenly adding stitches at the sides.
- Work 2 repeats from Chart 14, then the filet pattern from Chart 15, and finish with an edging along the lower border following Chart 16.
Finishing:
- Join the shoulders of the back and fronts.
- Edge with dc stitches with picots of 3 chains.
Charts and Diagrams
Chaleco Largo de Ganchillo
Ligero, fresco y con mucho estilo — este chaleco largo de ganchillo es la prenda ideal para superponer en los días cálidos. Diseñado por Vita Salenkova, combina delicados motivos circulares, encaje de filet y puntos calados para crear una prenda tan elegante como divertida de tejer.
La construcción comienza con una franja de motivos unidos, que forma la base del diseño. A partir de ahí, el chaleco crece hacia arriba y hacia abajo, formando sisas, escote y bajo con hermosos puntos de encaje. La mezcla de texturas le da una caída fluida, mientras que el hilo de algodón lo mantiene fresco y cómodo.
Ya sea que lo combines con un vestido sencillo, una camiseta veraniega o incluso ropa de playa, este chaleco añade un toque de elegancia artesanal a cualquier look. Perfecto para ganchilleras que disfrutan de los motivos y los puntos de encaje, ¡será un proyecto favorito en tu guardarropa tejido a mano!
Patrón: Chaleco Largo de Ganchillo “Campos de Lavanda”
Diseño de Vita Salenkova
Talla: XS–S
Materiales:
- Hilo (100% algodón, 250 m / 50 g) – 600 g
- Aguja de ganchillo Nº 3
Instrucciones:
- Teje 6 motivos redondos siguiendo el Esquema 1. Trabaja el primer motivo completo y luego une cada motivo siguiente al anterior en la última vuelta en 3 puntos de los abanicos.
- Borda la franja resultante:
- Borde derecho (delantero derecho) – según Esquema 2
- Bordes superior e inferior de la franja – según Esquema 3
- Borde izquierdo – según Esquema 4
- Continúa tejiendo hacia arriba desde la franja, formando las sisas. Divide el tejido en secciones:
- 2 delanteros (5 repeticiones cada uno)
- Espalda (11 repeticiones)
- Haz la transición al nuevo punto según el Esquema 5.
- Teje los delanteros de manera simétrica:
- Empieza a dar forma al escote según Esquema 6
- Forma la sisa según Esquema 7
- Tras completar 5 repeticiones de altura, forma la inclinación de los hombros según el Esquema 8.
- Para la espalda, trabaja igual que en los delanteros:
- Sisas según Esquema 7
- Hombros según Esquema 8
- Disminuciones del escote según Esquema 9
Parte Inferior:
- Desde la franja de motivos redondos, continúa tejiendo hacia abajo.
- Teje una fila de base y después el punto del Esquema 10 (aprox. 23 repeticiones).
- Teje el punto de filet según Esquema 11:
- Cuadro vacío = 1 p.a., 1 cad., 1 p.a.
- Cuadro lleno = 4 p.a.
- Luego teje 3,5 repeticiones de altura del Esquema 12, seguido del punto de filet del Esquema 13.
- Si lo deseas, puedes ensanchar ligeramente el chaleco hacia el bajo aumentando puntos de forma uniforme en los laterales.
- Teje 2 repeticiones del Esquema 14, luego el punto de filet del Esquema 15, y finaliza con una orilla de puntilla siguiendo el Esquema 16.
Acabado:
- Une los hombros de la espalda y los delanteros.
- Remata con puntos altos y picos de 3 cadenas.
Длинный вязаный крючком жилет
Легкий, воздушный и невероятно стильный — этот длинный жилет крючком станет идеальной верхней одеждой для теплых дней. Дизайн от Виты Саленковой сочетает в себе изящные круглые мотивы, филейное вязание и ажурные петли, создавая изделие, которое не только красиво выглядит, но и приятно вязать.
Конструкция начинается с полосы соединенных мотивов, которая формирует основу изделия. Далее жилет вяжется вверх и вниз, формируя проймы, горловину и низ с помощью красивых ажурных узоров. Комбинация текстур придает изделию мягкую драпировку, а хлопковая пряжа делает его легким и комфортным.
Жилет прекрасно смотрится как поверх простого платья, летней майки или даже пляжной одежды. Идеален для любительниц мотивного и ажурного вязания — этот проект быстро станет любимым в вашем гардеробе ручной работы!
Узор: Длинный жилет крючком «Лавандовые поля»
Дизайн Виты Саленковой
Размер: XS–S
Вам потребуется:
- Пряжа (100% хлопок, 250 м / 50 г) – 600 г
- Крючок №3
Инструкции:
- Свяжите 6 круглых мотивов по Схеме 1. Первый мотив свяжите полностью, затем присоединяйте каждый последующий к предыдущему в последнем ряду за 3 вершины вееров.
- Обвяжите получившуюся полосу:
- С правого края (правая полочка) – по Схеме 2
- По верхнему и нижнему краю полосы – по Схеме 3
- С левого края – по Схеме 4
- Далее вяжите вверх от полосы, формируя проймы. Для этого разделите работу на части:
- 2 полочки (по 5 раппортов каждая)
- Спинка (11 раппортов)
- Перейдите к новому узору по Схеме 5.
- Вяжите полочки симметрично. При этом:
- Начинайте формировать горловину по Схеме 6
- Выполняйте пройму по Схеме 7
- После 5 раппортов по высоте выполните скос плеча по Схеме 8.
- Спинку вяжите аналогично полочкам:
- Проймы – по Схеме 7
- Скосы плеч – по Схеме 8
- Убавки для горловины – по Схеме 9
Нижняя часть:
- От полосы с круглыми мотивами вяжите вниз.
- Свяжите выравнивающий ряд, затем узор по Схеме 10 (около 23 раппортов).
- Вяжите филейный узор по Схеме 11:
- Пустая клетка = 1 ст. с/н, 1 возд. п., 1 ст. с/н
- Заполненная клетка = 4 ст. с/н
- Далее свяжите 3,5 раппорта по высоте по Схеме 12, затем филейный узор по Схеме 13.
- При желании можно слегка расширить жилет книзу, равномерно прибавляя петли по бокам.
- Вяжите 2 раппорта по Схеме 14, затем филейный узор по Схеме 15, и завершите обвязкой нижнего края по Схеме 16.
Отделка:
- Соедините плечи спинки и полочек.
- Обвяжите столбиками с/н с пико из 3 возд. п.