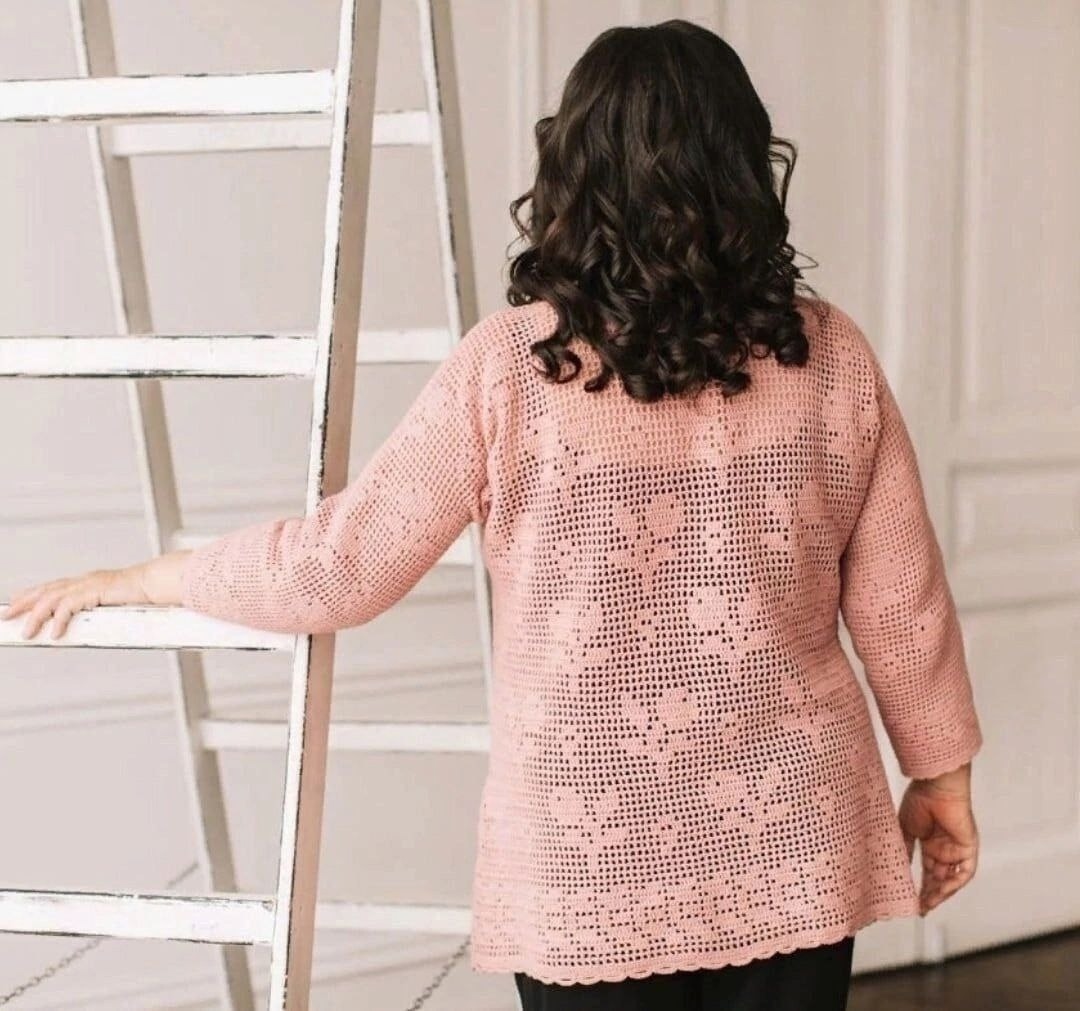
Ladies Plus Size Filet Crochet Top Pattern. The Lingonberry Linen Tunic is an elegant, airy design worked in a filet crochet pattern, perfect for warm weather. Made from a soft linen-cotton blend yarn, this tunic drapes beautifully and features delicate shaping for a flattering fit. With subtle side darts, neat sleeve edges, and a buttoned front placket, it’s both sophisticated and comfortable.
This pattern is worked from the bottom up, with filet mesh forming the structure. It includes clear shaping for bust darts, armholes, neckline, and sleeves. Ideal for intermediate crocheters familiar with filet crochet and garment shaping.
Size: XXXL
Finished measurements:
- Length: 65 cm
- Width: 71 cm
- Bust circumference: 120 cm
- Sleeve width: 20 cm
- Sleeve length: 53 cm
- Placket length: 25 cm
You will need:
- Yarn: “Linen” (55% linen, 45% cotton, 330 m / 100 g) – 650 g in lingonberry-linen color
- Crochet hooks: 2.25 mm, 1.75 mm, and 1.5 mm

Important:
The tunic is worked using a filet crochet pattern. For your size, convert centimeters to filet squares accordingly.
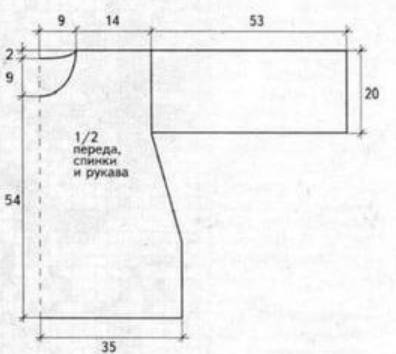
Front:
Start from the bottom edge.
With a 2.25 mm hook, chain 204 stitches + 3 chains to turn (= 102 filet squares, 71 cm wide).
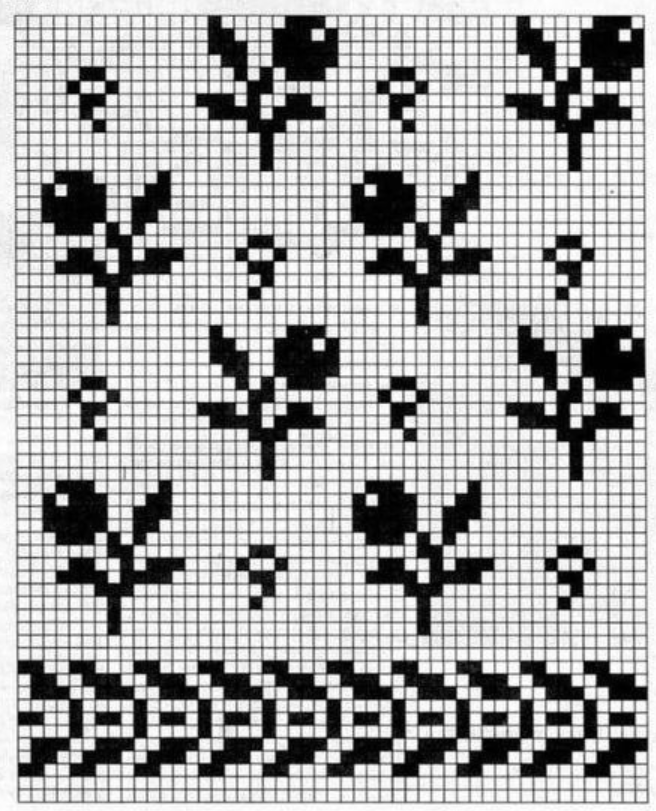
Work 15 rows following the filet pattern chart.
Then decrease 1 filet square on each side 5 times every 3 rows.
Continue working 12 more rows in pattern.
Mark the center of your work. From the center, count 3 filet squares to the left and right — these will form the button placket.
Switch to a 1.75 mm hook.
Now work each side separately, 58 squares wide, for 15 rows to begin shaping the bust dart.
Bust Darts:
From the edge, count 21 squares and place a marker — this marks dart length.
Work short rows to shape the dart as follows:
- Skip 2 squares with slip stitches, decrease the 3rd square.
- When you reach the placket edge, turn and crochet back, stopping 3 squares before the edge. Decrease 1 square, turn.
Repeat this process for 7 short rows.
Fasten off and weave in the yarn at the top of the dart.
Reattach yarn at the beginning of the row and continue following the pattern for 9 rows until you reach the armhole.
Armhole:
Skip 8 filet squares with slip stitches, decrease the 9th square.
Crochet to the end of the row, turn, and on the next row decrease 1 more square at the beginning.
Repeat this decrease 5 times in total (8 + 5 = 13 squares decreased).
Continue for 5 more rows, then begin shaping the neckline.
Neckline:
From the outer edge, mark 16 squares for the shoulder.
Crochet 30 squares, decrease the 31st, turn, decrease 1 more square at the beginning of the next row.
Continue working short rows, decreasing 1 square at the neckline edge each row, for 15 rows.
Work the second half of the front symmetrically.
Back:
Chain 204 + 3 turning chains (= 102 filet squares, 71 cm wide).
Work 15 rows in the same pattern as the front.
From the 16th row, decrease 1 square each side, 5 times every 3 rows.
Continue straight for 36 rows to reach the armhole.
For each armhole, skip 5 filet squares with slip stitches and decrease the 6th.
Continue to the end, leaving 6 squares at the edge; decrease 1 square, turn, decrease again on the next row.
Repeat this 5 + 3 = 8 decreases total.
Then work 25 rows straight until the back neckline.
Mark 16 squares for each shoulder.
From the 20th square inward, decrease 1 square each row, 4 times at the neckline edge.
Repeat symmetrically on the other side.
From the hem to shoulder, there should be 100 filet rows total.
Assembly:
Join shoulder and side seams.
Placket:
With 1.75 mm hook, work:
- Row 1: 2 dc (U.S. terms) in each filet square, 3 dc in each corner.
- Row 2: Double crochet across, working 3 dc in each corner stitch.
- Row 3–4: Work as Row 2.
- Row 5: On the right placket, mark buttonhole placement.
Make buttonholes evenly spaced using chain loops (the number of chains depends on button size).
On the left placket, sew buttons opposite the buttonholes.
Edging:
Along the hem and sleeve edges:
- Rows 1–2: Single crochet (sc) evenly.
- Row 3: Chain 6, skip 5 sts, sc in next st, repeat to end of round.
Sleeves:
Attach yarn under the arm.
Using a 1.5 mm hook, work in the round following the filet pattern until desired sleeve length is reached.
Result:
A lightweight, breathable linen tunic with gentle shaping and a lacy filet design — perfect layered over a camisole or swimsuit.
Patrón: Túnica de Lino Arándano Rojo
La Túnica de Lino Arándano Rojo es un diseño elegante y aireado tejido con punto de red (filet crochet), ideal para los días cálidos. Realizada con una suave mezcla de lino y algodón, esta túnica tiene una caída ligera y natural, con un ajuste favorecedor gracias a sus pinzas laterales. Los acabados delicados en las mangas y la tapeta con botones le dan un toque refinado y cómodo a la vez.
El patrón se trabaja de abajo hacia arriba, formando la estructura con el punto de red. Incluye instrucciones claras para moldear las pinzas del busto, sisas, escote y mangas. Es perfecto para tejedoras intermedias familiarizadas con el filet crochet y el moldeado de prendas.
Talla: XXXL
Medidas finales:
- Largo: 65 cm
- Ancho: 71 cm
- Contorno de busto: 120 cm
- Ancho de manga: 20 cm
- Largo de manga: 53 cm
- Largo de tapeta: 25 cm
Materiales necesarios:
- Hilo: “Linen” (55% lino, 45% algodón, 330 m / 100 g) – 650 g en color arándano-lino
- Ganchillos: 2,25 mm, 1,75 mm y 1,5 mm
Importante:
La túnica está tejida con un patrón de red (filet). Para tu talla, convierte los centímetros en cuadritos de filet según corresponda.
Delantero:
Comienza desde el borde inferior.
Con el ganchillo de 2,25 mm, teje una cadena de 204 puntos + 3 puntos de subida (= 102 cuadritos de filet, 71 cm de ancho).
Teje 15 hileras siguiendo el esquema del patrón.
Luego disminuye 1 cuadrito de filet a cada lado, 5 veces cada 3 hileras.
Continúa 12 hileras más siguiendo el dibujo.
Marca el centro de la labor. Desde el centro, cuenta 3 cuadritos hacia la izquierda y hacia la derecha: éstos formarán la tapeta de botones.
Cambia al ganchillo de 1,75 mm.
Ahora trabaja cada parte por separado, de 58 cuadritos de ancho, durante 15 hileras para comenzar la pinza del busto.
Pinzas del busto:
Desde el borde, cuenta 21 cuadritos y coloca un marcador (esto marca la longitud de la pinza).
Trabaja hileras cortas de la siguiente forma:
- Omite 2 cuadritos con puntos rasos, disminuye el tercer cuadrito.
- Al llegar al borde de la tapeta, gira la labor y teje hasta que queden 3 cuadritos antes del final, disminuye 1 cuadrito y gira nuevamente.
Repite este proceso durante 7 hileras cortas.
Corta y asegura el hilo en la parte superior de la pinza.
Vuelve a unir el hilo al inicio de la hilera y continúa tejiendo 9 hileras más hasta llegar a la sisa.
Sisa:
Omite 8 cuadritos de filet con puntos rasos, disminuye el 9º cuadrito.
Teje hasta el final de la hilera, gira, y en la siguiente hilera disminuye 1 cuadrito más al comienzo.
Repite esta disminución 5 veces en total (8 + 5 = 13 cuadritos disminuidos).
Trabaja 5 hileras rectas más, luego comienza el escote.
Escote:
Desde el borde exterior, marca 16 cuadritos para el hombro.
Teje 30 cuadritos, disminuye el 31º, gira, y disminuye 1 cuadrito más al inicio de la siguiente hilera.
Sigue trabajando hileras de ida y vuelta, disminuyendo 1 cuadrito en cada hilera del borde del escote, durante 15 hileras.
Teje la otra mitad del delantero de manera simétrica.
Espalda:
Haz una cadena de 204 + 3 puntos de subida (= 102 cuadritos de filet, 71 cm de ancho).
Trabaja 15 hileras igual que en el delantero.
Desde la 16ª hilera, disminuye 1 cuadrito a cada lado, 5 veces cada 3 hileras.
Continúa recto 36 hileras hasta llegar a la sisa.
Para cada sisa, omite 5 cuadritos con puntos rasos y disminuye el 6º.
Sigue hasta que queden 6 cuadritos al borde; disminuye 1 cuadrito, gira, y en la siguiente hilera disminuye otro.
Repite esto 5 + 3 = 8 disminuciones en total.
Luego teje 25 hileras rectas hasta formar el escote trasero.
Marca 16 cuadritos para cada hombro.
Desde el 20º cuadrito hacia el interior, disminuye 1 cuadrito por hilera, 4 veces, en el borde del escote.
Repite de manera simétrica en el otro lado.
Desde el borde inferior hasta el hombro, debe haber 100 hileras de filet en total.
Montaje:
Une los hombros y los costados con puntadas invisibles o puntos deslizados.
Tapeta:
Con el ganchillo de 1,75 mm, trabaja:
- 1ª hilera: 2 puntos altos en cada cuadrito, y 3 puntos altos en cada esquina.
- 2ª hilera: puntos altos en toda la hilera, con 3 puntos altos en cada esquina.
- 3ª–4ª hilera: igual que la 2ª.
- 5ª hilera: en la tapeta derecha, marca los lugares para los ojales.
Haz los ojales con arcos de cadenetas (la cantidad depende del tamaño de los botones).
En la tapeta izquierda, cose los botones frente a los ojales.
Borde inferior y mangas:
- Hileras 1–2: punto bajo alrededor del dobladillo y del borde de las mangas.
- 3ª hilera: 6 cadenetas, salta 5 puntos de base, 1 punto bajo, repite hasta el final.
Mangas:
Une el hilo en la parte inferior de la sisa.
Con el ganchillo de 1,5 mm, teje en hileras circulares siguiendo el patrón de filet hasta alcanzar el largo deseado.
Resultado final:
Una túnica ligera, transpirable y con un diseño calado de filet que realza el lino natural. Ideal para llevar sobre un top, una camiseta o incluso como salida de playa.
Туника «Льняная брусника»
Туника «Льняная брусника» — это элегантная и воздушная модель, выполненная филейным узором. Идеально подходит для тёплых дней. Пряжа из смеси льна и хлопка придаёт изделию мягкость, лёгкость и естественное драпирование. Благодаря аккуратным вытачкам по бокам, оформленным краям рукавов и застёжке на пуговицы, туника выглядит изысканно и при этом очень комфортна.
Модель вяжется снизу вверх филейной сеткой. В узоре предусмотрено формирование вытачек, пройм, горловины и рукавов. Подходит для мастериц со средним уровнем опыта, знакомых с филейным вязанием и вязанием изделий по выкройке.
Размер: XXXL
Готовые размеры:
- Длина: 65 см
- Ширина: 71 см
- Обхват груди: 120 см
- Ширина рукава: 20 см
- Длина рукава: 53 см
- Длина планки: 25 см
Материалы:
- Пряжа «Льняная» (55% лён, 45% хлопок, 330 м / 100 г) — 650 г цвета бруснично-льняного
- Крючки №2,25; №1,75; №1,5
Важно:
Туника вяжется филейным узором. Для вашего размера пересчитайте сантиметры в клетки.
Перед:
Начать вязание снизу.
Крючком №2,25 набрать 204 возд. п. + 3 возд. п. подъёма (= 102 филейные клетки, 71 см).
Провязать 15 рядов по схеме.
Затем убавить по 1 клетке с каждой стороны 5 раз через каждые 3 ряда.
Продолжить вязание ещё 12 рядов по узору.
Отметить середину полотна. От середины влево и вправо отложить по 3 клетки — это место для планки.
Сменить крючок на №1,75.
Далее вязать обе половины отдельно, по 58 клеток, 15 рядов до формирования вытачки.
Вытачки:
От края полотна отложить 21 клетку, поставить маркер — длина вытачки.
Вязать укороченные ряды:
- Пропустить 2 клетки соединительными петлями, 3-ю клетку убавить.
- Довязав до края планки, повернуть работу и вязать до последних 3 клеток, 3-ю убавить, снова повернуть.
Таким образом связать 7 рядов вытачки.
Оборвать нить и закрепить на вершине вытачки.
Привязать нить в начало ряда и связать 9 рядов по рисунку до формирования проймы.
Пройма:
Пропустить 8 клеток соединительными петлями, 9-ю убавить.
Довязать до конца ряда, повернуть, и в следующем ряду убавить 1 клетку.
Так убавить 5 раз по 1 клетке (всего 8 + 5 = 13 клеток).
Далее вязать ещё 5 рядов прямо, затем начать вывязывать горловину.
Горловина:
От края отметить 16 клеток на плечо.
Провязать 30 клеток, 31-ю убавить, повернуть, убавить ещё 1 клетку.
Вязать поворотными рядами, убавляя по 1 клетке с внутренней стороны горловины в каждом ряду, всего 15 рядов.
Вторую половину переда связать зеркально.
Спинка:
Набрать 204 возд. п. + 3 возд. п. подъёма (= 102 филейные клетки, 71 см).
Провязать 15 рядов по схеме, как для переда.
Начиная с 16-го ряда, убавить по 1 клетке с каждой стороны 5 раз через каждые 3 ряда.
Далее вязать 36 рядов прямо до проймы.
Для проймы с обеих сторон пропустить 5 клеток соединительными петлями, 6-ю убавить.
Продолжать вязание, пока до края не останется 6 клеток, убавить одну клетку, повернуть работу и убавить ещё одну.
Таким образом выполнить 5 + 3 = 8 убавлений.
Далее вязать 25 рядов прямо до формирования горловины спинки.
Отложить 16 клеток на плечо, начиная с 20-й клетки, убавлять по 1 клетке с внутренней стороны горловины 4 раза.
Выполнить убавления симметрично с другой стороны.
От начала вязания до линии плеча должно быть 100 филейных рядов.
Сборка:
Выполнить плечевые и боковые швы.
Планка:
Крючком №1,75 обвязать:
- 1-й ряд: в каждую клетку по 2 ст. с/н, на углах по 3 ст. с/н.
- 2-й ряд: ст. с/н, в углах по 3 ст. с/н.
- 3–4-й ряды: вязать как 2-й ряд.
- 5-й ряд: на правой планке отметить места для петелек под пуговицы, выполнить отверстия из возд. петель (их количество зависит от размера пуговиц).
На левой планке пришить пуговицы напротив отверстий.
Обвязка низа и рукавов:
- 1–2-й ряды: ст. б/н по краю низа и рукавов.
- 3-й ряд: 6 возд. п., пропустить 5 петель основания, 1 ст. б/н, повторять до конца ряда.
Рукава:
Привязать нить снизу проймы.
Крючком №1,5 вязать по кругу филейным узором до нужной длины.
Результат:
Лёгкая, дышащая туника из льняной пряжи с нежным филейным узором. Отлично смотрится как с топом, так и как пляжное платье-накидка.