Free Crochet Jacket Pattern with Pockets and collar.
Size: Medium (M)
Difficulty: ★★★☆☆
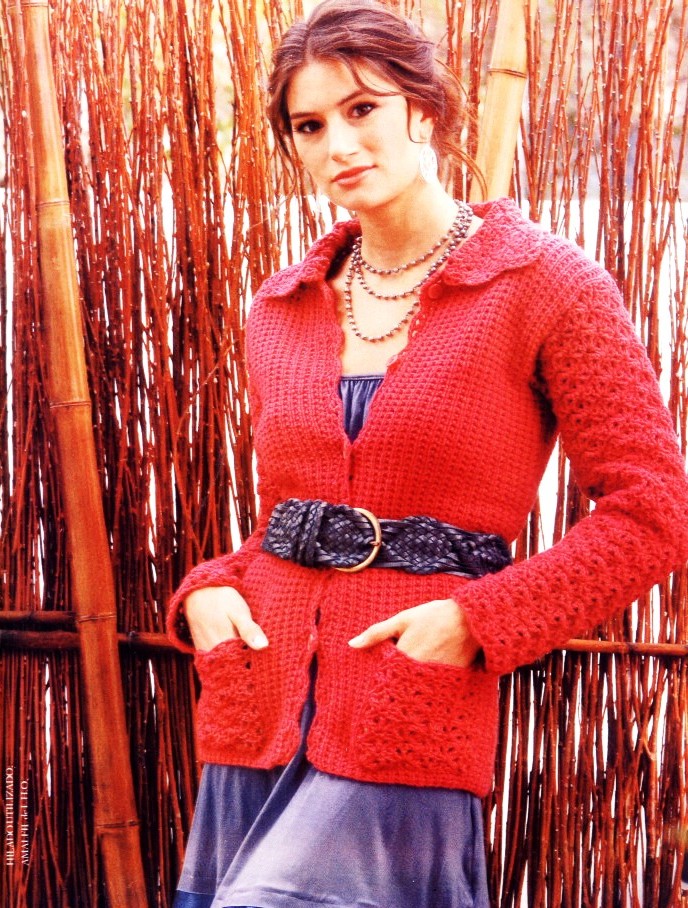
This cozy fuchsia cardigan is worked with fine acrylic yarn doubled for extra softness and warmth. Featuring two complementary stitch patterns, elegant front pockets, and a classic button closure, it’s perfect for layering in cooler weather. The cardigan has a straight silhouette, with shaped sleeves, a neat neckline, and thoughtful detailing that makes it both stylish and comfortable.
Materials
- 500 g fine acrylic yarn, doubled, fuchsia
- Knitting needles size 4½
- Crochet hook size 5
- 5 matching buttons
Stitches Used
Fantasy Stitch I:
- 1st row: 1 knit, 1 purl, repeat across row, end with 1 knit
- 2nd row: knit all stitches in reverse
- Repeat these 2 rows continuously
Basic stitches: chain, single crochet, double crochet (see manual)
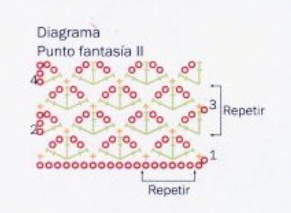
Fantasy Stitch II:
- Follow the stitch diagram
Gauge
- 10 cm = 18 sts in Fantasy Stitch I on 4½ mm needles
- 10 cm = 15 rows in Fantasy Stitch II with crochet hook 5 mm
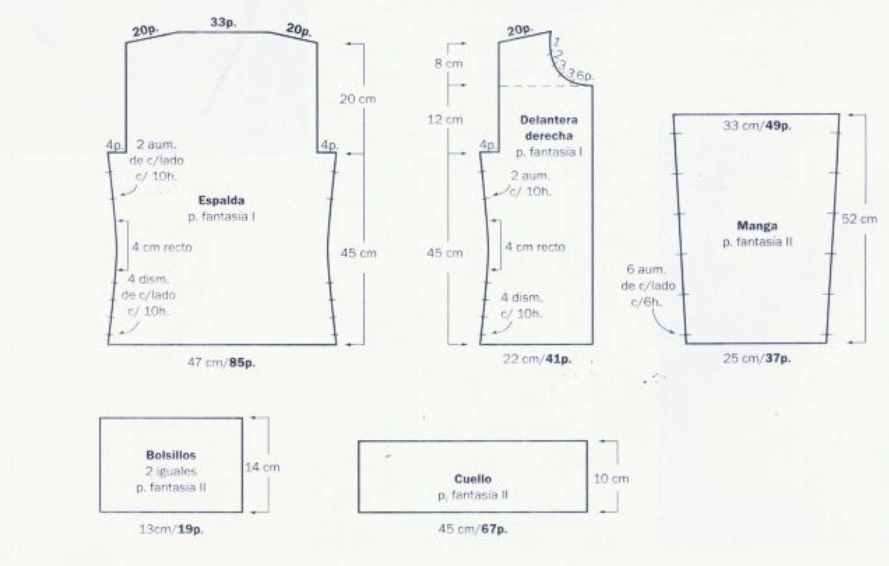
Back
- Using 2 strands, cast on 85 sts on 4½ mm needles and work in Fantasy Stitch I.
- Decrease 1 stitch at each edge every 10 rows, 4 times → 77 sts remain.
- Work straight for 4 rows, then increase 1 stitch at each edge every 10 rows, 2 times → 81 sts remain.
- At total height 45 cm, bind off 4 sts at each side for the armholes → 73 sts remain.
- Continue straight for 20 cm of armhole height.
- Bind off 20 sts at each shoulder and finally bind off the 35 central sts for the back neckline.
Right Front
- Using 2 strands, cast on 41 sts on 4½ mm needles and work in Fantasy Stitch I.
- Decrease 2 sts at the left edge every 10 rows, 4 times, then continue straight for 4 cm.
- Increase 1 stitch at the same edge every 10 rows, 2 times → 39 sts remain.
- At total height 45 cm, bind off 4 sts at the left edge for the armhole.
- At 12 cm of armhole height, begin shaping the neckline: bind off 6 sts, then 2×3 sts, 2 sts, and 1 sts.
- Complete 20 cm of armhole height and bind off 20 sts for the shoulder.
Left Front: Work the same as right front but mirrored.
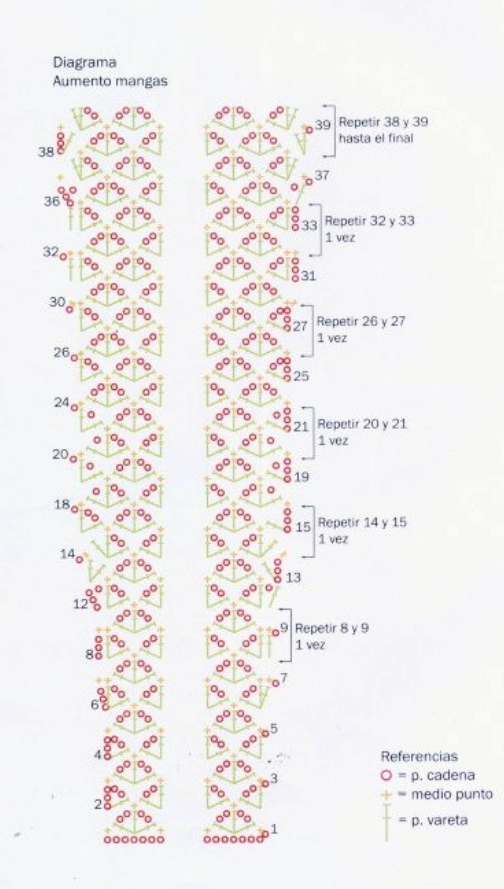
Sleeves
- Using 2 strands and crochet hook 5 mm, chain 37 + 1 to turn.
- Work Fantasy Stitch II according to diagram.
- Increase 1 stitch at each edge every 6 rows, 6 times → 49 sts remain.
- At total length 52 cm, cut yarn and fasten off.
Pockets and Neckline
Pockets:
- Using 2 strands and crochet hook 5 mm, chain 19 + 1 to turn.
- Work Fantasy Stitch II according to diagram.
- At approx. 14 cm height, cut yarn and fasten off.
- Make 2 pockets.
Neckline:
- Chain 67 + 1 to turn and work Fantasy Stitch II according to diagram.
- At 10 cm height, cut yarn and fasten off.
Assembly and Finishing
- Sew shoulders, sides, and sleeves, leaving a 2 cm opening at the top edge.
- Attach sleeves, aligning center with shoulder seam and the 2 cm opening with closed stitches of the armholes, forming a right angle.
- Using 2 strands and crochet hook, work 1 row of single crochet along the edges of the fronts and neckline.
- Finish with 1 row of Fantasy Stitch II along the front edges only. Cut yarn and fasten off.
- Sew pockets onto the fronts and attach the neckline, aligning the center with the back.
- Sew buttons along the left front edge, using the eyelets of Fantasy Stitch II as buttonholes.
Chaqueta de punto fucsia con bolsillos
Talle: M
Dificultad: ★★★☆☆
Descripción del modelo
Esta acogedora chaqueta fucsia se teje con fibra acrílica fina doble para mayor suavidad y calidez. Presenta dos puntos fantásticos complementarios, elegantes bolsillos delanteros y cierre con botones clásicos. Tiene un corte recto, mangas ligeramente formadas, escote prolijo y detalles cuidados que hacen que sea tanto cómoda como estilizada.
Materiales
- 500 g de fibra acrílica finita tejida doble, color fucsia
- Agujas de tejer Nº 4½
- Aguja de crochet Nº 5
- 5 botones a tono
Puntos empleados
Punto fantasía I:
- 1ª hilera: 1 p. derecho, 1 p. revés, repetir hasta el final de la hilera, terminar con 1 p. derecho
- 2ª hilera: tejer todos los puntos al revés
- Repetir siempre estas 2 hileras
Puntos básicos: cadena, medio punto y punto vareta (ver manual)
Punto fantasía II:
- Seguir el diagrama
Muestra
- 10 cm = 18 puntos en punto fantasía I con agujas Nº 4½
- 10 cm = 15 hileras en punto fantasía II con aguja de crochet Nº 5
Espalda
- Con 2 hebras, montar 85 p. en agujas Nº 4½ y tejer en punto fantasía I.
- Disminuir 1 p. de cada lado cada 10 hileras, 4 veces → quedan 77 p.
- Continuar 4 hileras rectas, luego aumentar 1 p. de cada lado cada 10 hileras, 2 veces → quedan 81 p.
- Al tener 45 cm de altura total, cerrar 4 p. de cada lado para las sisas → quedan 73 p.
- Completar 20 cm de altura de sisa.
- Cerrar 20 p. de cada hombro y finalmente los 35 p. centrales para el escote de la espalda.
Delantera derecha
- Con 2 hebras, montar 41 p. en agujas Nº 4½ y tejer en punto fantasía I.
- Hacer 2 p. juntos en el borde izquierdo cada 10 hileras, 4 veces, luego continuar recto 4 cm.
- Aumentar 1 p. en el mismo borde cada 10 hileras, 2 veces → quedan 39 p.
- Al tener 45 cm de altura, cerrar 4 p. en el borde izquierdo para la sisa.
- A los 12 cm de altura de sisa, comenzar el escote: cerrar 6 p., luego 2×3 p., 2 p. y 1 p.
- Completar 20 cm de altura de sisa y cerrar 20 p. del hombro.
Delantera izquierda: hacer igual que la derecha, pero invertida.
Mangas
- Con 2 hebras y aguja de crochet Nº 5, hacer cadena de 37 p. + 1 para girar.
- Tejer según el diagrama del punto fantasía II.
- Aumentar 1 p. de cada lado cada 6 hileras, 6 veces → quedan 49 p.
- Al tener 52 cm de altura, cortar hebras y rematar.
Bolsillos y cuello
Bolsillos:
- Con 2 hebras y aguja de crochet Nº 5, hacer cadena de 19 p. + 1 para girar.
- Tejer según el diagrama del punto fantasía II.
- Al alcanzar aproximadamente 14 cm, cortar hebras y rematar.
- Hacer 2 bolsillos iguales.
Cuello:
- Hacer cadena de 67 p. + 1 para girar y tejer según el diagrama del punto fantasía II.
- A los 10 cm de altura, cortar hebras y rematar.
Armado y terminación
- Coser hombros, costados y mangas, dejando 2 cm de abertura en el borde superior.
- Coser las mangas alineando el centro con la costura de los hombros y los 2 cm de abertura con los puntos cerrados de las sisas, formando un ángulo recto.
- Con 2 hebras y aguja de crochet, tejer 1 hilera de medio punto sobre los bordes de las delanteras y el escote.
- Terminar con 1 hilera de punto fantasía II solo en los bordes de las delanteras, cortar la hebra y rematar.
- Aplicar los bolsillos sobre las delanteras y coser el cuello, alineando el centro con el de la espalda.
- Coser los botones sobre el borde de la delantera izquierda, usando los calados del punto fantasía como ojales.
Фуксиевая вязаная кофта с карманами
Размер: M
Сложность: ★★★☆☆
Описание модели
Эта уютная фуксиевая кофта связана двойной тонкой акриловой пряжей для дополнительной мягкости и тепла. Модель сочетает два разных фантазийных узора, элегантные карманы спереди и классическую застёжку на пуговицы. Прямой силуэт, аккуратный вырез, оформленные рукава и продуманные детали делают кофту стильной и удобной.
Материалы
- 500 г тонкой акриловой пряжи, двойная нить, цвет фуксия
- Спицы № 4½
- Крючок № 5
- 5 пуговиц в тон
Используемые петли
Фантазийный узор I:
- 1-й ряд: 1 лицевая, 1 изнаночная, повторять до конца ряда, закончить 1 лицевой
- 2-й ряд: вязать все петли изнаночными
- Повторять эти 2 ряда постоянно
Базовые петли: цепочка, столбик без накида, столбик с накидом (см. руководство)
Фантазийный узор II:
- Следовать схеме
Плотность вязания
- 10 см = 18 петель в фантазийном узоре I на спицах № 4½
- 10 см = 15 рядов в фантазийном узоре II крючком № 5
Спинка
- Набрать 85 петель двойной нитью на спицы № 4½ и вязать фантазийным узором I.
- Убавлять 1 петлю с каждого края каждые 10 рядов, 4 раза → остаётся 77 петель.
- Вязать 4 ряда прямо, затем прибавлять 1 петлю с каждого края каждые 10 рядов, 2 раза → остаётся 81 петля.
- На общей высоте 45 см закрыть 4 петли с каждого края для пройм → остаётся 73 петли.
- Продолжить 20 см высоты проймы.
- Закрыть 20 петель с каждого плеча и, наконец, 35 центральных петель для выреза спинки.
Правая полочка
- Набрать 41 петлю двойной нитью на спицы № 4½ и вязать фантазийным узором I.
- Убавлять 2 петли в левом крае каждые 10 рядов, 4 раза, затем вязать прямо 4 см.
- Прибавлять 1 петлю с того же края каждые 10 рядов, 2 раза → остаётся 39 петель.
- На общей высоте 45 см закрыть 4 петли в левом крае для проймы.
- На высоте проймы 12 см начать формировать вырез горловины: закрыть 6 петель, затем 2×3 петли, 2 петли и 1 петлю.
- Закончить 20 см высоты проймы и закрыть 20 петель плеча.
Левая полочка: выполнять симметрично правой.
Рукава
- Крючком № 5 и двойной нитью набрать цепочку 37 + 1 для поворота.
- Вязать согласно схеме фантазийного узора II.
- Прибавлять 1 петлю с каждого края каждые 6 рядов, 6 раз → остаётся 49 петель.
- На общей длине 52 см обрезать нити и закрепить.
Карманы и вырез горловины
Карманы:
- Крючком № 5 и двойной нитью набрать цепочку 19 + 1 для поворота.
- Вязать по схеме фантазийного узора II.
- На высоте около 14 см обрезать нити и закрепить.
- Сделать 2 одинаковых кармана.
Вырез горловины:
- Набрать цепочку 67 + 1 для поворота и вязать по схеме фантазийного узора II.
- На высоте 10 см обрезать нити и закрепить.
Сборка и отделка
- Сшить плечи, боковые швы и рукава, оставив 2 см отверстия в верхнем крае.
- Вшить рукава, совместив центр с плечевым швом и 2 см отверстия с закрытыми петлями пройм, образуя прямой угол.
- Крючком № 5 и двойной нитью обвязать 1 ряд столбиков без накида края полочек и вырез горловины.
- Закончить 1 рядом фантазийного узора II только по краям полочек, обрезать нить и закрепить.
- Пришить карманы на полочки и закрепить вырез горловины, совместив центр с центром спинки.
- Пришить пуговицы на левую полочку, используя отверстия фантазийного узора как петли.