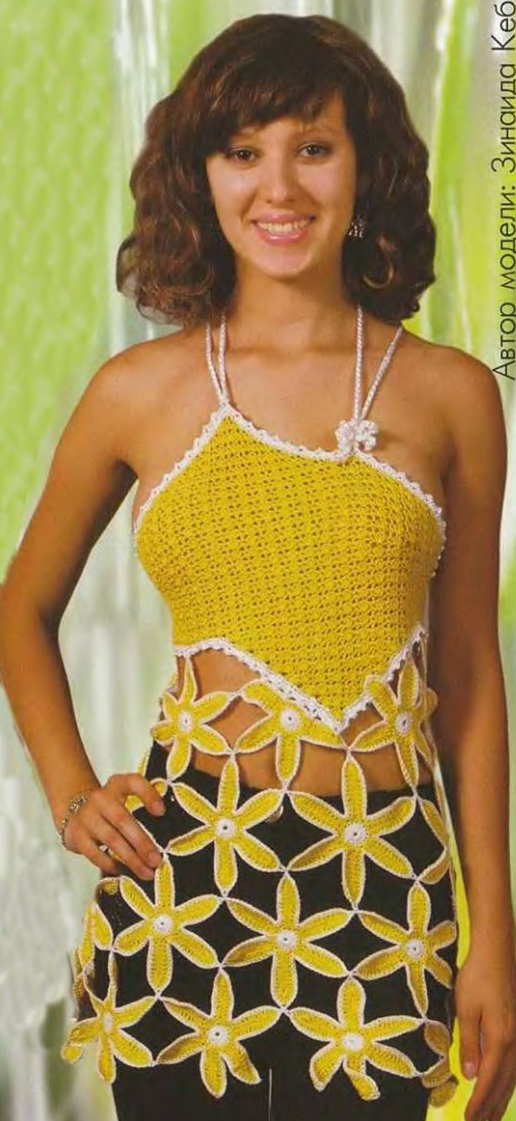
Size 44-46
This charming crochet top, inspired by the delicate beauty of chamomile flowers, combines soft cotton yarn with ribbon-like viscose for a textured, airy effect. Perfect for spring and summer wear, it is both elegant and playful, featuring floral motifs at the hem and a lace-like back closure with a drawstring. The top is made in two main parts: the upper portion is worked from the bottom up, while the lower floral section is assembled from individual flowers joined together. The design allows some flexibility in flower size and arrangement, making each top slightly unique. A well-planned layout and careful assembly will give your top a professional finish. All sizes are in centimeters.
Materials Needed:
- 300 g of yellow cotton yarn, 100% cotton (“Narcissus”)
- 100 g of white cotton yarn, 100% cotton (“Chamomile”)
- 50 g of white ribbon-like viscose yarn, 100% viscose (180 m/90 g)
- Crochet hooks: No. 2 and No. 2.5
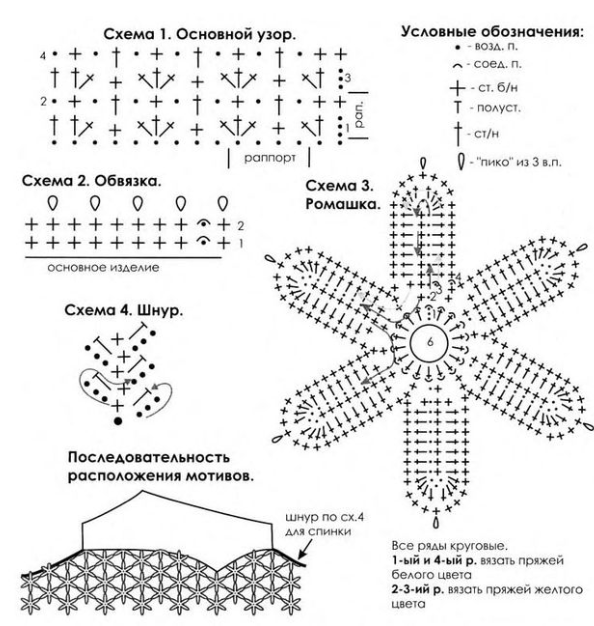
Main Pattern: Work according to Chart 1.
Instructions
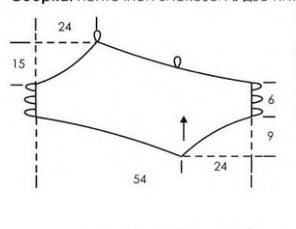
Step 1: Prepare the Top Pattern
- Create a full-size paper pattern of the top.
- Using the pattern, crochet the upper part of the top from the bottom up with yellow cotton yarn and a No. 2 hook, following Chart 1.
Step 2: Edging with Ribbon Viscose
- Using No. 2.5 hook, edge the upper part in the round with ribbon viscose yarn according to Chart 2.
Step 3: Back Drawstring
- Crochet a cord following Chart 4 with ribbon viscose yarn and a No. 2.5 hook.
- This cord will be used to create the back opening and for attaching flowers later.
Step 4: Crochet Flowers for the Bottom
- Make the flowers following Chart 3:
- 1st row and the edging: white yarn, single crochet (sc)
- 2nd–3rd rows: yellow yarn
- Crochet 26 flowers, joining them together in the last row using the picot stitches, following the specified sequence.
- If needed, adjust the number of petals per flower (6, 5, 4, 3, or 2 petals) depending on space and design preference.
Step 5: Assembly
- Using two strands of ribbon viscose yarn, make three chains of foundation chains.
- Attach one chain at the top front of the top and secure it at another point.
- Attach the other two chains on the front part of the top, then use them to lace up the back.
- Sew the flowers to the bottom edge of the top as indicated.
Notes:
- All sizes are provided in centimeters.
- Direction of crochet: follow the indicated arrows on the charts.
Top de Ganchillo “Margarita” – Talla 44-46
Este encantador top de ganchillo, inspirado en la delicada belleza de las margaritas, combina suave hilo de algodón con viscosa tipo cinta para un efecto texturizado y ligero. Perfecto para la primavera y el verano, resulta elegante y alegre, con motivos florales en el dobladillo y un cierre trasero con cordón de encaje. El top se trabaja en dos partes principales: la parte superior se teje de abajo hacia arriba, mientras que la sección inferior se ensambla a partir de flores individuales unidas entre sí. El diseño permite cierta flexibilidad en el tamaño y disposición de las flores, haciendo que cada top sea ligeramente único. Un buen plan de disposición y un ensamblaje cuidadoso darán al top un acabado profesional. Todas las medidas se indican en centímetros.
Materiales necesarios:
- 300 g de hilo de algodón amarillo, 100% algodón (“Narciso”)
- 100 g de hilo de algodón blanco, 100% algodón (“Margarita”)
- 50 g de hilo de viscosa tipo cinta blanco, 100% viscosa (180 m/90 g)
- Ganchillos: Nº 2 y Nº 2,5
Punto principal: Seguir el esquema 1.
Instrucciones
Paso 1: Preparar el patrón del top
- Hacer un patrón de papel a tamaño real del top.
- Usando el patrón, tejer la parte superior del top de abajo hacia arriba con hilo amarillo y ganchillo Nº 2, siguiendo el esquema 1.
Paso 2: Remate con viscosa tipo cinta
- Con ganchillo Nº 2,5, rematar la parte superior en redondo usando la viscosa tipo cinta según el esquema 2.
Paso 3: Cordón trasero
- Tejer un cordón siguiendo el esquema 4 con viscosa tipo cinta y ganchillo Nº 2,5.
- Este cordón servirá para crear la apertura trasera y para sujetar las flores después.
Paso 4: Tejer flores para la parte inferior
- Hacer las flores siguiendo el esquema 3:
- 1ª fila y remate: hilo blanco, punto bajo (pb)
- 2ª–3ª filas: hilo amarillo
- Tejer 26 flores, uniéndolas entre sí en la última fila usando los puntos pico, siguiendo la secuencia indicada.
- Si es necesario, ajustar el número de pétalos por flor (6, 5, 4, 3 o 2 pétalos) según el espacio y la preferencia de diseño.
Paso 5: Montaje
- Con dos hebras de viscosa tipo cinta, hacer tres cadenas.
- Fijar una cadena en el punto superior delantero del top y asegurarla en otro punto.
- Fijar las otras dos cadenas en la parte delantera del top y usarlas para atar la espalda.
- Coser las flores en el borde inferior del top según se indica.
Notas:
- Todas las medidas se indican en centímetros.
- Dirección del tejido: seguir las flechas indicadas en los esquemas.
Топ «Ромашка» – Размер 44-46
Этот очаровательный топ крючком, вдохновлённый нежной красотой ромашек, сочетает мягкую хлопковую пряжу с ленточной вискозой, создавая текстурный и лёгкий эффект. Идеально подходит для весны и лета, выглядит одновременно элегантно и игриво, с цветочными мотивами внизу и ажурной шнуровкой на спинке. Топ состоит из двух основных частей: верхняя часть вяжется снизу вверх, а нижняя — из отдельных цветочных мотивов, соединённых между собой. Дизайн допускает некоторую вариативность в размере и расположении цветов, благодаря чему каждый топ получается слегка уникальным. Правильная раскладка и аккуратная сборка обеспечат профессиональный вид изделия. Все размеры указаны в сантиметрах.
Необходимые материалы:
- 300 г желтой хлопковой пряжи 100% (“Нарцисс”)
- 100 г белой хлопковой пряжи 100% (“Ромашка”)
- 50 г белой ленточной вискозы 100% (180 м/90 г)
- Крючки № 2 и № 2,5
Основной узор: следовать схеме 1.
Инструкции
Шаг 1: Подготовка выкройки топа
- Сделать выкройку топа в натуральную величину.
- По выкройке выполнить верхнюю часть топа снизу вверх пряжей желтого цвета крючком № 2 по схеме 1.
Шаг 2: Обвязка ленточной вискозой
- Крючком № 2,5 обвязать верхнюю часть изделия по кругу ленточной вискозой согласно схеме 2.
Шаг 3: Шнур на спинке
- Связать шнур по схеме 4 ленточной вискозой крючком № 2,5.
- Шнур используется для оформления выреза на спинке и для последующего крепления цветов.
Шаг 4: Вязание цветов для нижней части
- Связать цветы по схеме 3:
- 1-й ряд и обвязка: белая пряжа, столбики без накида (ст. б/н)
- 2–3-й ряды: желтая пряжа
- Связать 26 цветов, соединяя их в процессе выполнения последнего ряда за «пико», следуя указанной последовательности.
- При необходимости изменять количество лепестков в цветке (6, 5, 4, 3 или 2) в зависимости от места и дизайна.
Шаг 5: Сборка
- Ленточной вискозой в две нити связать три цепочки из возд. п.
- Одну цепочку присоединить к верхней точке передней части топа и зафиксировать в другой точке.
- Две другие цепочки зафиксировать на передней части топа и с их помощью зашнуровать спинку.
- Пришить цветы к нижнему краю топа согласно схеме.
Примечания:
- Все размеры указаны в сантиметрах.
- Направление вязания указано стрелками на схемах.