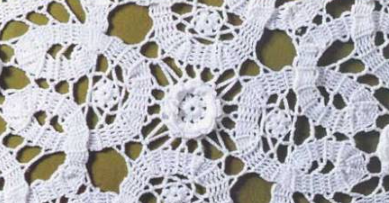
This technique, which allows you to create a wide variety of designs, uses long ribbons formed into spirals and arabesques.
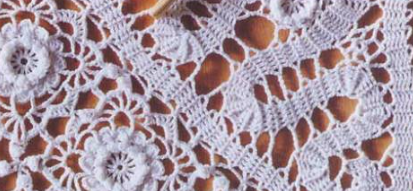
Bruges lace, often mistaken for Irish crochet, makes it possible to create delicate and intricate pieces.
Crocheting the lace ribbon itself is quite simple, but it’s important to follow the exact sequence of steps, as it determines the harmony of the finished work.
When crocheting and joining the ribbons, great care must be taken. The joining of ribbons is aesthetically significant — it is much easier to connect straight ribbons.
Working with curved sections requires special attention, as it’s essential to achieve beautiful, smooth curves.
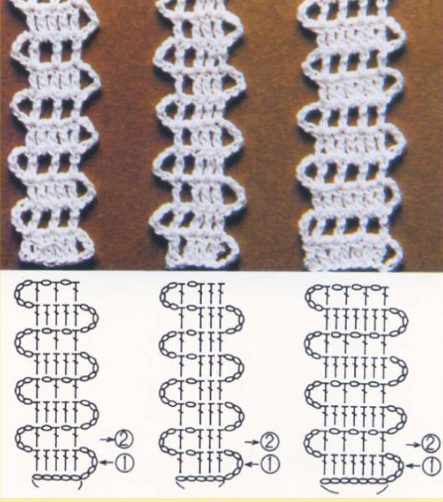
Main Ribbon
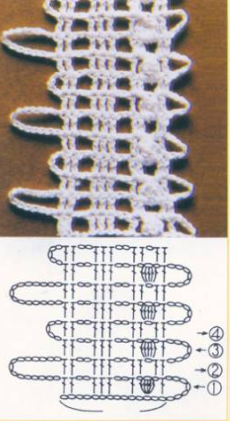
The illustrated Bruges lace ribbon consists of 5 double crochet stitches (dc).
Depending on the design, its length and number of dc stitches may vary.
By alternating double crochet stitches and open mesh spaces, you can also create a decorative, intricate border.
At the beginning of each row, make a turning arch — the number of chain stitches in this arch depends on the length of the ribbon and the style of the motif.
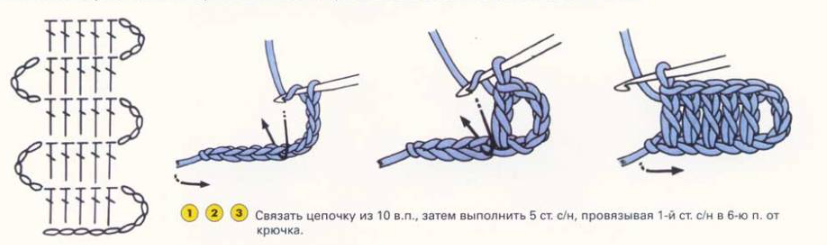
Video Instructions:
Crochet a chain of 10 chain stitches (ch).
Then make 5 double crochet stitches (dc), working the first dc into the 6th chain from the hook.
4–5–6. Turn the work, make 5 chain stitches (ch) for the joining arch, and continue crocheting, working 5 double crochet stitches (dc).
Keep repeating this pattern until the desired length is reached.
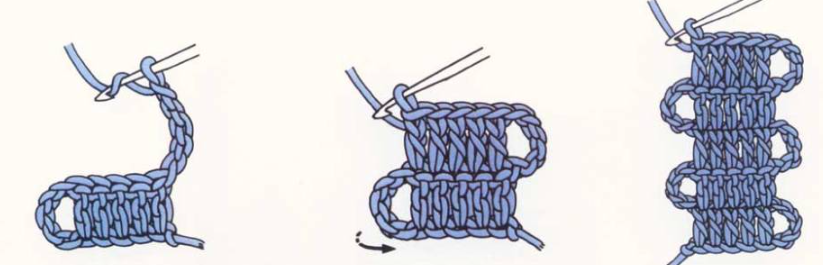
Curving
The curve is formed by tightening the inner rows.
To do this, make a tightened stitch by inserting the hook under several arches and pulling the yarn through.
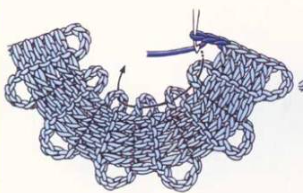
- At the end of the row where the curve begins, instead of making 5 chain stitches (ch) for the arch, make 2 chain stitches, then insert the hook under 4 arches.
2. Yarn over once and pull it through the 4 arches.
Yarn over again and pull through the last two loops on the hook.
Then make one more double crochet stitch (dc) to join the 4 arches together.
3. Make 2 chain stitches (ch) to complete the arch, turn the work, then continue crocheting straight in double crochet stitches (dc) until you reach the next curve of the ribbon.
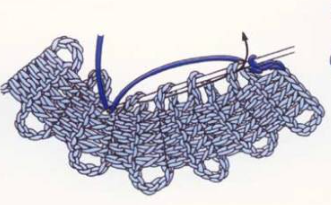
Parallel Joining of Ribbons
Shown here are ribbons joined side by side to achieve the desired shapes.
Joining with Tightened Stitches:
Place the ribbons parallel to each other, so that the arches align opposite one another.
At the end of the row, make 2 chain stitches (ch), then 1 single crochet (sc) under the arch of the ribbon being joined.
Turn the work, make 2 chain stitches, and continue the row with double crochet stitches (dc).
Joining with Double Crochet (dc) Stitches
As in the previous method, place the ribbons parallel to each other, so that the arches align opposite one another.
At the end of the row, make 2 chain stitches (ch), then 1 double crochet (dc) under the arch of the ribbon being joined.
Turn the work, make 2 chain stitches, and continue the row with double crochet stitches (dc).
Bruges Lace II
There are many ways to join the ends of ribbons.
You can use either a crochet hook or a needle for this purpose.
As with modular pieces, the ends of crocheted strips can be joined using either a slip stitch seam or a looped seam with a crochet hook.
The easiest method is the slip stitch seam. On a crocheted strip without a foundation chain, this method looks best, as no visible joining marks remain.
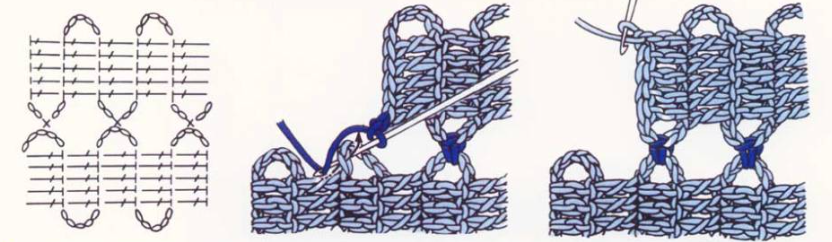
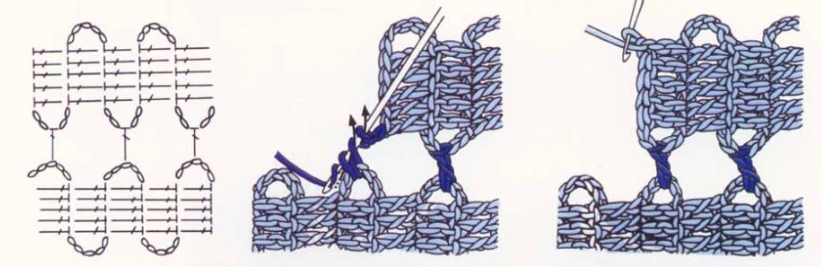
Joining the Ends
Joining with Double Crochet (dc) Stitches
To maintain the alternating arches, the work should be finished on an even-numbered row, which corresponds to the wrong side of the piece.
1–2–3. Chain 5 (ch) for the last arch, insert the hook into the first chain stitch of the main chain, yarn over, insert the hook into the first double crochet (dc) of the lower ribbon, and pull up one loop.
4–5–6. Pull through 2 loops, yarn over, and pull through 3 loops on the hook.
Continue in the same way for the next 4 double crochet (dc) stitches.
Finish the work and cut the yarn.
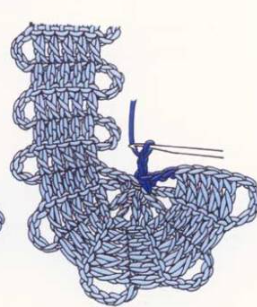
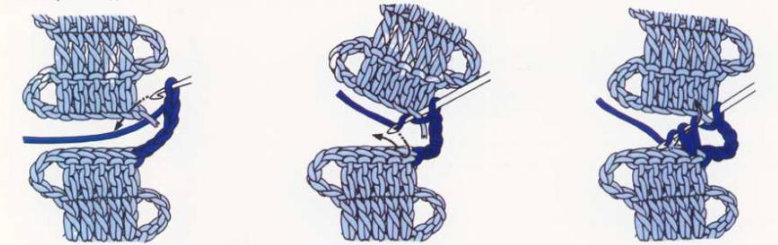
Joining with Double Crochet (dc) Stitches Without a Foundation Chain
When using this technique, no visible joining seams appear.
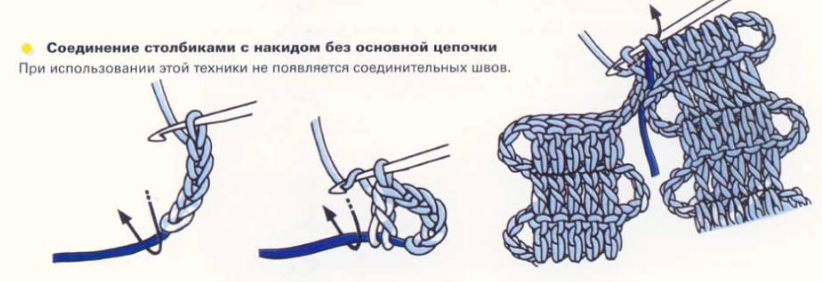
1–2–3. At the beginning of the ribbon, leave a long enough tail of yarn.
Chain 5 stitches (ch) for the first arch, then work 5 double crochet stitches (dc) into the starting tail.
After completing the last row of the ribbon, chain 5 stitches (ch) for the arch.
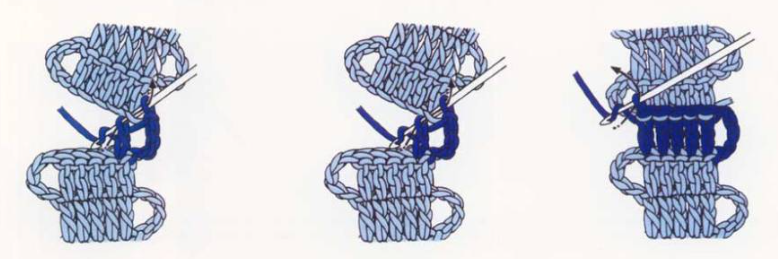
Remove the hook from the 5th chain stitch, insert the hook into 2 main stitches of the first dc worked on the starting tail, and pull the 5th chain stitch through these 2 stitches.
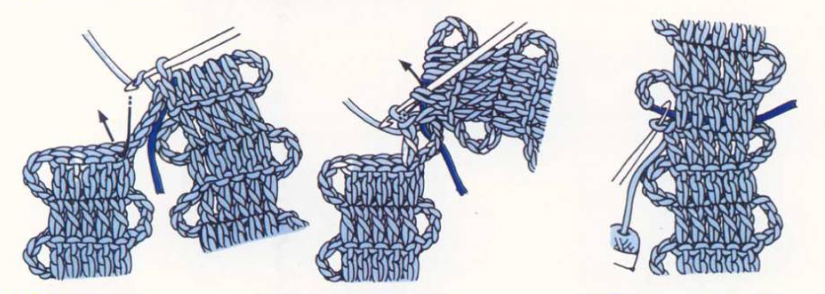
4–5. Yarn over, insert the hook into 2 loops of the first dc of the last row, and work 1 double crochet (dc).
Continue in the same way for the other 4 double crochet stitches.
- To finish the work, pull the starting tail through the last loop on the hook.
Cut the working yarn and weave in the ends.
Joining with a Slip Stitch Seam
(or Edge-to-Edge Seam)

1–2–3. Place the two ends to be joined opposite each other, ensuring the alternating right/left arches align.
Then insert the needle under the yarn of the main chain and under the 2 strands of the corresponding double crochet (dc) stitch, as shown in the diagram.
Repeat the same steps for the next 4 stitches.
Bruges Lace III
The tape is the foundation of crocheted Bruges lace.
Here are a few examples, both simple and more complex, to inspire you to create your own masterpieces.
TECHNIQUE
Crocheting Bruges lace requires some skill in assembling motifs, but at the same time it is an excellent source of inspiration and helps develop creative abilities.
Of course, you can enjoy playing with the arabesque shapes of the tape, but you can also put your creativity into the tape itself.
Main Tape
This simple tape is worked on a base of 4 or 5 double crochet (dc) stitches.
It is crocheted in forward and return rows, making chain stitch arches at the beginning of each row.
Using this principle, you can create tapes of different widths.
Tape with Mesh (Grid)
The tape with a mesh pattern is based on two types of stitches:
1 double crochet (dc), 1 chain stitch (ch), skip one stitch,
and the motif varies depending on the design.
The wider the tape, the more creativity is required in its execution.
However, in general, to keep the piece elegant, it is advisable not to make the tape too
Bruges Lace 3
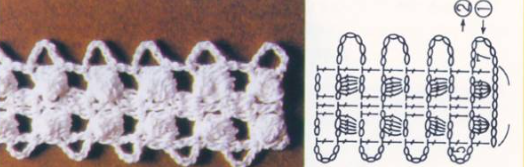
Tape of Puff Stitches
This tape consists of two rows of puff stitches, which, taking into account the relief of the pattern, are worked on a foundation of 9 stitches.
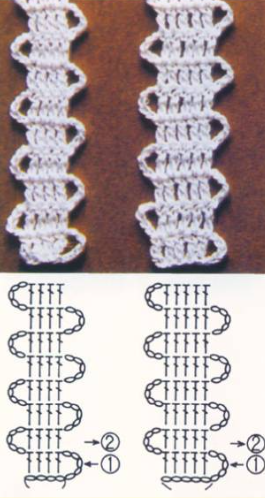
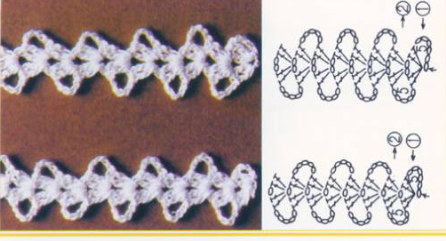
Fan Tape
The two presented models are very similar to each other; the only difference is that in the first model, the central arch consists of one stitch, while in the second model it consists of two stitches, giving the latter greater openness and transparency.
Rounded Tape
In this model, the tape widens and splits, creating rounded lines and a central motif with picots.
By repeating this motif, you can crochet a charming tape, which could be used, for example, as a bookmark.
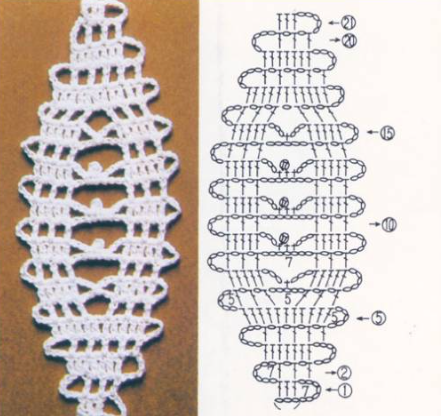
Extravagant Tape
This magnificent fantasy tape consists of mesh squares and puff stitches, worked on a foundation of 14 stitches.
Note: the uneven placement of arches adds originality to the design.
Bruges Lace 4
Working on small motifs allows you to learn how to crochet various types of Bruges lace tapes.
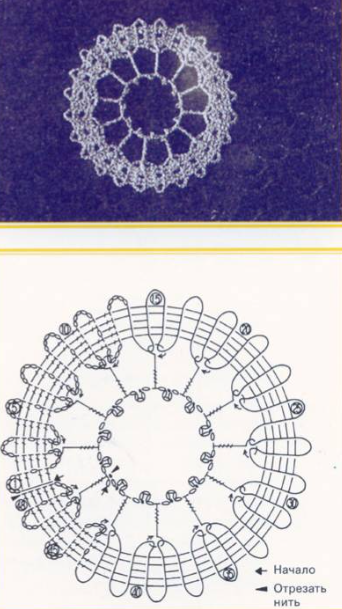
Ring
Leave a 10 cm tail of yarn. Chain 5 stitches (ch) for the first arch, then work 5 double crochet stitches (dc) into the starting tail, followed by 5 chain stitches (ch) for the turning arch.
Continue working straight until the 35th row, and join the first row while working the 36th row of the tape to close it into a circle, then cut the yarn.
To fill the central part, chain 1, pulling the yarn to tighten the piece. Yarn over 6 times, insert the hook under 2 consecutive inner arches of the tape, yarn over and pull up 1 loop, then repeat 7 times: yarn over, pull through 2 loops.
Continue working in the same way, inserting the hook under the next 2 arches of the tape for each new dc with 6 yarn overs.
Finally, finish the work and secure the yarn end.

Chamomile (Romashka)
Leave a 10 cm yarn tail. Chain 5 stitches (ch) for the first arch, then work 2 double crochet stitches (dc), 1 chain (ch), and 2 dc into the 10 cm tail. Chain 5 stitches (ch) for the turning arch.
In the 2nd row, work 1 dc into each stitch of the previous row, then chain 5 stitches (ch) for the turning arch.
Continue in this manner for 47 rows, then join the first row while working the 48th row and cut the yarn.
To fill the central part, chain 1, then:
- Yarn over 4 times, insert the hook under 2 consecutive arches of the inner tape, yarn over, pull up 1 loop, then complete the dc with 4 yarn overs, working loops 2 by 2.
- Chain 4 stitches (ch), slip stitch (sl st) into the 3rd chain from the hook (= 1 picot), chain 1, and repeat the process, joining the next arches of the tape 2 by 2.
Finish the work and secure the yarn end.
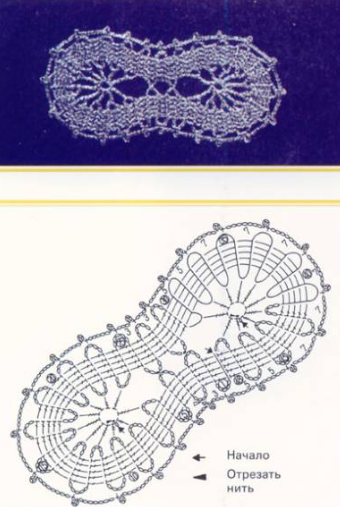
Knot
Leave a 10 cm yarn tail. Chain 5 stitches (ch) for the first arch, then work 5 double crochet stitches (dc) into the starting tail, followed by 5 chain stitches (ch) for the turning arch.
Continue crocheting until the 25th row.
At the beginning of the 26th and 28th rows, replace the 5-chain arch with 2 chain stitches (ch), 1 slip stitch (sl st) worked into the arches of the 4th and 2nd rows that are opposite each other, then 2 chain stitches (ch) to join the central part of the tape.
Continue crocheting until the 47th row, then join the first row while working the 48th row, and cut the yarn.
For the 2 filling motifs, first chain 1, then alternate dc with 2 yarn overs, dc with 3 yarn overs, dc with 4 yarn overs, inserting the hook into the inner arches left unworked on each side of the tape, then secure the yarn end.
Exercise in Creating Style
Using different motifs, you can compose a beautiful arrangement.
Before placing the lace in a frame, it should be prepared: wash it, lightly starch, and iron. Then attach it to a sturdy colored backing (you can choose the color to your taste) or to cardboard covered with fabric or paper.
You can also create a monochromatic or multicolored composition, using one or several types of yarn.
This can also make a wonderful gift.
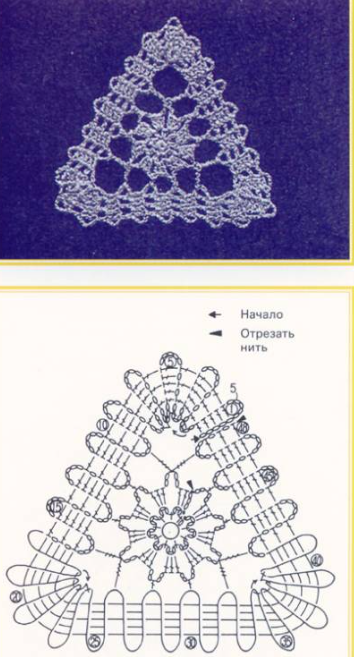
Triangle
Chain 5 stitches (ch) + 5 ch for the first arch, then begin crocheting into the 6th chain from the hook, alternating rows of 5 double crochet (dc) stitches and 2 mesh (grid) squares.
Continue until the 7th row, and at the end of the row for the first corner, make 2 chain stitches (ch) and 1 single crochet (sc) worked simultaneously under the three previous inner arches.
Continue in the same way to form the other 2 corners of the triangle.
Cut the yarn at the end of the 48th row, leaving a 10 cm tail to sew the last row to the foundation chain using an edge-to-edge seam.
For the filling motif, chain 1, then repeat 9 times: 1 sc, 3 ch into the starting stitch.
Finish with 1 slip stitch (sl st) into the first sc and work an additional sl st into the first arch.
While working the 2nd round, join the inner arches of the tape left unworked using groups of 2 triple crochet (tr) stitches worked together, then close this round.
Finish with 1 sl st into the 3rd of the 3 chains that replace the first dc, and cut the yarn.
Bruges Lace 5
These mini-motifs demonstrate types of Bruges lace, made by joining arches of braid.
Sun
Chain 10 stitches (ch), then chain 7 more stitches for the first arch.
Work 1 double crochet (dc) into the 8th chain from the hook, chain 1, skip 1 chain, work 1 puff stitch of 5 dc into the next chain, chain 1, skip 2 chains, 1 dc in the next chain, chain 2, then 1 dc in each of the last 3 chains. Chain 15 for the turning arch.
2nd row:
Work 1 dc into each of the 3 dc from the previous row, chain 2, 1 dc into the next dc, 1 dc under the next chain, chain 1, 1 dc under the next chain, 1 dc into the next dc, chain 7, turn, and continue working straight, alternating these 2 rows with outer arches of 7 chains. Also alternate arches of 5 and 15 chains inside the tape.
Cut the yarn at the end of the 48th row, leaving a 15 cm tail, and join this row to the foundation chain with a slip stitch seam.
To work the central filling motif, attach the yarn to the inner 15-chain arch and repeat:
1 dc, 1 ch in each 15-chain arch, finish with 1 slip stitch (sl st) into the 3rd of 3 chains that replace the first dc.
2nd round: Chain 1, then repeat: 1 single crochet (sc) in each 1-chain arch, 1 picot (= 3 ch and 1 sl st into the first of these 3 chains). Finish with 1 sl st into the first sc and cut the yarn.
Clovers (Trefoils)
Leave a 10 cm yarn tail. Chain 5 stitches (ch) for the first outer arch, then work 5 double crochet stitches (dc) into the tail. Chain 7 stitches (ch) for the inner arch, and turn.
Continue working straight until the 4th row, at the end of which make 1 outer arch of 13 chains instead of 5.
5th row: Work 5 dc, chain 7 for the turning arch, chain 3, then work 18 dc into the previous outer arch of 13 chains, chain 3, 1 dc into the 2nd chain of the first arch, chain 3, 1 dc, repeat 8 times: 4 ch, 1 slip stitch (sl st) into the 3rd chain from the hook, 1 ch, 1 dc over every other dc; chain 3, 1 dc into each dc of the tape, chain 7, turn.
Continue working the tape straight, making outer arches of 13 chains at the end of the 12th, 20th, and 28th rows to form the outer motif.
At the 32nd row, close the tape into a circle and cut the yarn.
To work the central filling motif, attach the yarn to the inner 7-chain arch at the start of the 28th row, chain 1, and repeat 4 times: 1 single crochet (sc) into the arch, 3 ch, 1 sc under 3 inner arches, 3 ch.
Finish with 1 sl st into the first sc and cut the yarn.
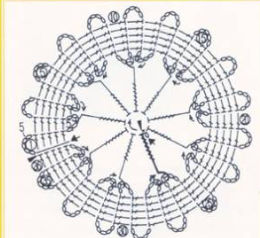
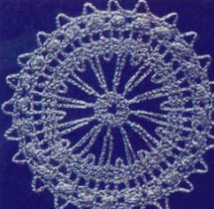
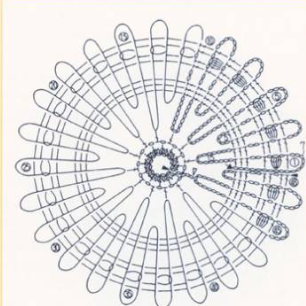
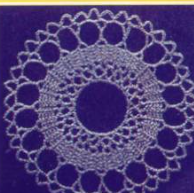
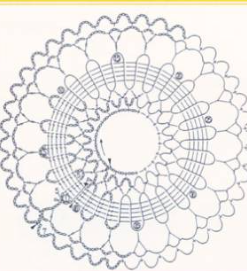
Circle
ave a 10 cm yarn tail, chain 5 stitches (ch) for the first arch, work 5 double crochet (dc) stitches into the tail, and chain 5 stitches (ch) for the turning arch.
Crochet straight until the 39th row, join the 40th row to the 1st row, and cut the yarn.
To work the central filling motif, attach the yarn to the inner arch of the tape, and, replacing the first unfinished dc with 3 chain stitches (ch), repeat:
2 dc worked together at the junction of 2 arches, 5 ch; replace the last 3 chains with 1 dc, inserting the hook under the first group of dc worked together.
2nd round: Repeat: 1 single crochet (sc), 2 ch in each arch, finish with 1 slip stitch (sl st) into the first sc, cut the yarn, and attach it to the first outer arch of the tape.
Work 2 rounds of edging along the outer arches of the tape.
1st round for the first “U”: Chain 10, work 1 dc with 2 yarn overs (dc2) into the 8th chain from the hook, and for the remaining arches, work 1 dc with 4 yarn overs (dc4) into the next outer arch of the tape, chain 3, 1 dc with 2 yarn overs (dc2) under the 2nd slanting yarn of the previous dc4. Finish the round with 1 slip stitch (sl st) into the 7th of the 10 chains from the start, then another sl st into the first arch.
2nd round: Work arches of 7 chains (ch), finish with 1 sl st into the first sc, and cut the yarn.
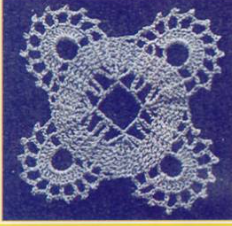
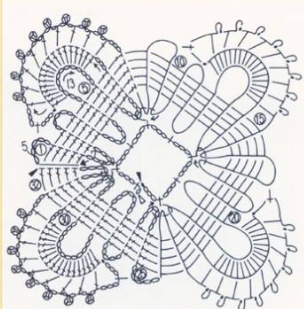
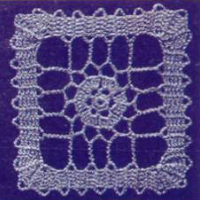
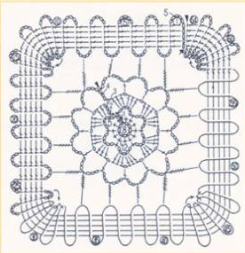
Square
Chain 5 stitches (ch) for the first arch, then crochet rows of tape with 5 double crochet (dc) stitches, forming a square shape.
For the corners, at the end of the corresponding row, make 2 chains (ch), 1 single crochet (sc) worked simultaneously under the 3 previous inner arches, and 2 chains (ch) to complete the current arch.
Cut the yarn at the end of the 64th row, leaving a 10 cm tail to join the last row to the foundation chain with an edge-to-edge seam.
Begin the central filling motif with a chain of 8 stitches (ch) joined into a ring, and crochet the first 3 rounds according to the diagram.
In the 4th round, join the remaining free inner arches of the tape with dc4 into the inner arches of the motif, and at the corners, work 2 dc6 together: insert the hook into the first arch after the corner, yarn over, pull through 3 loops on the hook in one step, then chain 3 to complete the current arch.
Finish this round with 1 slip stitch (sl st) into the 3rd of 6 chains from the start, and cut the yarn.
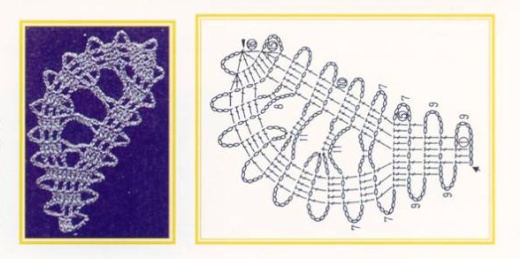
Ellipse
Leave about a 10 cm yarn tail, chain 5 stitches (ch) for the first arch, then work 5 double crochet (dc) into the 10 cm tail, and chain 5 stitches (ch) for the turning arch.
Continue crocheting straight for 35 rows, then join the 36th row to the 1st row and cut the yarn.
Central filling motif: Chain 1, yarn over 3 times, insert the hook into the inner arch of the tape, yarn over, pull up a loop, then work all loops on the hook in pairs to form the first dc with 3 yarn overs (dc3).
Skip 1 arch of the tape, work 1 single crochet (sc), and continue working in the same manner according to the diagram.
Secure the yarn end.