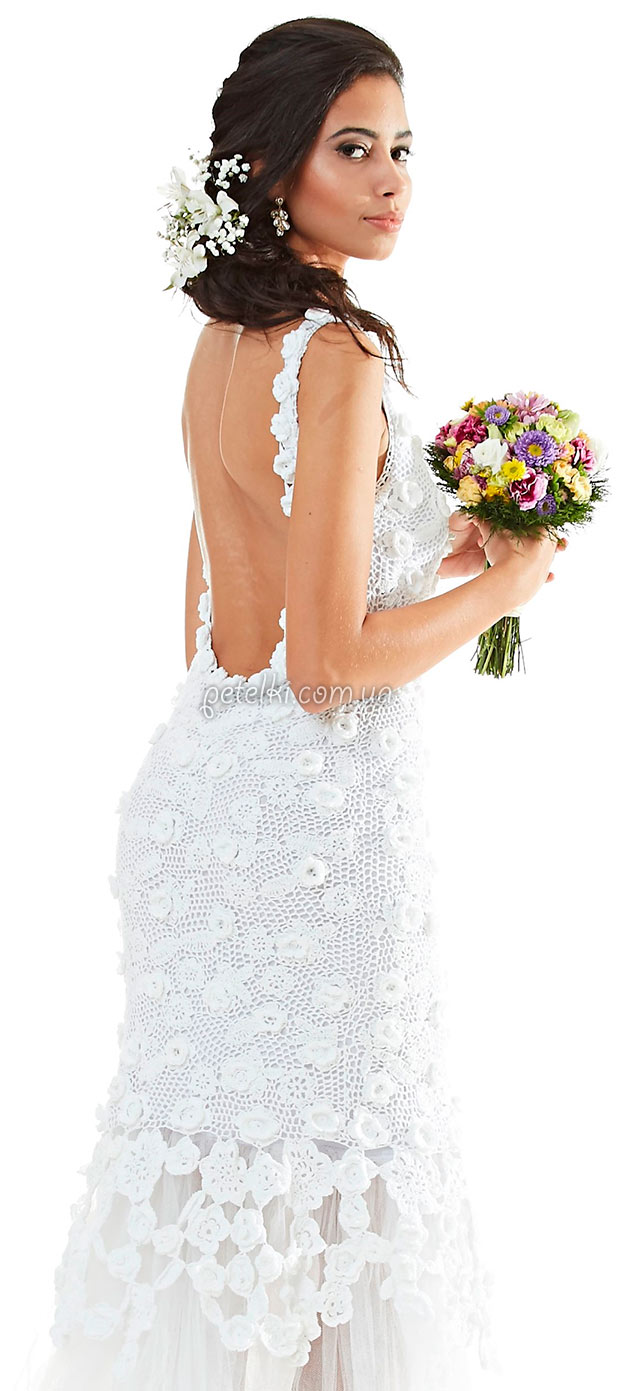
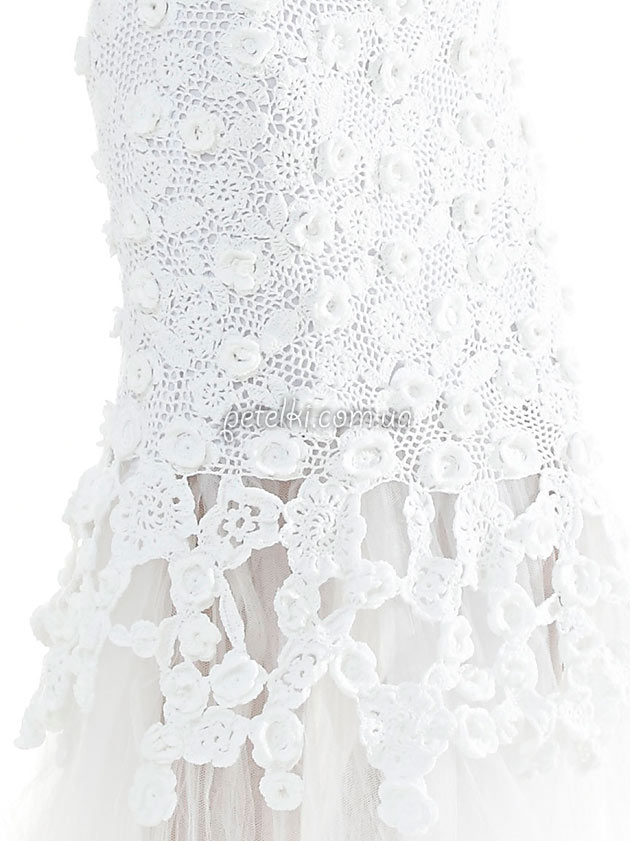
Beautiful Crochet Wedding Dress Pattern. This is a translation of the Russian pattern:
Size: 44–46 (EU sizing)
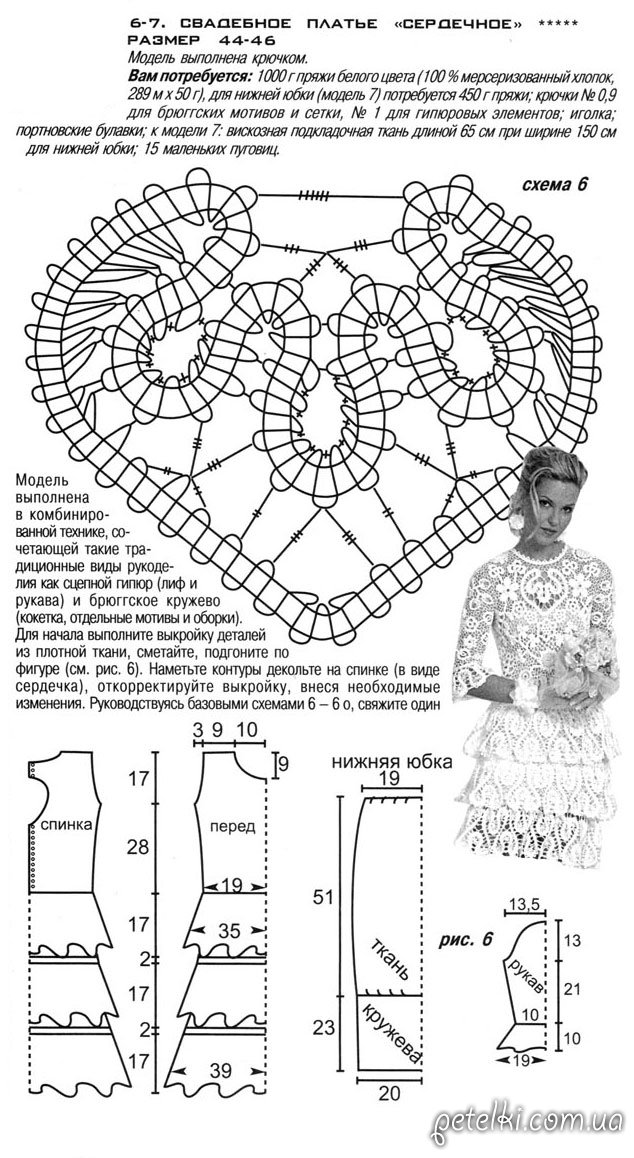
The design is made using crochet.
You will need:
- 1000 g of white yarn (100% mercerized cotton, 289 m per 50 g),
- For the underskirt (model 7), you will need 450 g of yarn;
- Crochet hooks: No. 0.9 for Bruges motifs and mesh, No. 1 for guipure elements;
- A needle;
- Tailor’s pins;
- For model 7: 65 cm of viscose lining fabric (150 cm wide) for the underskirt;
- 15 small buttons.

The model is made using a combined technique that merges traditional types of needlework such as tape guipure (bodice and sleeves) and Bruges lace (yoke, individual motifs, and ruffles).
To begin, make pattern pieces from dense fabric, baste them together, and adjust the fit to the body (see fig. 6).
Mark the neckline contours on the back (in the shape of a heart), and adjust the pattern, making any necessary changes.
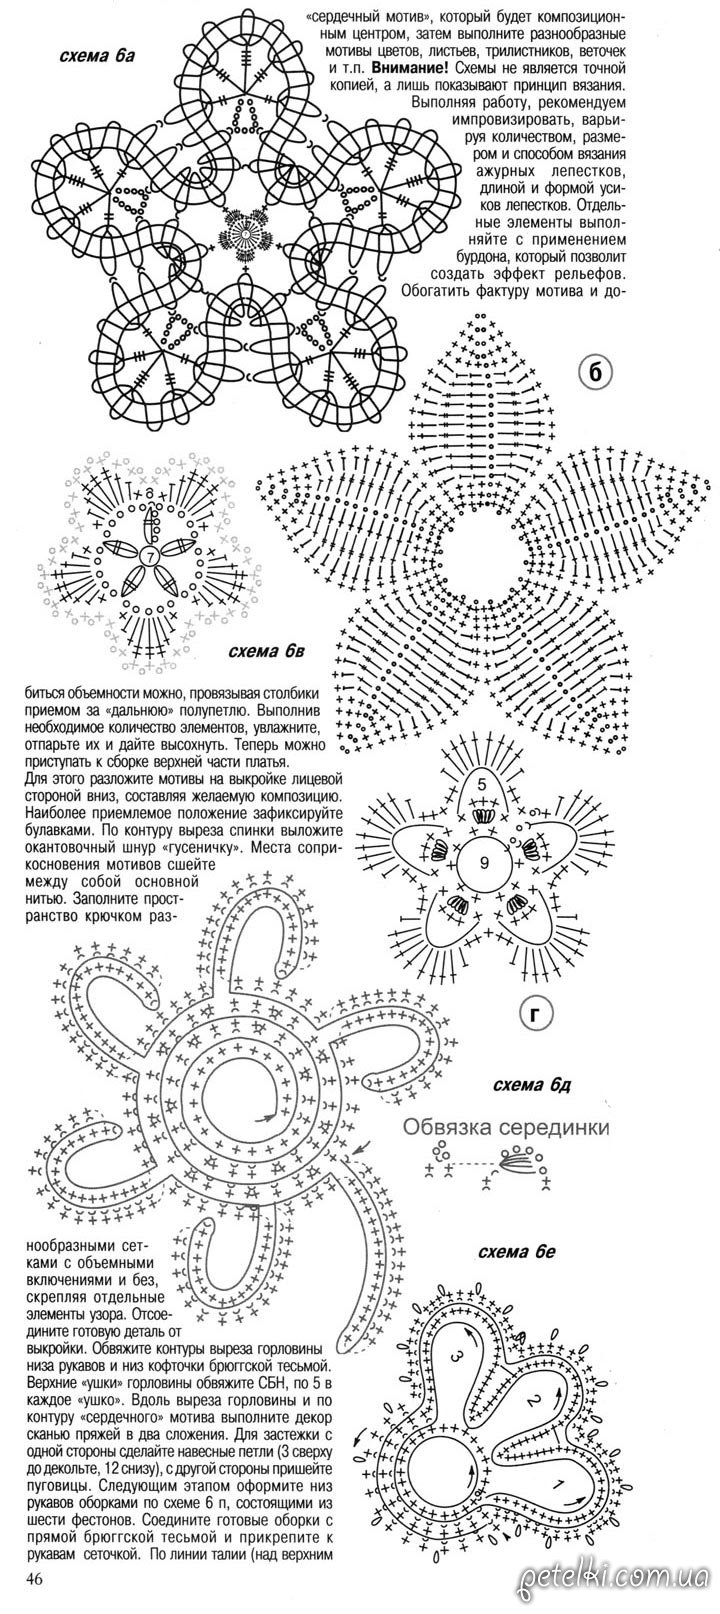
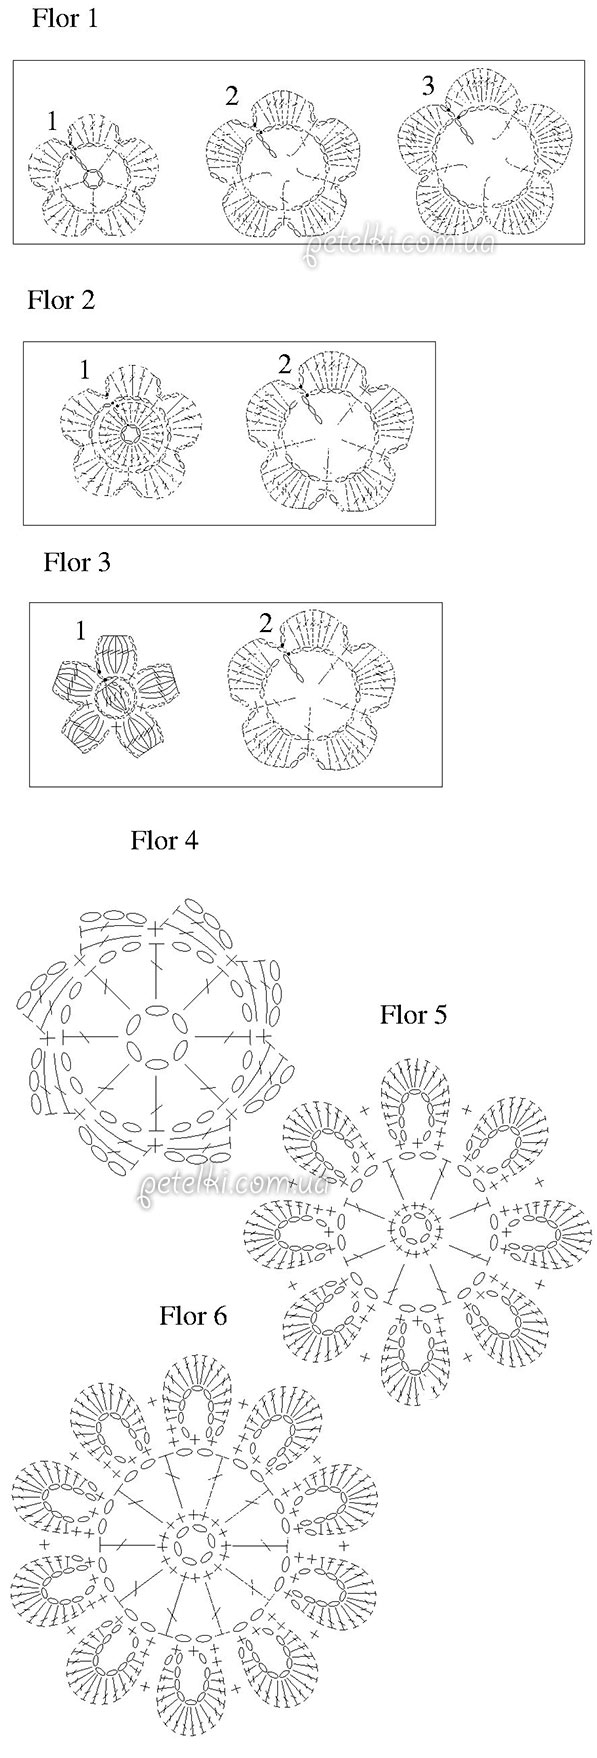
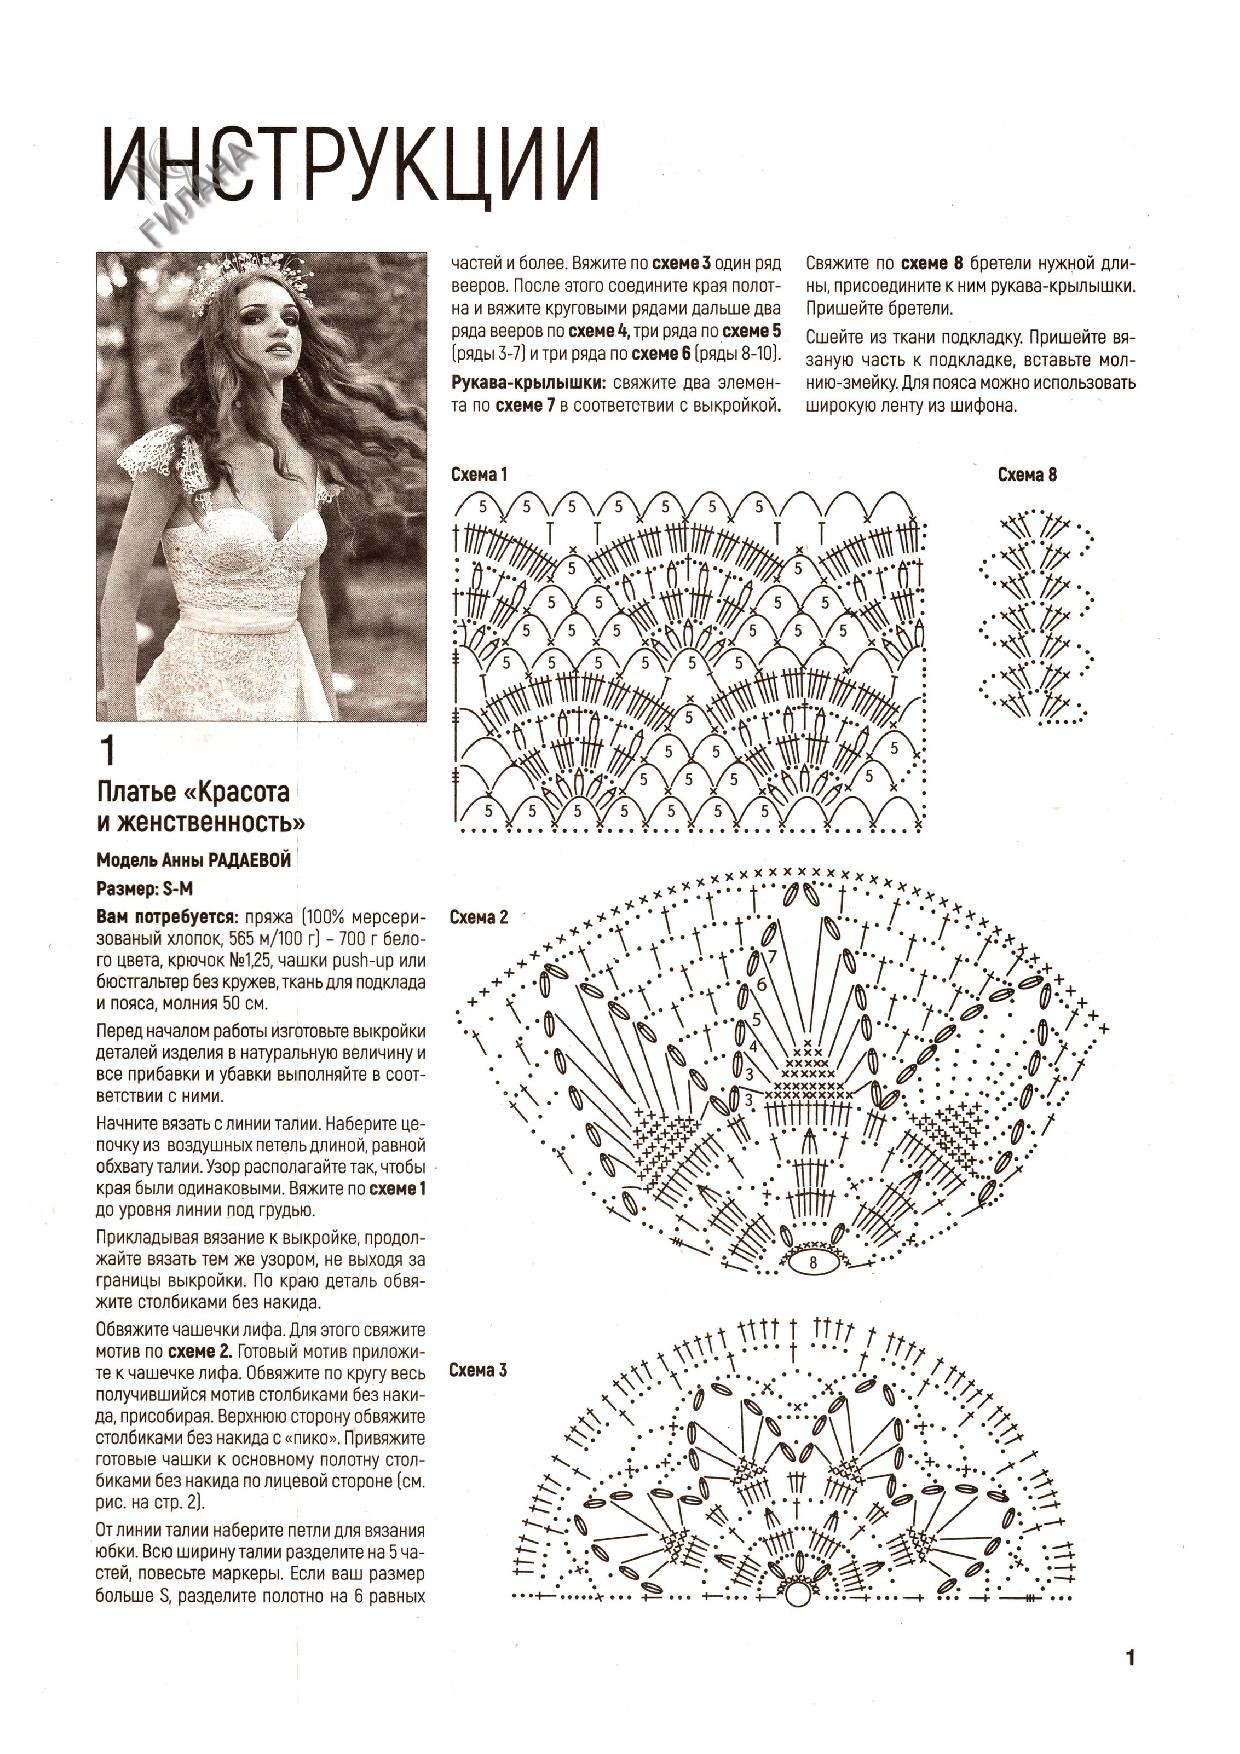
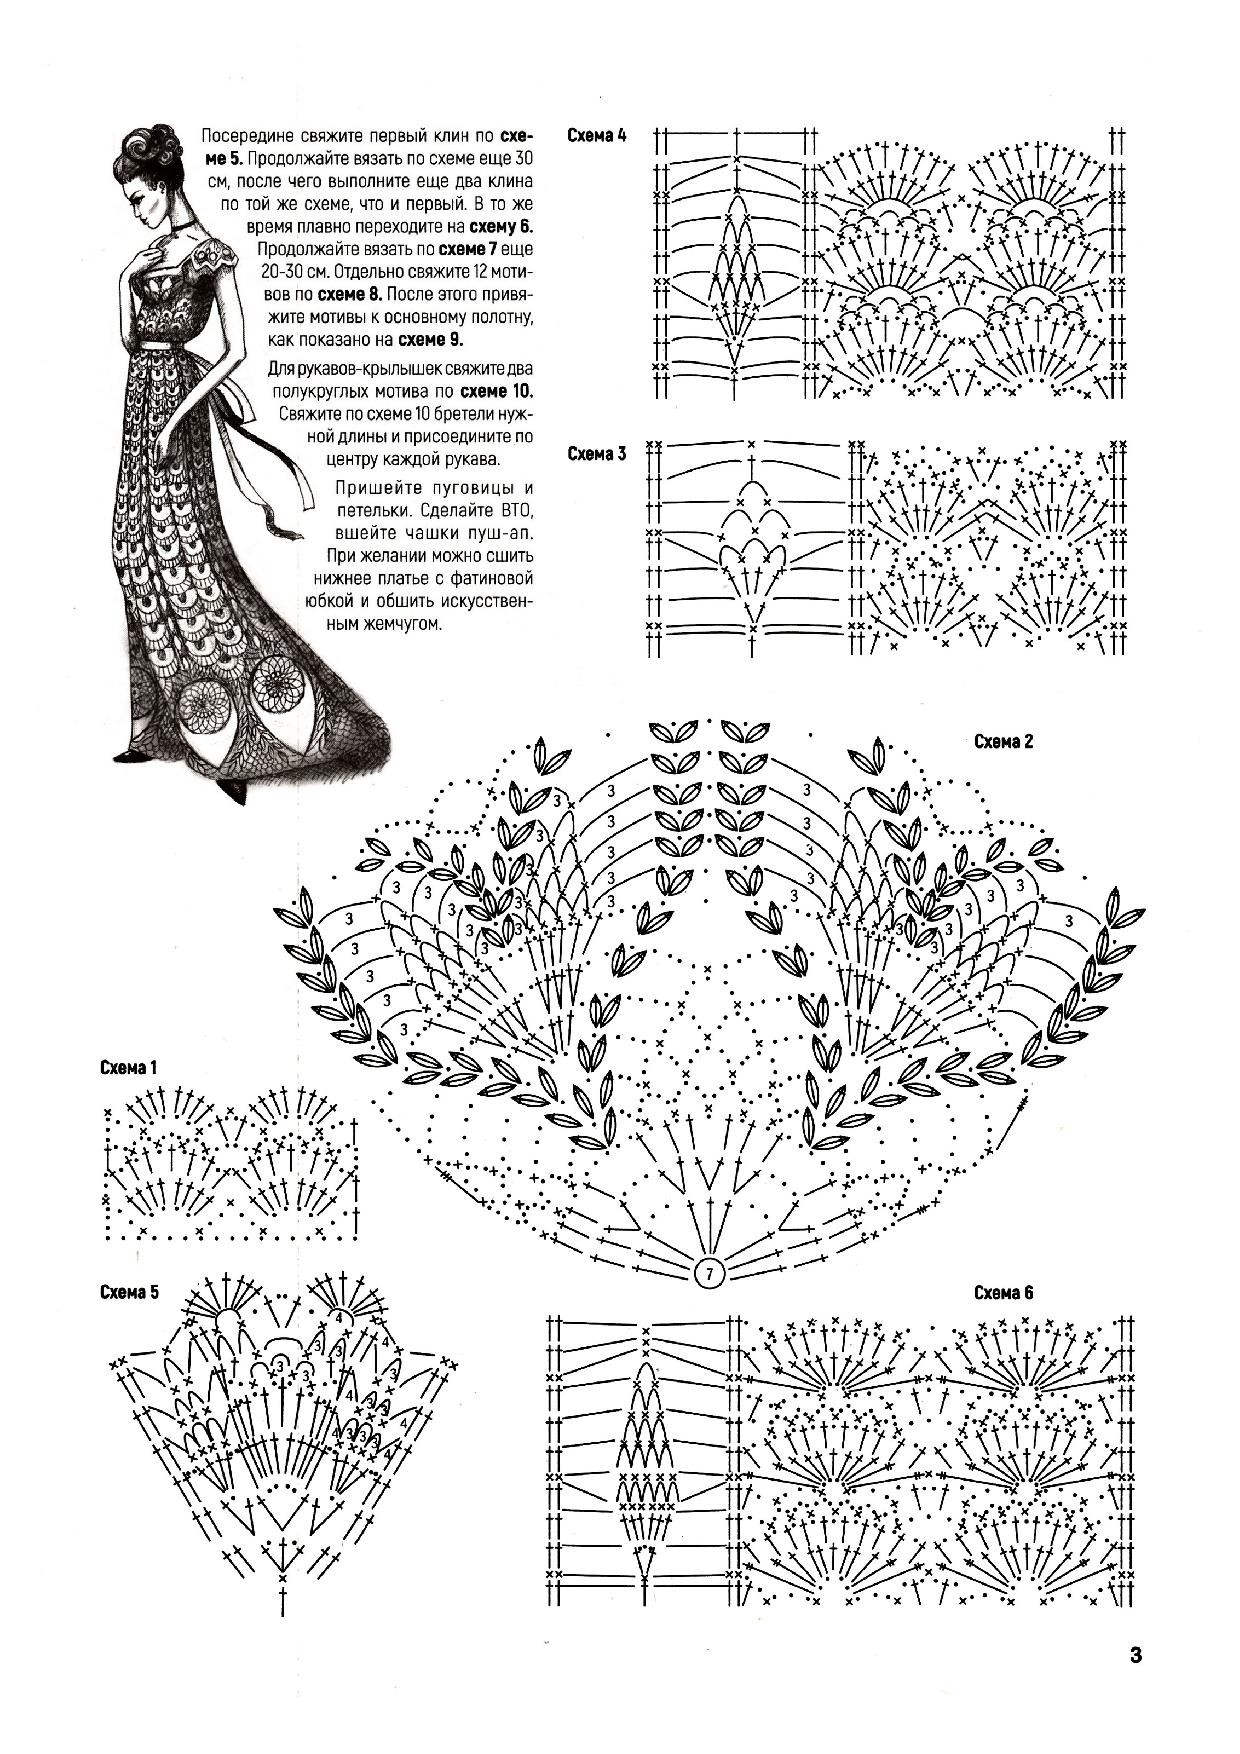
Using the basic charts No. 6, crochet one. “Heart-shaped motif” will be the compositional center of the design.
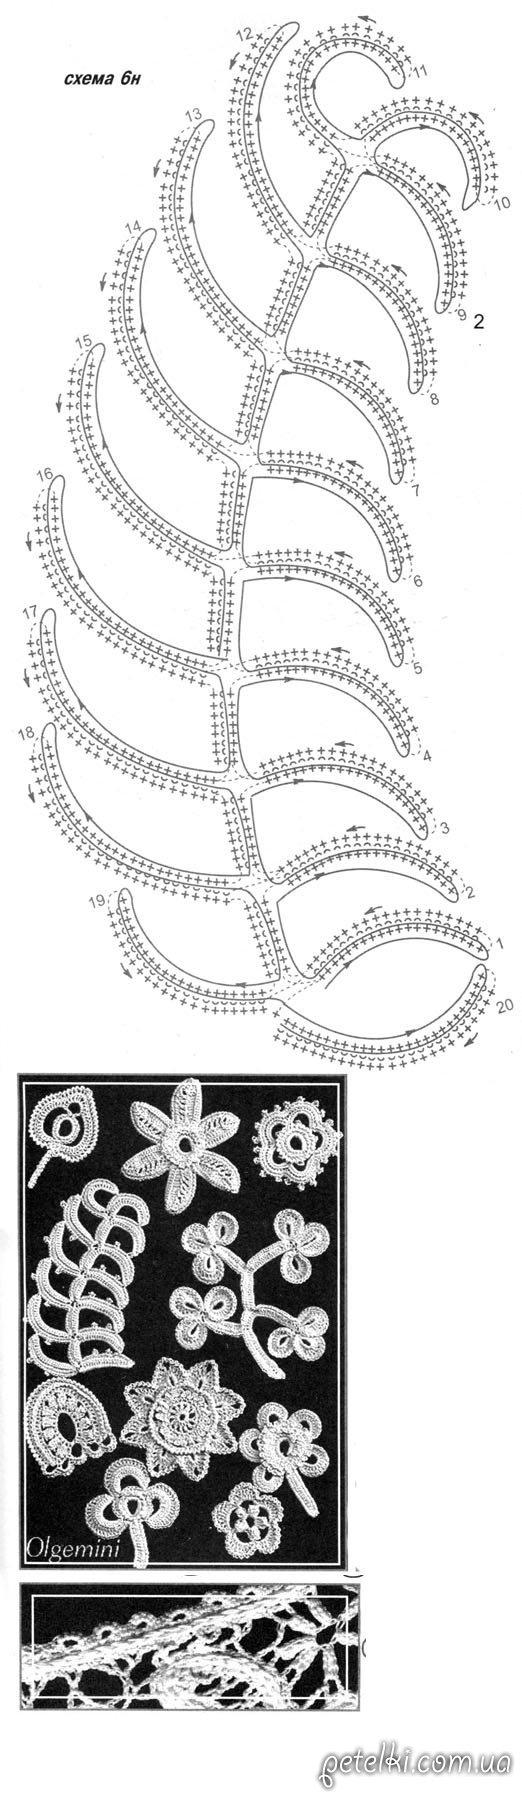
Then, crochet a variety of motifs such as flowers, leaves, trefoils, branches, etc.
Attention! The diagrams are not exact copies, but only show the principles of the crochet technique.
While working, we recommend improvising, varying the number, size, and method of crocheting the lacy petals, as well as the length and shape of the petal tendrils.
Some elements should be made using a cord (burdon), which will help create a relief (raised) effect.
To enrich the texture of the motif and contour you can enhance volume by crocheting stitches in the back loop only.
Once you’ve made the required number of elements, dampen, steam, and allow them to dry.
Now you can begin assembling the upper part of the dress.
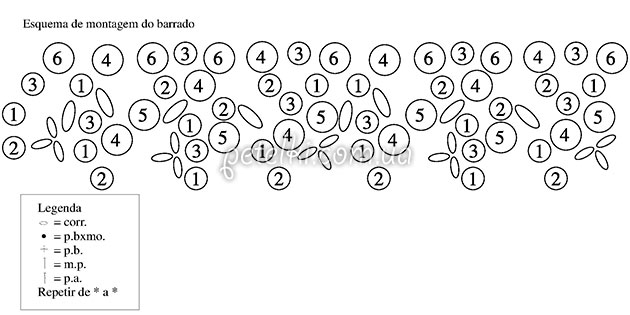
To do this, lay out the motifs on the pattern, right side down, arranging them into the desired composition.
Secure the most suitable placement with pins.
Along the edge of the back neckline, lay out a “caterpillar” cord edging.
Sew together the points where the motifs touch using the main yarn.
Fill in the spaces between motifs with crochet with various mesh patterns, with or without raised elements, joining the individual parts of the design.
Once assembled, detach the completed piece from the pattern.
Edge the neckline, sleeve hems, and bottom of the bodice with Bruges lace tape.
Single crochet (sc) around the top “loops” of the neckline—5 single crochets in each loop.
Along the neckline and around the heart-shaped motif, add decorative embroidery (skan’) using yarn held double-stranded.
For the closure, on one side make thread loops (3 above the neckline, 12 below); on the other side, sew on buttons.
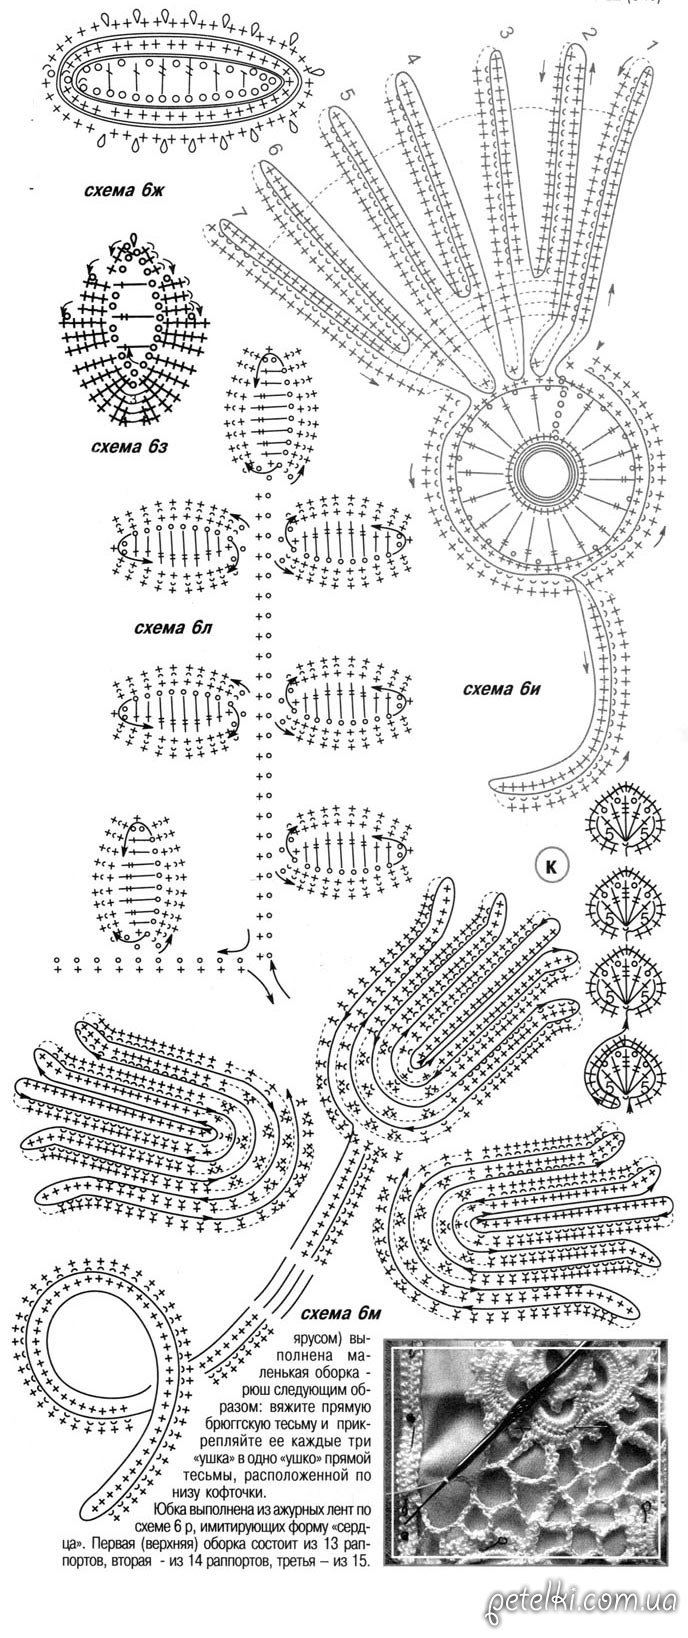
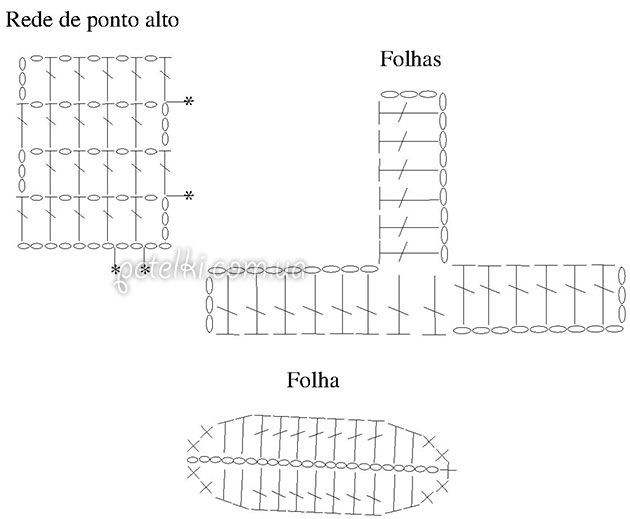
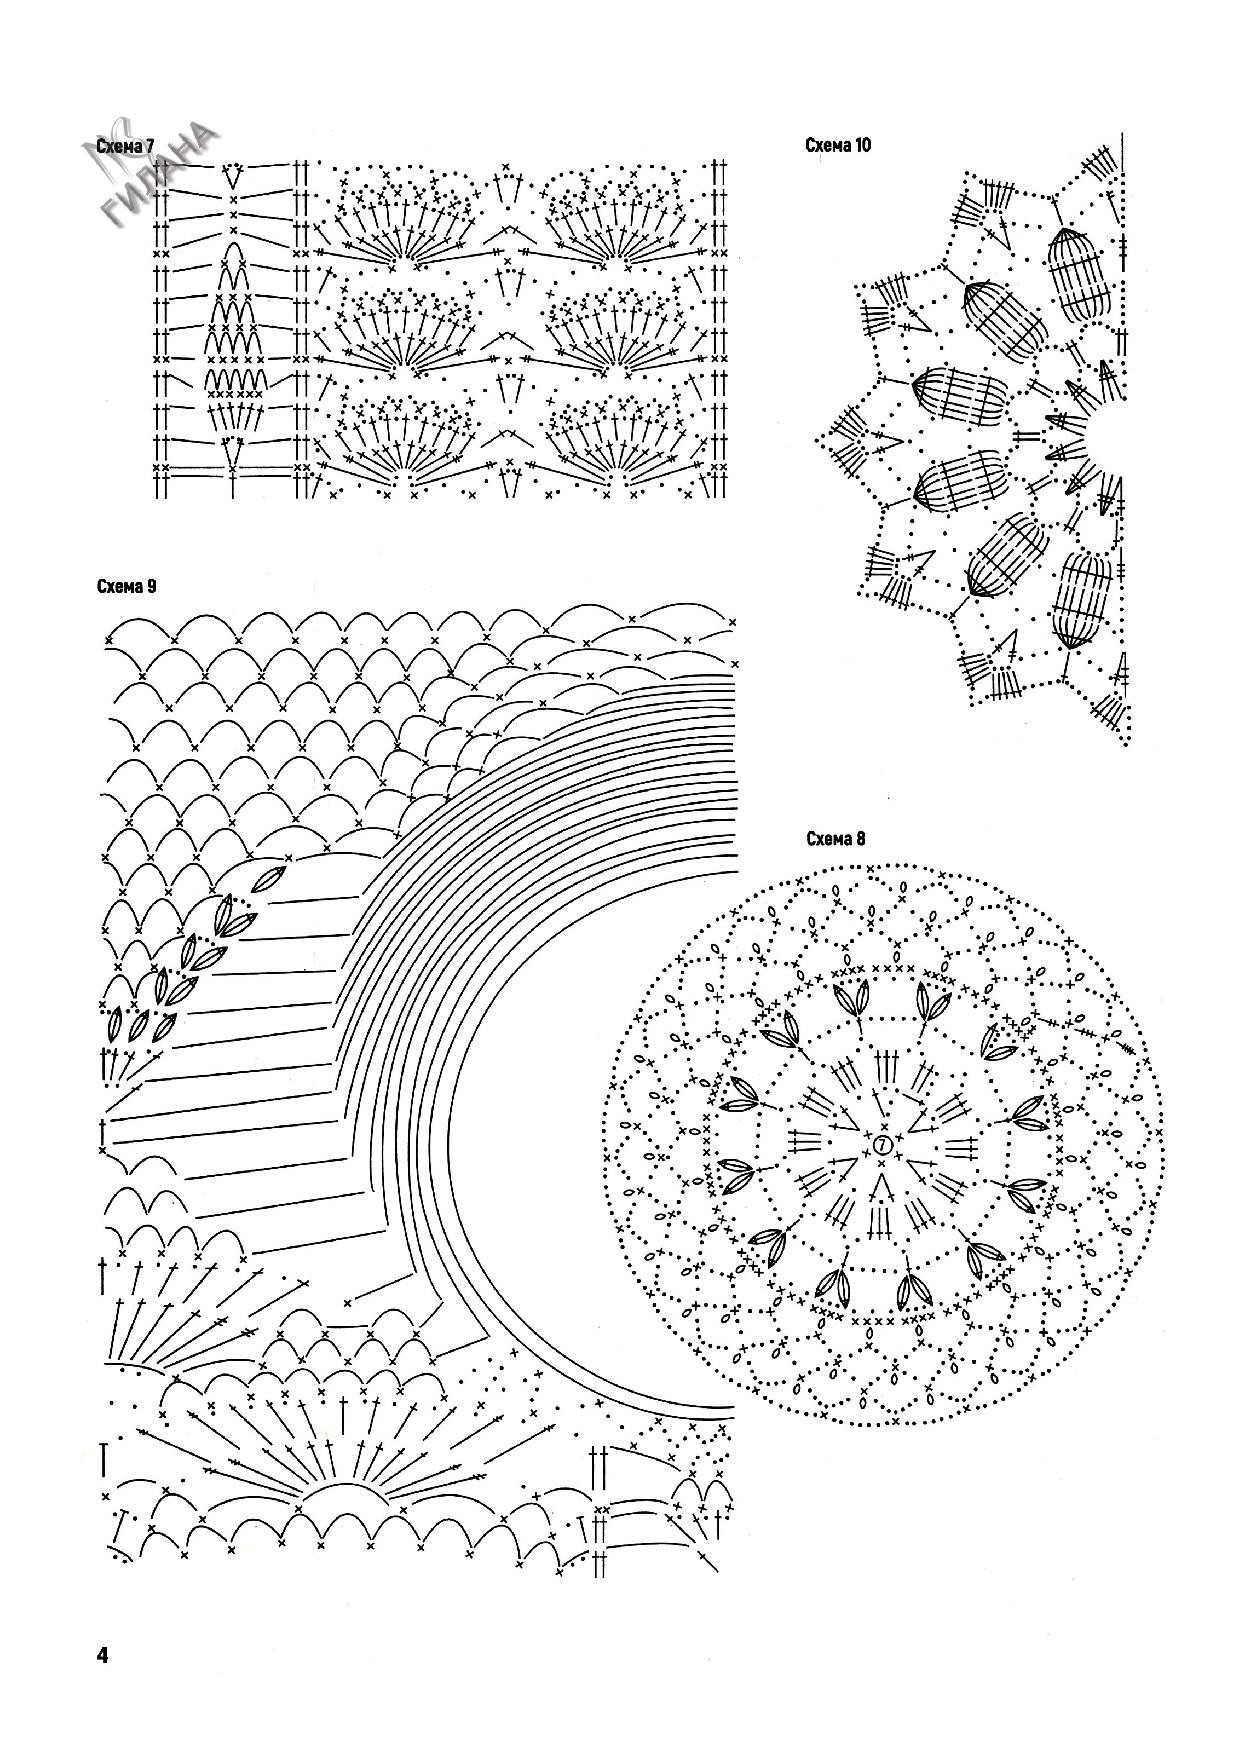
Next, finish the sleeve hems with ruffles using diagram 6p, consisting of six scallops.
Attach the finished ruffles to straight Bruges lace tape and then join them to the sleeves using mesh.
Along the waistline (just above the small ruffle (flounce) is made as the top tier in the following way:
Crochet a straight Bruges lace tape, and attach it every three “loops” into one “loop” of the straight tape that runs along the bottom edge of the bodice.
The skirt is made of lacy strips following diagram 6r, imitating the shape of a heart.
The first (top) ruffle consists of 13 repeats, the second of 14 repeats, and the third of 15 repeats.
Join each lace strip into a ring, sewing the first and last repeats together with a needle.
Decorate all the ruffles with embroidery (skan’) using yarn held double.
Each lace strip is attached to a straight Bruges lace tape.
Between the tiers of ruffles, crochet a diagonal mesh, attaching it to the arches (5 chain stitches each) of the straight tape.
While crocheting and assembling the tiers, constantly compare your work to the pattern template.
Tip:
You can adjust the size of the garment by changing how each row of scallops is attached to the straight Bruges lace tape:
- To reduce: join two arches into one.
- To increase: make two arches out of one.
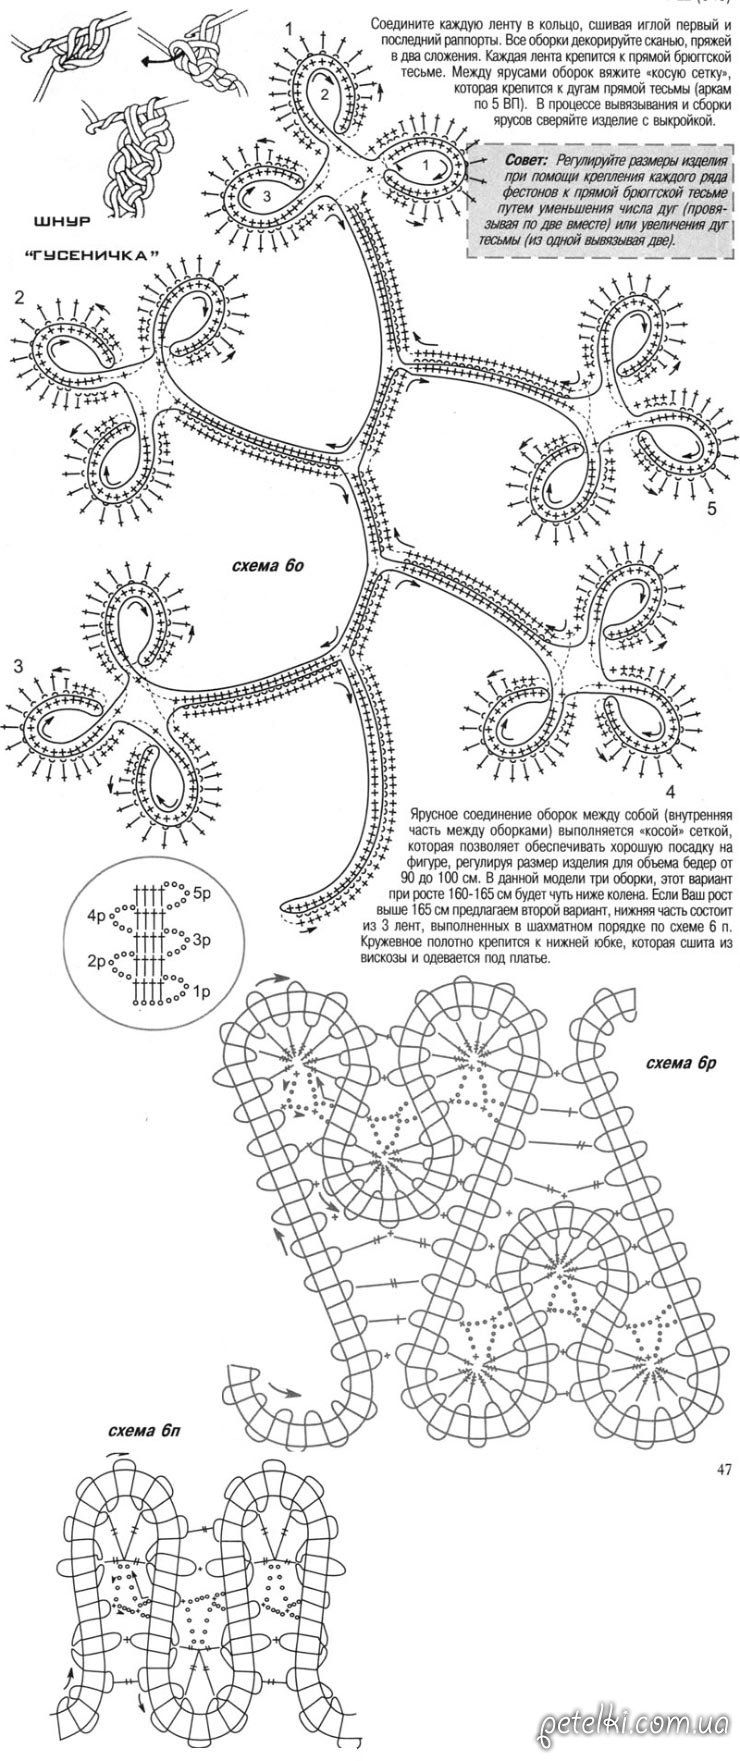
The tiered connection between the ruffles (the inner part between each flounce) is made using a diagonal mesh, which provides a good fit to the body and allows for size adjustment to fit hip measurements from 90 to 100 cm.
This model has three ruffles, which, for a height of 160–165 cm, will fall just below the knee.
If your height is above 165 cm, we suggest a second variation:
The lower part consists of three lace strips arranged in a staggered (checkerboard) layout following diagram 6p.
The lace fabric is attached to an underskirt, which is sewn from viscose and worn under the dress.
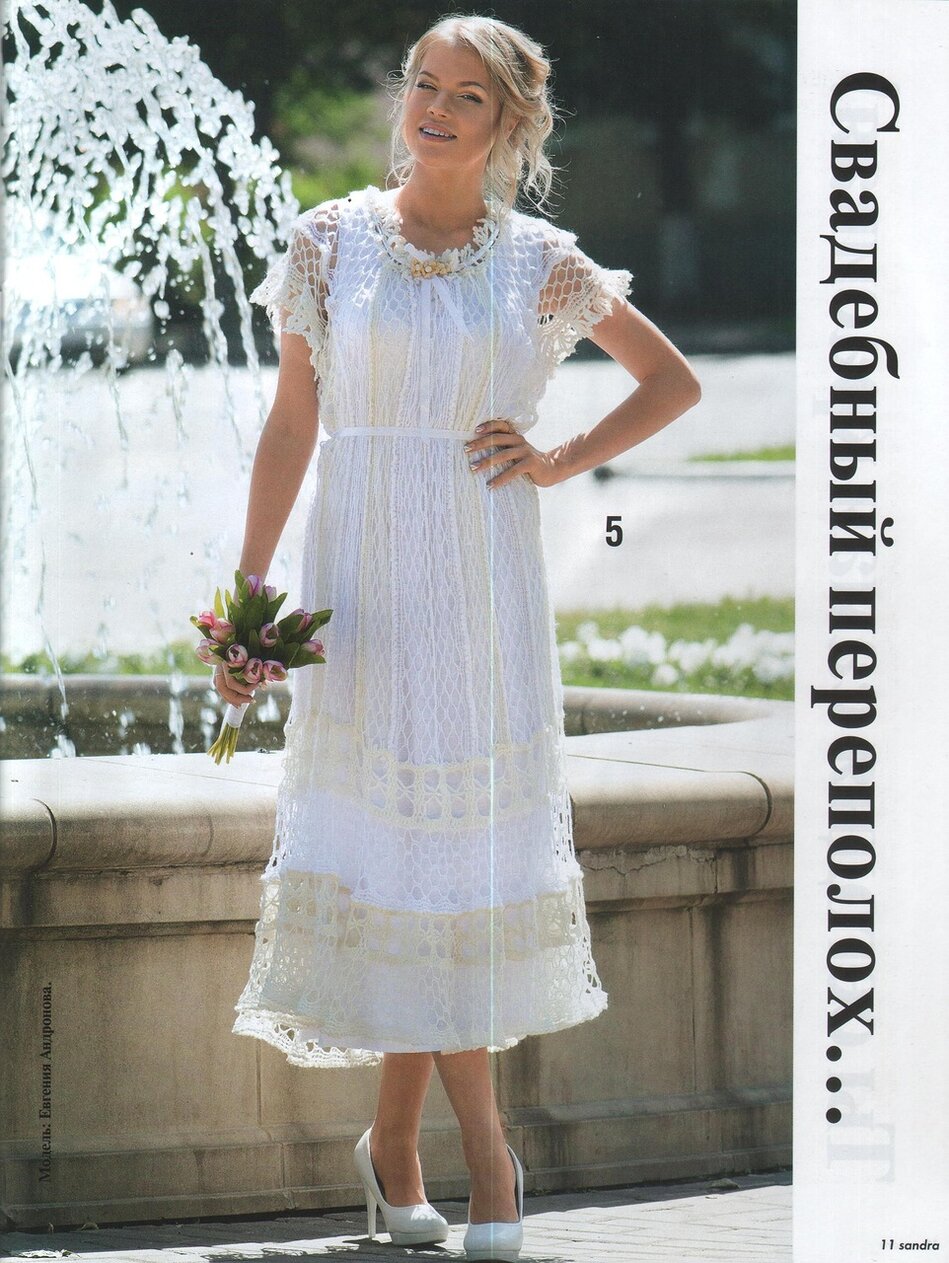
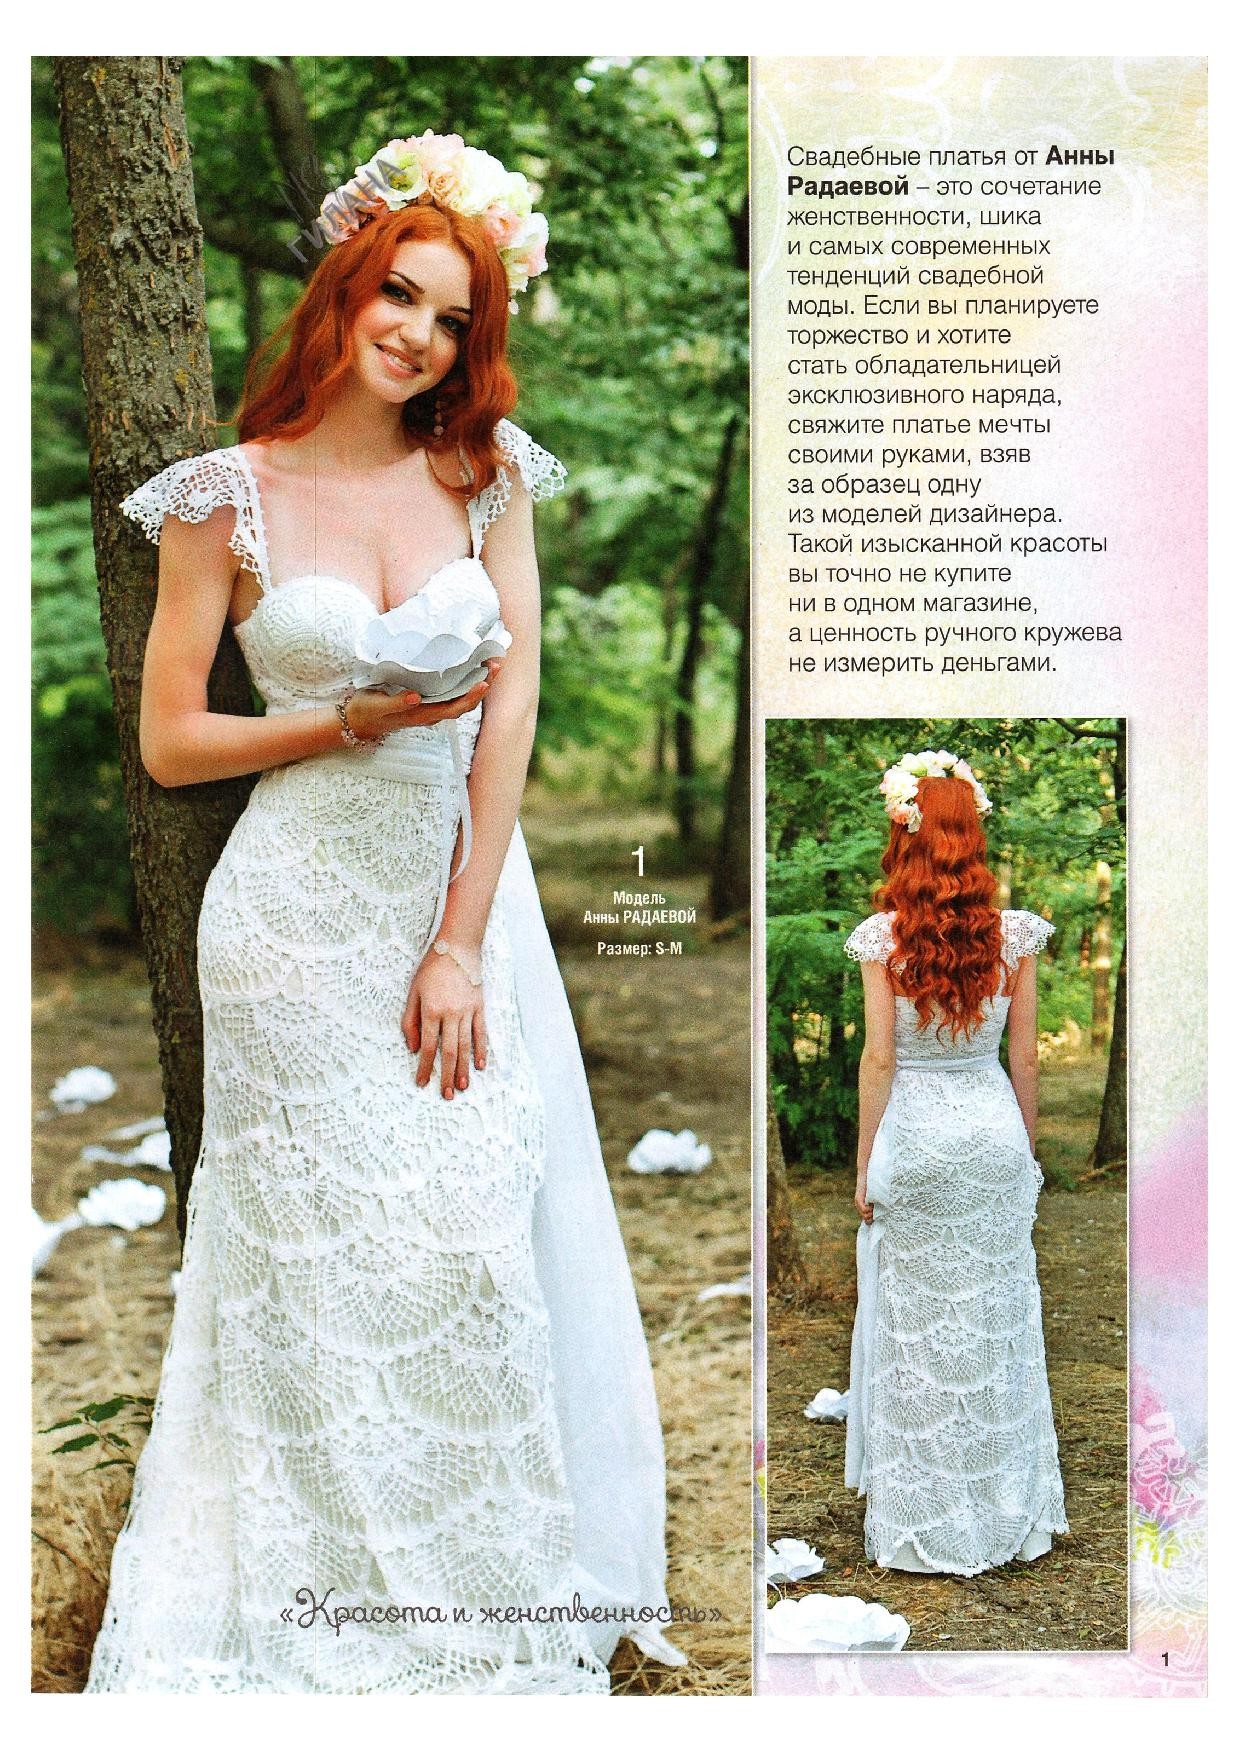
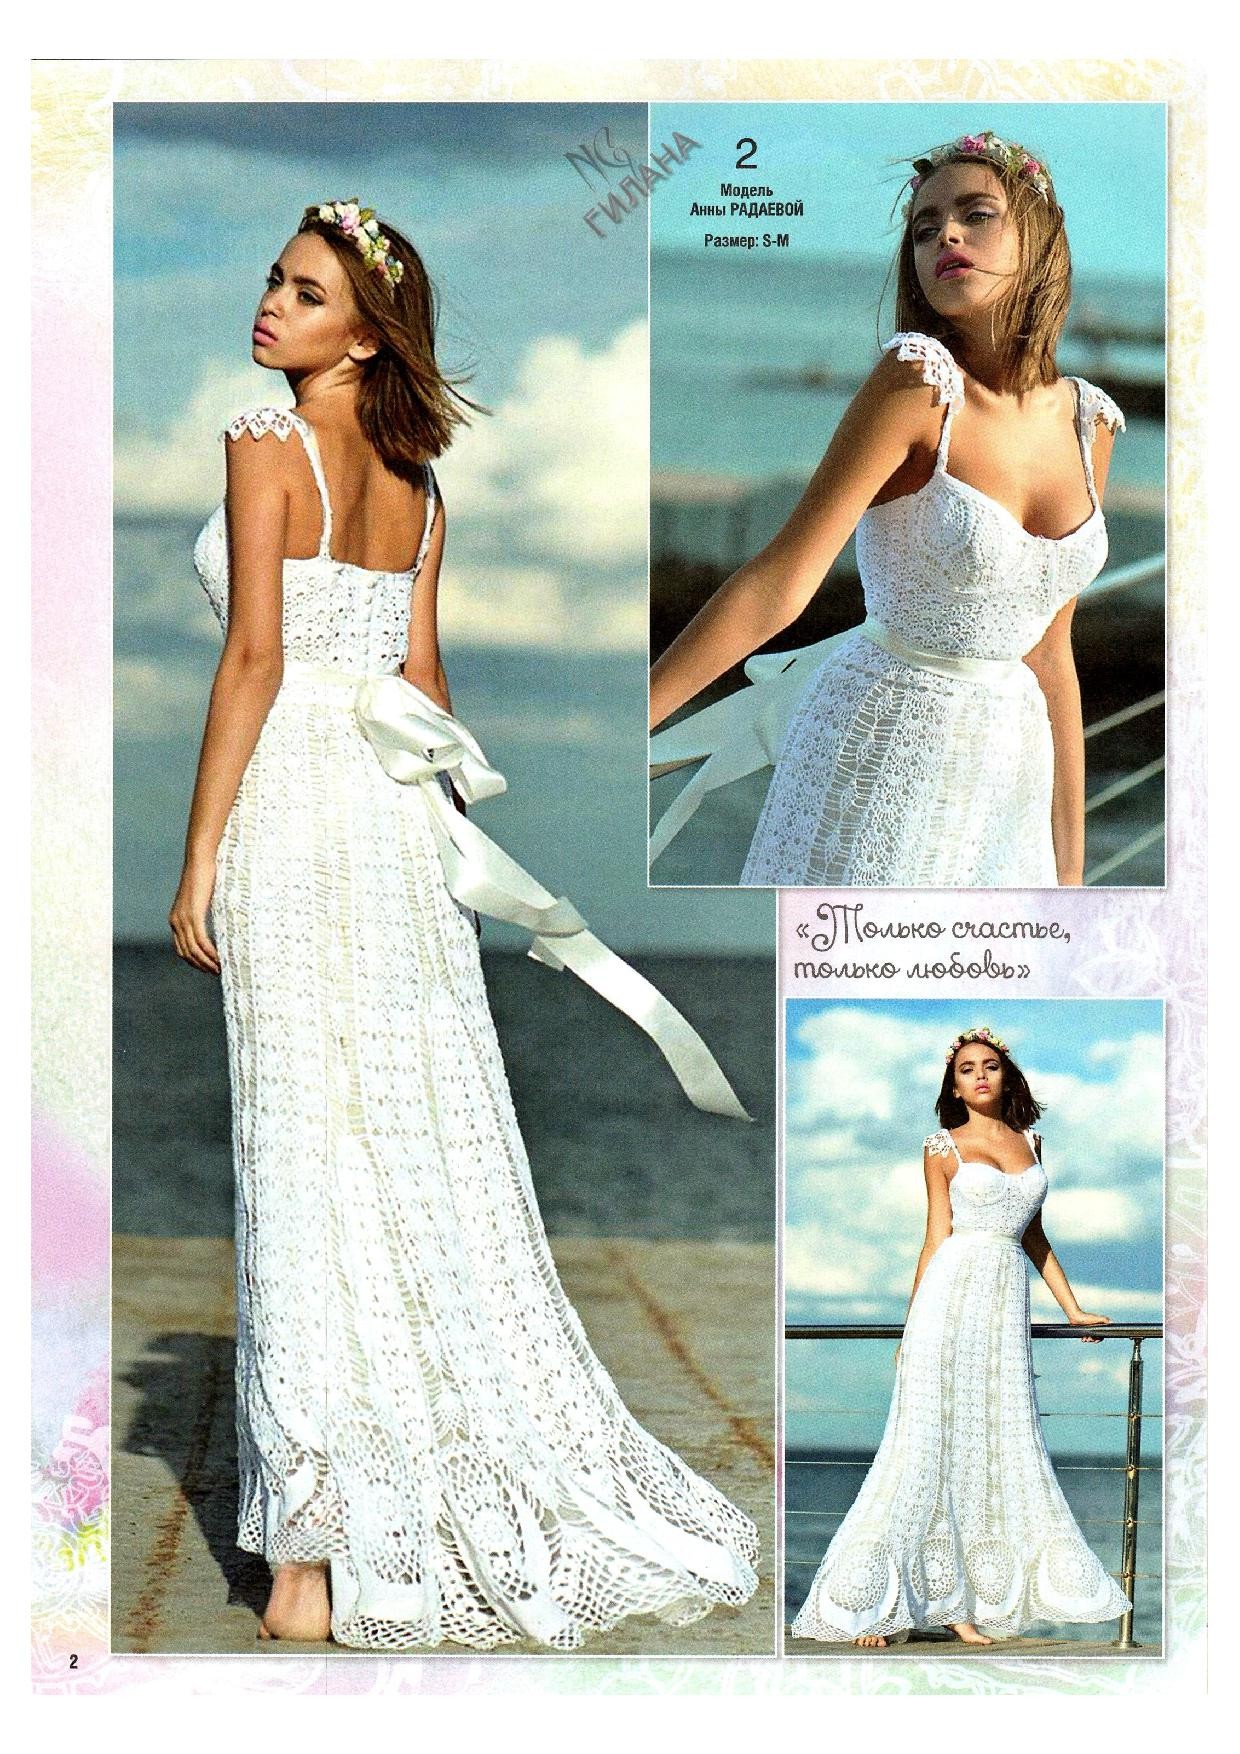
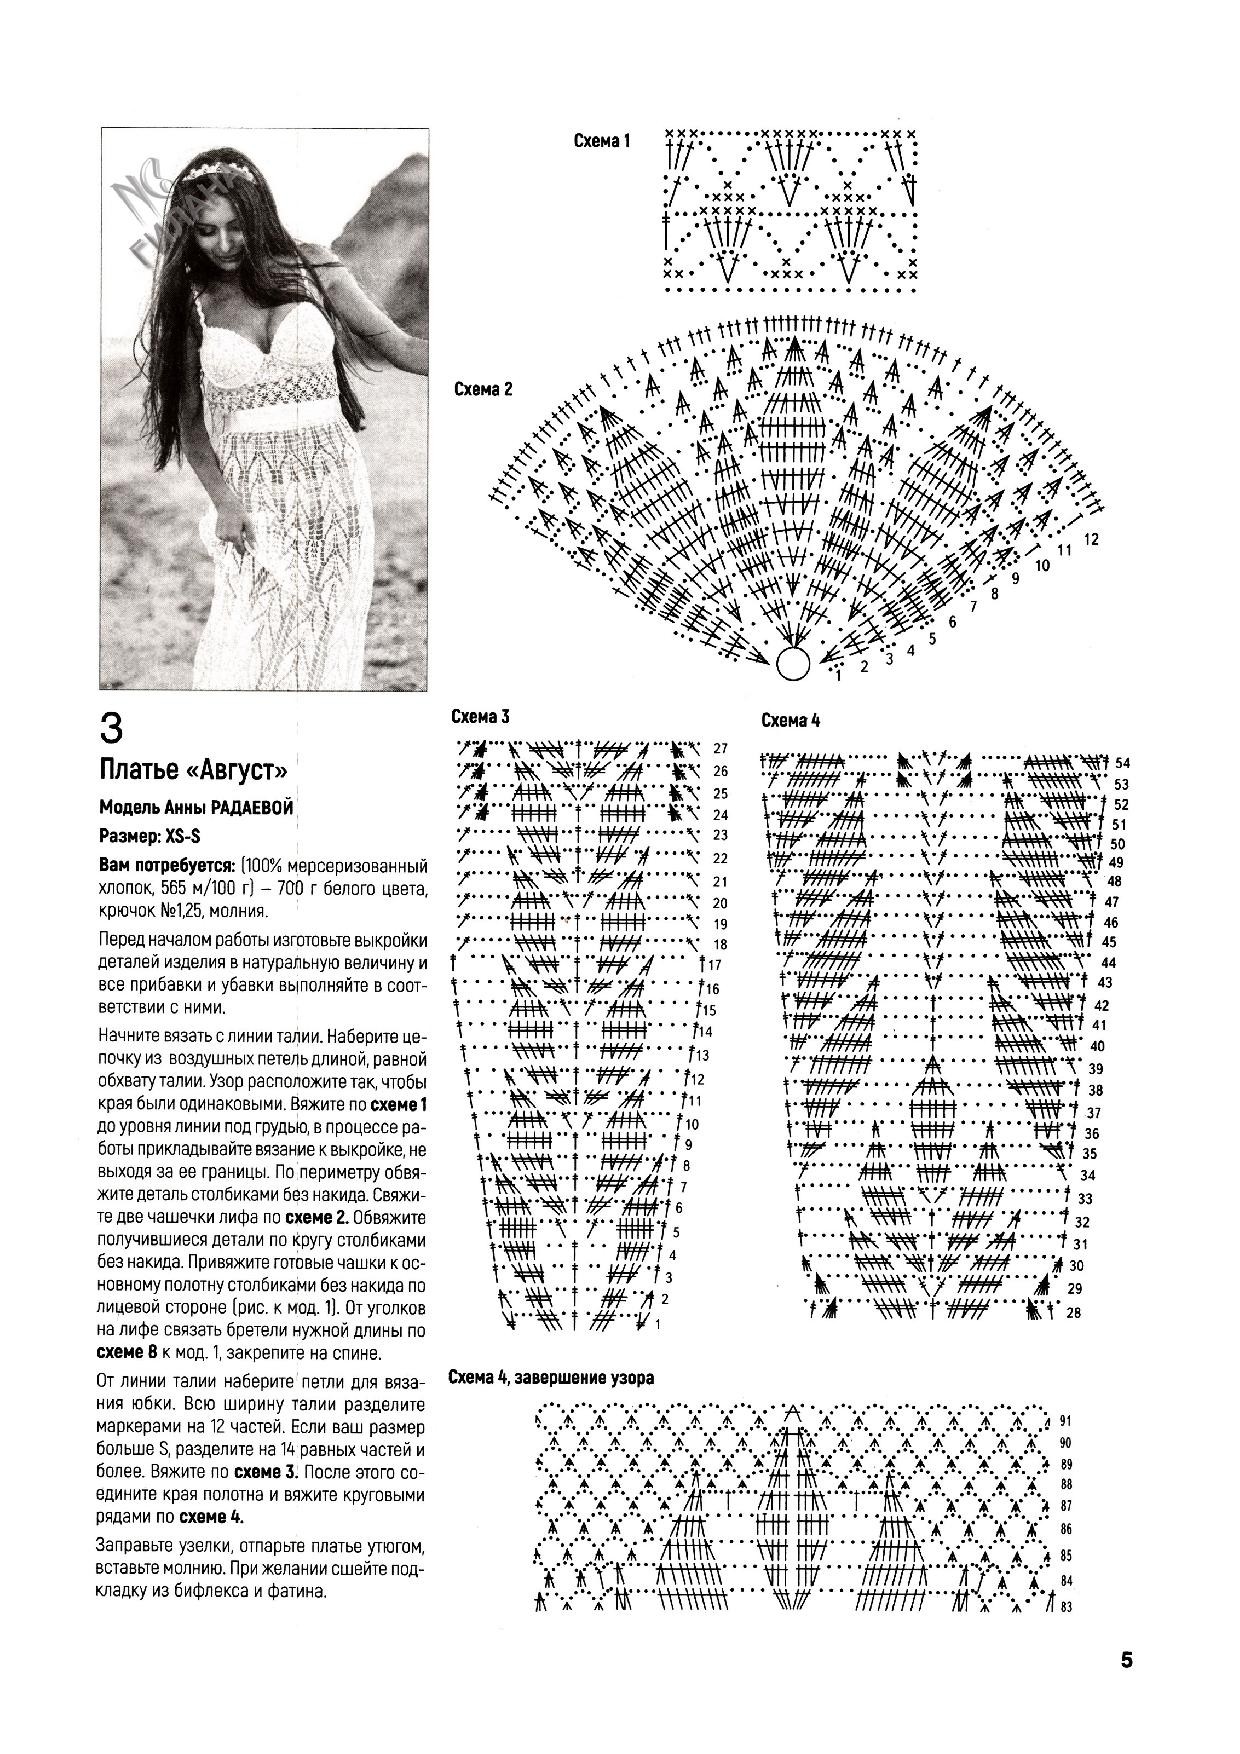
Delicate


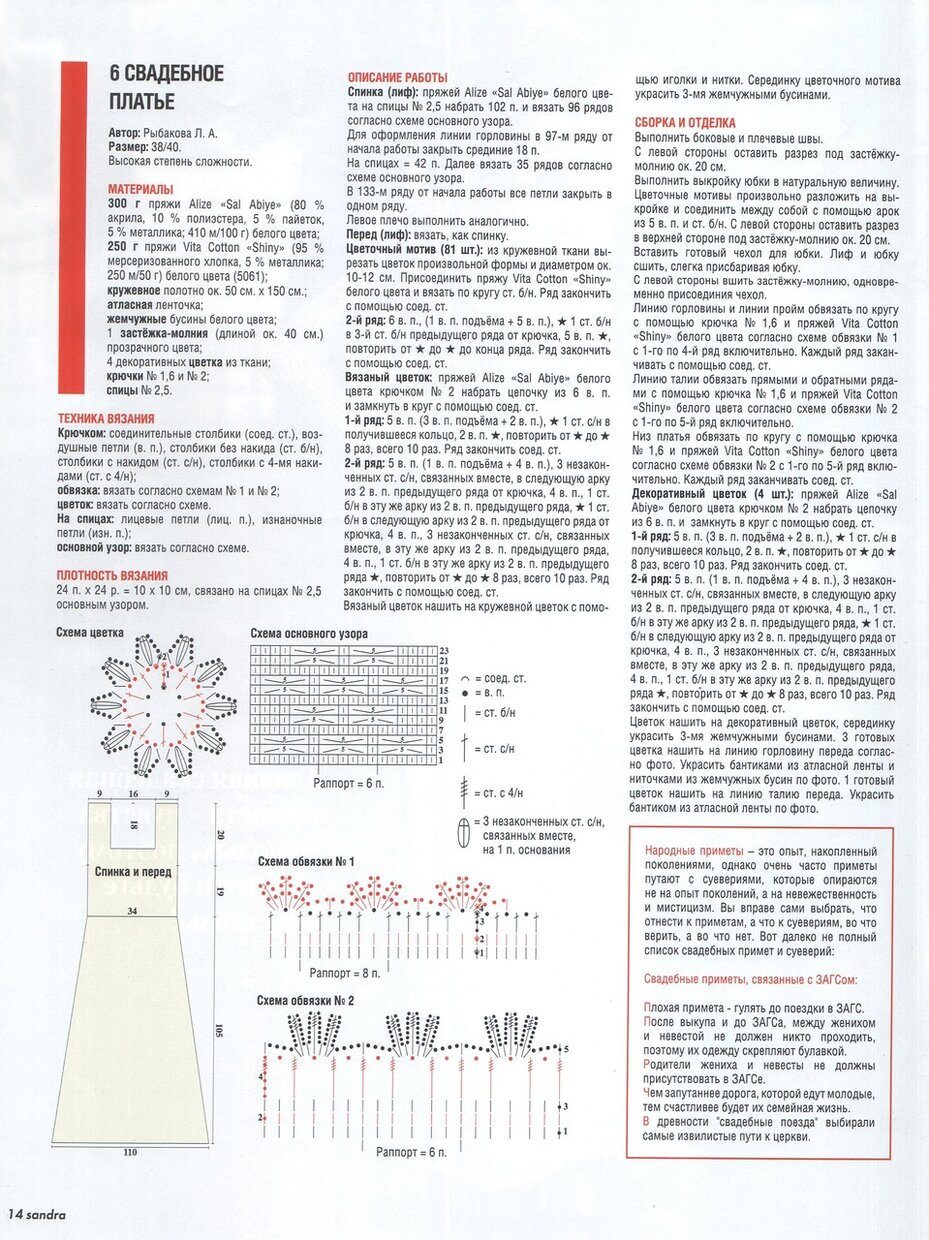
WEDDING DRESS
Author: L. A. Rybakova
Size: 38/40 (European sizing)
Difficulty level: High
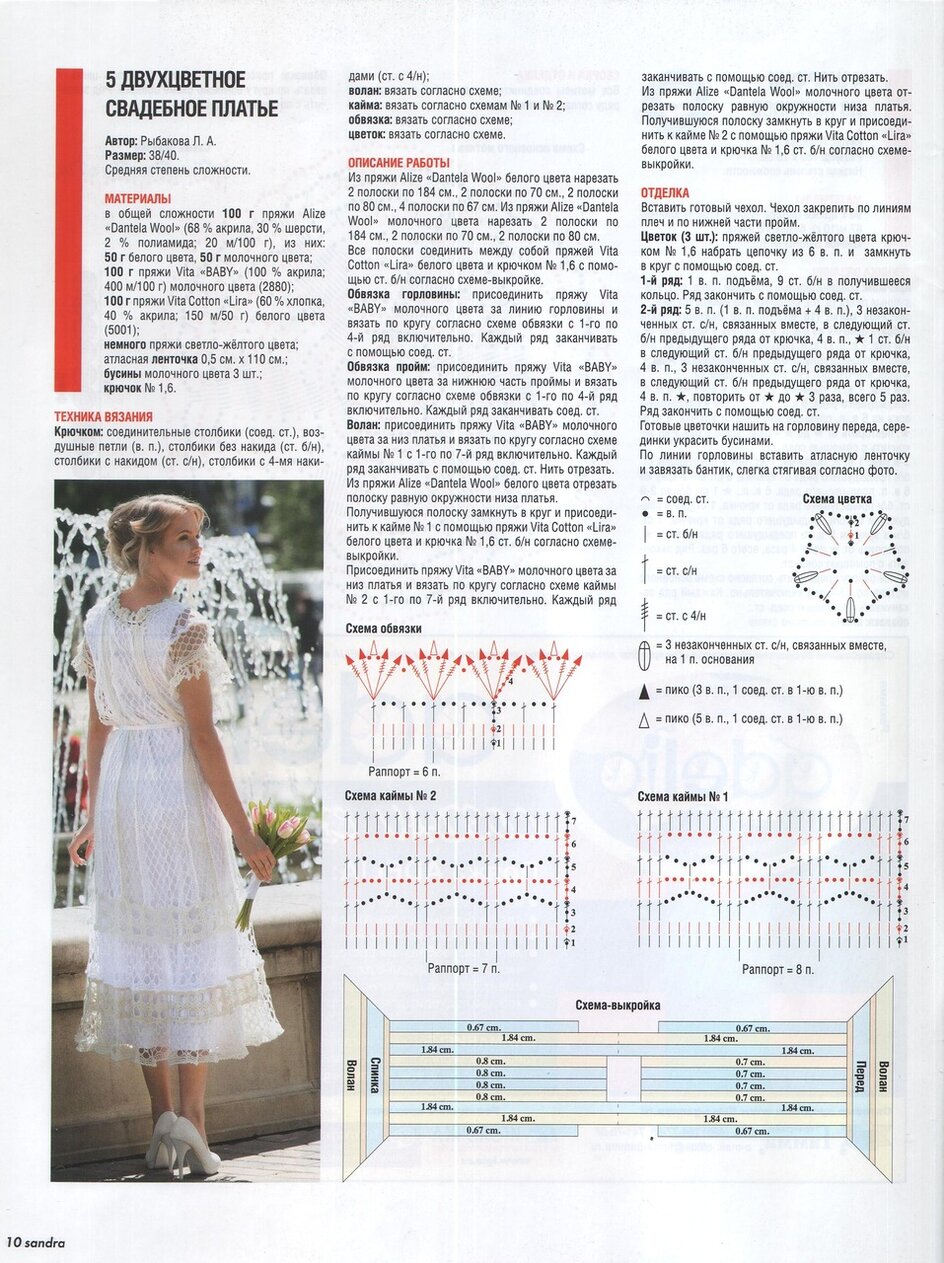
MATERIALS:
- 300 g of Alize Sal Abiye yarn (80% acrylic, 10% polyester, 5% sequins, 5% metallic; 410 m/100 g) in white
- 250 g of Vita Cotton Shiny yarn (95% mercerized cotton, 5% metallic; 250 m/50 g) in white (color 5061)
- Lace fabric approx. 50 cm x 150 cm
- Satin ribbon
- White pearl beads
- 1 zipper (approx. 40 cm), transparent color
- 4 decorative fabric flowers
- Crochet hooks No. 1.6 and No. 2
- Knitting needles No. 2.5
KNITTING/ CROCHET TECHNIQUES:
- Crochet: slip stitches (sl st), chain stitches (ch), single crochet (sc), double crochet (dc), quadruple treble crochet (dc with 4 yarn overs)
- Edging: work according to charts No. 1 and No. 2
- Flowers: crochet according to the chart
- Knitting: knit stitches (k), purl stitches (p)
- Main pattern: knit according to chart
GAUGE:
24 stitches x 24 rows = 10 x 10 cm, knitted with needles No. 2.5 using the main pattern.
WORK DESCRIPTION
Back (bodice):
Using Alize “Sal Abiye” white yarn and knitting needles No. 2.5, cast on 102 stitches and knit 96 rows according to the main pattern chart.
To shape the neckline, in the 97th row from the beginning, bind off the middle 18 stitches.
You will have 42 stitches remaining on the needles. Continue knitting 35 rows following the main pattern chart.
In the 133rd row from the start, bind off all stitches in one row.
Knit the left shoulder in the same way.
Front (bodice):
Knit the same as the back.
Flower motif (81 pieces):
Cut flowers of any shape from lace fabric about 10–12 cm in diameter. Attach white Vita Cotton Shiny yarn and crochet around the edge with single crochet (sc). Finish the round with a slip stitch (sl st).
2nd round:
Chain 6, (1 chain to lift, 5 chains), 1 sc in the 3rd sc of the previous row from the hook, 5 chains; repeat from * to * around. End the round with a slip stitch.
Crocheted flower:
Using Alize “Sal Abiye” white yarn and crochet hook No. 2, chain 6 and join into a ring with a slip stitch.
1st round:
Chain 5 (counts as 3 chains to lift + 2 chains), 1 dc in the ring, 2 chains; repeat from * to * 8 times, total 10 times. End the round with a slip stitch.
2nd round:
Chain 5 (1 chain to lift, 4 chains), unfinished double crochets worked together into the next 2-chain space of the previous round from the hook, 4 chains, 1 sc into the same 2-chain space, 1 sc into the next 2-chain space from the previous round, 4 chains, 3 unfinished double crochets worked together into the same 2-chain space, 4 chains, 1 sc into the same 2-chain space; repeat from * to * 8 times, total 10 times. End the round with a slip stitch.
Sew the crocheted flower onto the lace flower with the help of the diagram.
ASSEMBLY AND FINISHING
Sew the side and shoulder seams.
Leave an opening about 20 cm on the left side for the zipper closure.
Make a full-scale pattern for the skirt.
Arrange the flower motifs freely on the pattern and join them together using arches of 5 chain stitches and single crochet stitches. Leave an opening about 20 cm at the top left side for the zipper closure.
Insert the finished skirt lining. Sew the bodice and skirt together, slightly gathering the skirt.
Sew in the zipper on the left side, simultaneously attaching the lining.
Crochet around the neckline and armholes using crochet hook No. 1.6 and white Vita Cotton “Shiny” yarn according to edging chart No. 1, working rows 1 through 4 inclusive. End each row with a slip stitch.
Crochet the waistline edging back and forth using crochet hook No. 1.6 and white Vita Cotton “Shiny” yarn according to edging chart No. 2, rows 1 through 5 inclusive.
Crochet around the hem of the dress using crochet hook No. 1.6 and white Vita Cotton “Shiny” yarn according to edging chart No. 2, rows 1 through 5 inclusive. End each row with a slip stitch.
Decorative flowers (4 pieces):
Using Alize “Sal Abiye” white yarn and crochet hook No. 2, chain 6 and join into a ring with a slip stitch.
1st row:
Chain 5 (3 chains to lift + 2 chains), 1 double crochet in the ring, 2 chains, repeat from * to * 8 times, total 10 times. End the row with a slip stitch.
2nd row:
Chain 5 (1 chain to lift + 4 chains), 3 unfinished double crochets worked together into the next 2-chain space from the previous row, 4 chains, 1 single crochet in the same 2-chain space, 1 single crochet in the next 2-chain space, 4 chains, 3 unfinished double crochets worked together into the same 2-chain space, 4 chains, 1 single crochet in the same 2-chain space; repeat from * to * 8 times, total 10 times. End the row with a slip stitch.
Sew the crocheted flower onto the decorative flower, and decorate the center with 3 pearl beads.
Sew the finished flowers along the front neckline as shown in the photo.
Decorate with satin ribbon bows and strands of pearl beads as shown.
Sew one finished flower on the front waistline.
Decorate it with a satin ribbon bow as shown in the photo.
Crochet Wedding Bag
MATERIALS
- 50 g of Vita Cotton Shiny yarn (95% mercerized cotton, 5% metallic; 250 m/50 g), white (color 5061)
- Satin ribbon
- White pearl beads
- Satin fabric for lining
- Crochet hook No. 1.6
CROCHET TECHNIQUES
- Slip stitch (sl st)
- Chain stitch (ch)
- Single crochet (sc)
- Double crochet (dc)
- Double treble crochet (dc with 2 yarn overs)
- Triple treble crochet (dc with 3 yarn overs)
Main pattern worked according to chart.
INSTRUCTIONS
Using white yarn and crochet hook No. 2, chain 8 and join into a ring with a slip stitch.
1st round:
Chain 5 (counts as 3 chains to lift + 2 chains).
1 double crochet into the ring, 2 chains — repeat 10 times, total 12 times. End the round with a slip stitch.
2nd round:
Chain 3 to lift, 2 double crochets into the 2-chain space of the previous round, 2 chains, 3 double crochets into the next 2-chain space, 2 chains; repeat 10 times, total 12 times. End the round with a slip stitch.
3rd round:
Chain 4 to lift, 1 unfinished double treble crochet worked together with the 4 chains to lift into the 2nd double crochet of the previous round, 7 chains, 2 unfinished double treble crochets worked together into the next 2 double crochets of the previous round, 7 chains; repeat 10 times, total 12 times.
ASSEMBLY AND FINISHING
Cut a circle from satin fabric equal in diameter to the finished crochet piece and sew it to the wrong side along the 9th row using needle and thread.
Thread a satin ribbon through the arches of the 11th row.
Decorate with strands of pearl beads as shown in the photo.

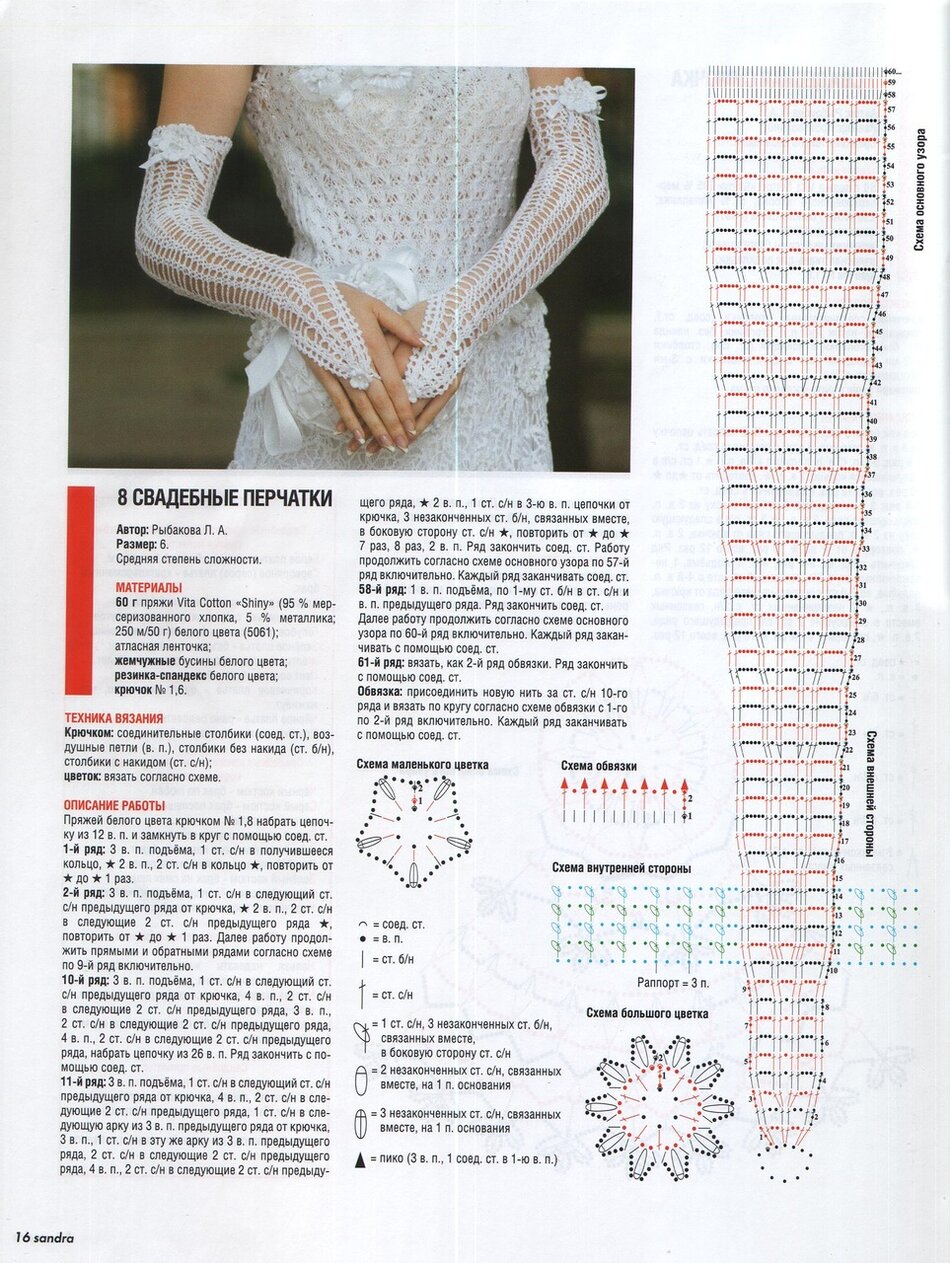
Wedding Gloves to Crochet
Size: 6
Difficulty: Medium
MATERIALS
- 60 g of Vita Cotton Shiny yarn (95% mercerized cotton, 5% metallic; 250 m/50 g) white (color 5061)
- Satin ribbon
- White pearl beads
- White spandex elastic band
- Crochet hook No. 1.6
CROCHET TECHNIQUES
- Slip stitch (sl st)
- Chain stitch (ch)
- Single crochet (sc)
- Double crochet (dc)
Flower motif worked according to chart.
INSTRUCTIONS (Summary of the beginning steps):
Using white yarn and crochet hook No. 1.8, chain 12 and join into a ring with slip stitch.
1st row: Chain 3 to lift, 1 dc into the ring, 2 chains, 2 dc into the ring; repeat as indicated.
2nd row: Chain 3 to lift, 1 dc into the next dc of previous row, 2 chains, 2 dc into next 2 dc of previous row; repeat accordingly.
Continue working back and forth rows following the chart through the 9th row.
10th row: Chain 3 to lift, 1 dc in next dc, 4 chains, 2 dc in next 2 dc, 3 chains, 2 dc in next 2 dc, 4 chains, 2 dc in next 2 dc, chain 26; finish the row with a slip stitch.
11th row: Chain 3 to lift, 1 dc in next dc, 4 chains, 2 dc in next 2 dc, 1 dc in next 3-chain arch, 3 chains, 1 dc in the same 3-chain arch, 2 dc in next 2 dc, 4 chains, 2 dc in next 2 dc, and so on.


| Вязаная свадебная шапочка с жемчугом |
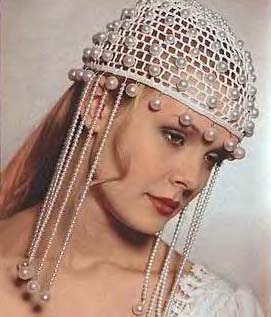
Эта свадебная шапочка (р-р. 57) выполнена крючком. Чтобы связать ее, вам потребуется: 50 г. х/б нитей «Снежинка»; крючок №51; искусственный жемчуг для отделки головного убора 16 шт. диаметром 1,3, 32 шт. диаметром 1 см, 48 шт. диаметром 0,7 см и 60 шт. диаметром 0,5, для подвесок 420 шт. диаметром 0,5 см и 10 шт. диаметром 1, 3 см.
Описание работы
Провяжите 6 рядов по схеме 1, затем вяжите прямо по схеме 2 15-17 см. Достигнув необходимой глубины, для ободка вяжите из ниток в 2 сложения 2 ряда СБН, причем во 2-м ряду крючок вводите за заднюю стенку косички. Искусственный жемчуг пришейте между столбиками по схеме 2, начиная с мелких жемчужин на макушке и постепенно переходя на больший диаметр. Подвески длиной 26 см выполните, ориентируясь на снимок.
Crocheted Wedding Hat with Pearls
Size: 57 cm head circumference
Materials Needed:
- 50 g of cotton thread “Snezhnika” (Snowflake – or similar fine crochet cotton)
- Crochet hook No. 1.5
- Artificial pearls for embellishment:
- 16 pieces – diameter 1.3 cm
- 32 pieces – diameter 1 cm
- 48 pieces – diameter 0.7 cm
- 60 pieces – diameter 0.5 cm
- For fringe-style dangling pearl strands (pendants):
- 420 pieces – diameter 0.5 cm
- 10 pieces – diameter 1.3 cm
Instructions:
- Crown of the Hat:
Start by crocheting 6 rounds following Chart 1 (a circular motif). - Body of the Hat:
Continue working straight (without increases) using Chart 2 for about 15–17 cm, or until the desired depth of the hat is reached. - Hat Band / Brim:
- Switch to double strands of thread.
- Work 2 rounds of single crochet (sc).
- In the second round, insert the hook into the back loop only of each stitch to create a subtle decorative ridge and flexible brim.
- Pearl Embellishment:
- Sew pearls between stitches along the Chart 2 pattern.
- Start with smaller pearls at the top (crown) and gradually increase the size of pearls as you move downward. This creates a beautiful gradient effect.
- Dangling Pearl Strands (Fringe):
- Create pendants about 26 cm long, referencing the original photo for placement and density.
- These are typically attached around the brim and consist of threads strung with small pearls and finished with a larger bead at the end.


