Size: 0–3 months
Difficulty: ★★☆☆☆
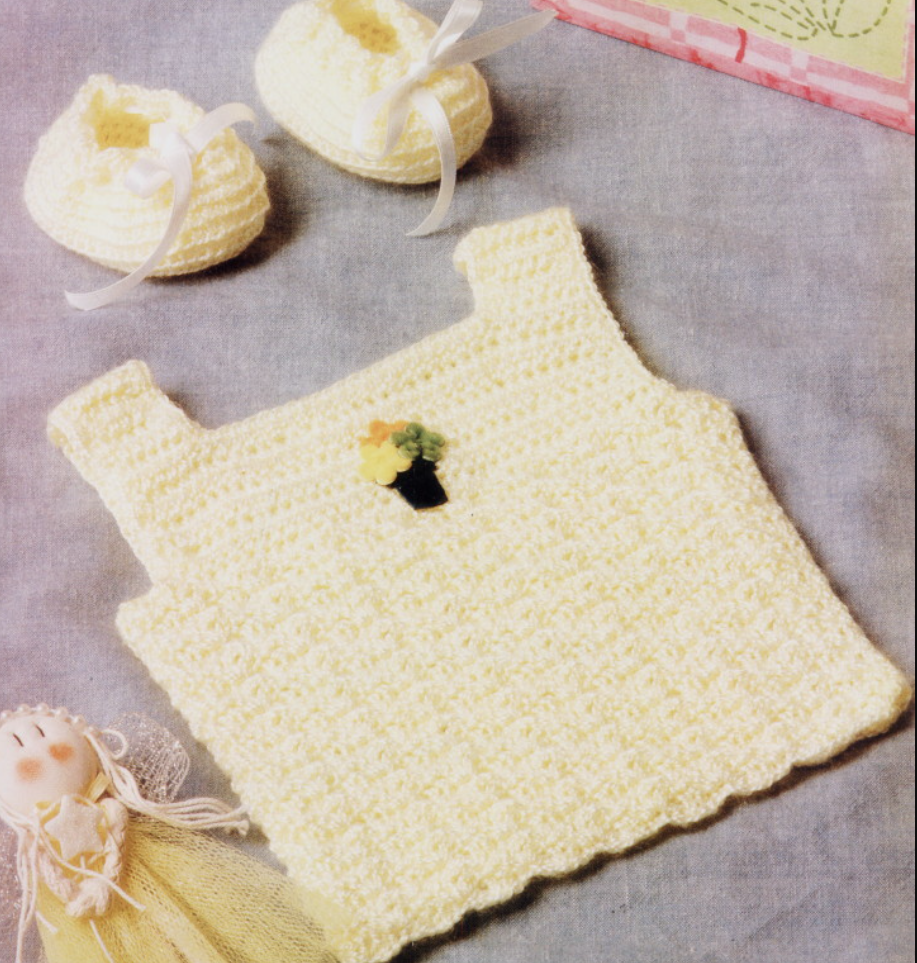
A sweet newborn set consisting of a lightweight t-shirt and matching booties. The t-shirt is worked in a delicate stitch pattern with soft armholes and features a small appliqué on the front. The booties have horizontal textured relief and a ribbon threaded through a row of eyelets to tie a front bow. This set is soft, comfortable, and perfect for everyday wear or special occasions.
Materials
T-shirt:
- 80 g summer acrylic yarn, single strand, yellow
- Crochet hook size 2 mm
- 4 small buttons
- 1 small appliqué
- 70 cm white satin ribbon
Booties:
- Same yarn and crochet hook size 2 mm
Abbreviations
- ch — chain
- sc — single crochet
- hdc — half double crochet
- dc — double crochet
- sl st — slip stitch
Pattern Stitch
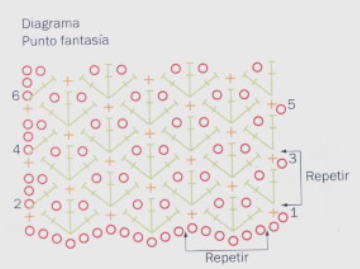
Work according to the stitch diagram.
Gauge
10 × 10 cm = 27 stitches in pattern stitch with 2 mm hook
T-Shirt
Back and Front
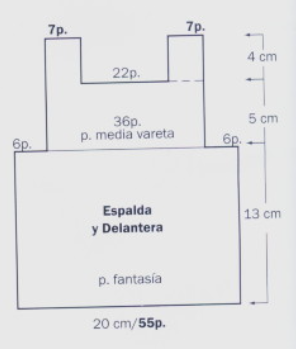
- With 2 mm hook, make a foundation chain of 55 ch + 1 ch to turn.
- Work in pattern stitch, continuously repeating the 2nd and 3rd rows of the diagram.
Armhole Shaping:
- When the piece reaches 15 cm total height, begin the armholes by slipping 6 sl st at the start of the row, chain 2, and continue in hdc, taking each double crochet and half double crochet from the previous row (do not work into the chain spaces of the motif).
- Finish the row, cut the yarn, and turn. You should have 36 stitches remaining.
Neckline and Shoulder Shaping:
- At 5 cm of armhole height, leave the 22 central stitches free for the neckline.
- Continue separately with the 7 stitches at each end for the shoulders, working 4 cm in height.
- Cut the yarn and fasten off.
- Make 2 identical pieces.
Assembly and Finishing for the T-Shirt
- Sew the side seams.
- Work 1 row of sc around the armholes, straps, and neckline on both pieces.
- Attach 2 buttons to each strap on the back and create corresponding buttonholes on the front (see manual).
- Sew the appliqué onto the front.
Booties
- Start with the sole: using a 2 mm hook, chain 9 + 2 ch to turn.
- Work hdc following the diagram for 3 rows (50 stitches).
- Continue in hdc for all rows, working into the back loop only from the previous row to create horizontal texture.
- Work 7 rows this way, chaining 2 at the start of each row and finishing with 1 sl st.

Eyelet Row (for ribbon):
- Work 1 row of eyelets: ch 2 to start, 1 ch space, 1 hdc skipping a stitch from the previous row, repeat across the row.
- End with 1 ch and join with a sl st.
Final Row:
- Work 1 row of hdc, cut the yarn, and fasten off.
- Make 2 booties.
- Cut 35 cm of satin ribbon and thread it through the eyelets, tying a bow at the front.
Camiseta con escarpines para bebé (0–3 meses)
Talle: 0–3 meses
Dificultad: ★★☆☆☆
Descripción del modelo
Conjunto delicado para recién nacido, compuesto por una camiseta ligera y escarpines a juego. La camiseta se teje en punto fantasía, con sisas suaves y detalle de aplicación infantil, mientras que los escarpines combinan textura en relieve y pasacintas con moño frontal, aportando estilo y comodidad. Perfecto para los primeros meses de vida, ideal tanto para uso diario como para ocasiones especiales.
Materiales
Camiseta:
- 80 g de fibra acrílica de verano, hebra simple, color amarillo
- Aguja de crochet Nº 2
- 4 botones pequeños
- 1 aplicación infantil
- 70 cm de cinta de raso blanca
Escarpines:
- La misma hebra y aguja de crochet Nº 2
Abreviaturas
- pc — punto cadena
- mp — medio punto (punto bajo)
- m.p.a. — medio punto alto
- pa — punto alto
- pe — punto enano
Punto fantasía
Seguir el diagrama proporcionado.
Muestra
10 × 10 cm = 27 puntos en punto fantasía con aguja Nº 2
Camiseta
Espalda y delantera
- Con aguja Nº 2, hacer una cadena base de 55 pc + 1 pc para girar.
- Continuar en punto fantasía repitiendo constantemente la 2ª y 3ª hilera del diagrama.
Formación de sisas:
- Al alcanzar 15 cm de altura total, iniciar las sisas deslizando 6 pe al inicio de la hilera, subir con 2 pc, y continuar en m.p.a., tomando cada punto alto y medio punto de la hilera anterior, es decir, sin tejer sobre los puntos cadena de cada motivo.
- Finalizar la hilera, cortar y girar el tejido. Quedan 36 puntos.
Formación del escote:
- A los 5 cm de altura de la sisa, dejar libres los 22 pts centrales y continuar separadamente con los 7 pts de cada extremo, formando los hombros durante 4 cm de altura.
- Cortar la hebra y rematar.
- Hacer 2 partes iguales.
Armado y terminación de la camiseta
- Coser los costados del cuerpo.
- Tejer 1 hilera de medio punto alrededor de las sisas, los breteles y el escote en ambas partes.
- Aplicar 2 botones en cada bretel de la parte posterior y abrir los ojales correspondientes en la parte delantera (ver manual).
- Pegar la aplicación infantil en la delantera.
Escarpines
- Comenzar por la base: con aguja Nº 2, tejer 9 pc + 2 pc para subir.
- Continuar en m.p.a. siguiendo el diagrama por 3 hileras (50 puntos).
- Luego, continuar todas las hileras en m.p.a. tomando la hebra de atrás del punto de la hilera anterior, formando un relieve horizontal.
- Tejer 7 hileras siguiendo esta técnica, subiendo con 2 pc y terminando con 1 pe en cada hilera.
Pasacintas:
- Tejer 1 hilera de pasacintas: 2 pc para subir, 1 pc al aire, 1 m.p.a. saltando 1 punto de la hilera anterior, repetir hasta el final de la hilera.
- Terminar con 1 pc y unir con pe.
Finalización:
- Tejer 1 hilera de m.p.a., cortar la hebra y rematar.
- Hacer 2 escarpines iguales.
- Cortar 35 cm de cinta de raso y pasarla por el pasacintas, haciendo un moño en el frente.
Футболка с пинетками для младенца (0–3 месяца)
Размер: 0–3 месяца
Сложность: ★★☆☆☆
Нежный комплект для новорожденного: лёгкая футболка и пинетки в комплекте. Футболка вяжется узором «фантазия», с мягкими проймами и маленькой аппликацией на переде. Пинетки имеют горизонтальный рельеф и ряд для ленточки, которую можно завязать бантом спереди. Комплект мягкий, удобный и подходит как для повседневного ношения, так и для особых случаев.
Материалы
Футболка:
- 80 г летнего акрилового волокна, нить в одну сложение, желтый цвет
- Крючок № 2 мм
- 4 маленькие пуговицы
- 1 детская аппликация
- 70 см белой атласной ленты
Пинетки:
- Та же пряжа и крючок № 2 мм
Условные обозначения
- в.п. — воздушная петля
- сбн — столбик без накида
- пссн — полустолбик с накидом
- ссн — столбик с накидом
- соед. ст. — соединительный столбик
Узор «Фантазия»
Вязать согласно схеме.
Плотность вязания
10 × 10 см = 27 петель в узоре «Фантазия» крючком № 2
Футболка
Спинка и перед
- Крючком № 2 набрать цепочку из 55 в.п. + 1 в.п. для подъёма.
- Продолжить узором «фантазия», постоянно повторяя 2-й и 3-й ряды схемы.
Формирование пройм:
- На высоте 15 см начать проймы: пропустить 6 соед. ст. в начале ряда, подняться с 2 в.п., продолжать вязать пссн, захватывая каждый столбик с накидом и полустолбик предыдущего ряда (не вязать по воздушным петлям мотива).
- Закончить ряд, обрезать нить и повернуть работу. Должно остаться 36 петель.
Формирование горловины и плеч:
- На 5 см высоты проймы оставить 22 центральные петли свободными для горловины.
- Продолжить отдельно с 7 петель с каждого края для плеч, связав 4 см.
- Обрезать нить и закрепить.
- Сделать 2 одинаковые части.
Сборка и отделка футболки
- Сшить боковые швы.
- Обвязать 1 рядом сбн проймы, бретели и горловину с обеих частей.
- Пришить по 2 пуговицы на каждую бретель сзади и сделать соответствующие петли на переде (см. руководство).
- Приклеить или пришить аппликацию на перед.
Пинетки
- Начать с основания: крючком № 2 набрать 9 в.п. + 2 в.п. для подъёма.
- Вязать пссн по схеме 3 ряда (50 петель).
- Далее вязать все ряды пссн, захватывая только заднюю стенку столбика, создавая горизонтальный рельеф.
- Связать 7 рядов, поднимая 2 в.п. в начале ряда и заканчивая 1 соед. ст.
Ряд для ленточки:
- Связать 1 ряд для ленточки: 2 в.п. подъёма, 1 в.п. пропуск, 1 пссн, пропуская 1 петлю предыдущего ряда, повторять по всей длине.
- Закончить 1 в.п. и соединить соед. ст.
Завершение:
- Связать 1 ряд пссн, обрезать нить и закрепить.
- Сделать 2 одинаковые пинетки.
- Отрезать 35 см атласной ленты и продеть её через ряд для ленточки, завязав бантик спереди.