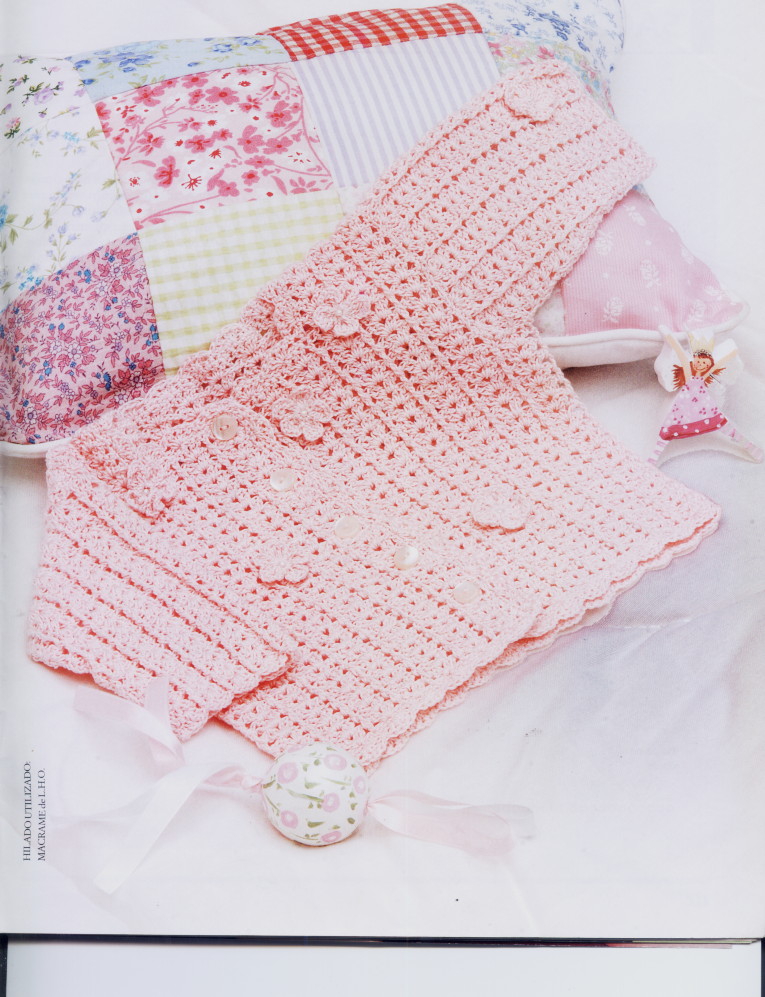
Baby Jacket Crochet Pattern with flowers Free Pattern. This sweet crochet baby cardigan is perfect for little ones aged 6–9 months. Made in soft pink mercerized cotton, it features a delicate openwork stitch pattern, pretty scalloped edging, and charming handmade crochet flowers with bead centers for a touch of sparkle. The cardigan is worked seamlessly in one piece for the body, with set-in sleeves that are crocheted from the top down for a neat finish. Front post stitches add subtle texture, while the airy lace design keeps it lightweight and breathable — ideal for layering in any season. Finished with matching buttons and dainty detailing, it’s a beautiful combination of comfort and elegance, perfect for special occasions or everyday wear.
Size:
6–9 months
Difficulty:
—
Materials:
- 100 g mercerized macramé cotton yarn, single strand, in pink
- Crochet hook size 2.5 mm
- 5 matching buttons
- 7 small beads
Stitches Used:
- Chain stitch
- Single crochet (sc)
- Half double crochet (hdc)
- Slip stitch (sl st)
- Double crochet (dc)
- Front post double crochet (fpdc)
- Treble crochet (tr)
- Magic ring (see manual for instructions)
Pattern stitch:
Work according to the stitch diagram, with a multiple of 6 + 1 chain.

Edging:
According to the edging diagram.
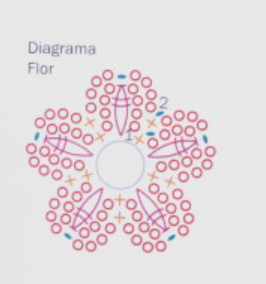
Flower:
According to the flower diagram.
Gauge:
10 cm = 32 sts in hdc using 2.5 mm hook.
Body
Work in one piece.
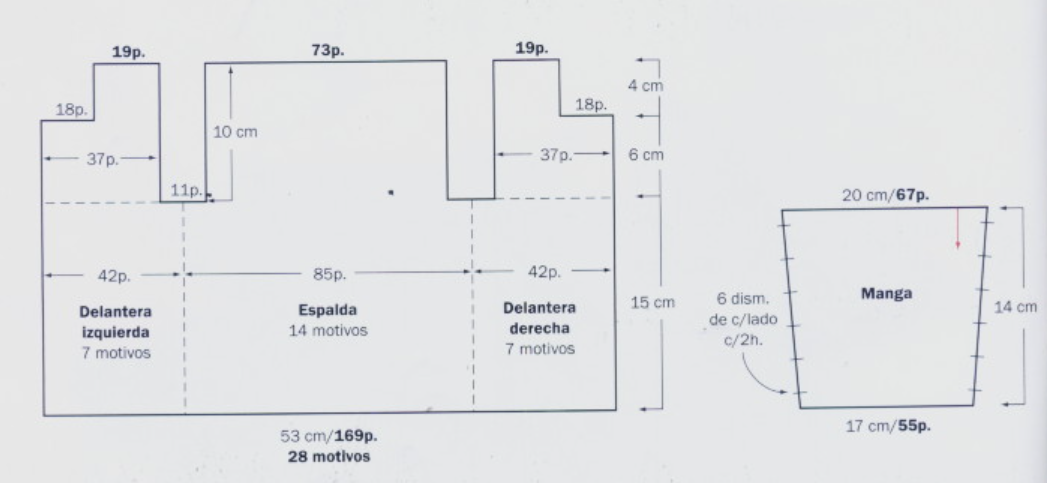
With 2.5 mm hook, make a foundation chain of 169 chains + 3 chains to turn.
Work in pattern stitch following the diagram, always repeating the 3rd and 4th rows.
When work measures 15 cm in height, begin armholes by dividing the piece into 3 parts:
- First 37 sts = right front
- Next 11 sts = armhole
- Middle 73 sts = back
- Next 11 sts = armhole
- Last 37 sts = left front
For the back (73 sts), continue working straight for 10 cm, fasten off, and weave in ends.
For the right front, work over the first 37 sts. When armhole measures 6 cm, slip stitch across the first 18 sts for the neckline shaping. Continue over the remaining 19 sts until armhole measures 10 cm in total.
For the left front, work over the last 37 sts in the same way as the right front, but reversed — for the neckline shaping, finish the row 18 sts before the end, turn work, and continue. Fasten off and weave in ends.
Sleeves
Worked from the top down toward the cuff.
Make a chain of 67 chains + 3 chains to turn and begin the pattern stitch from the 5th row of the diagram.
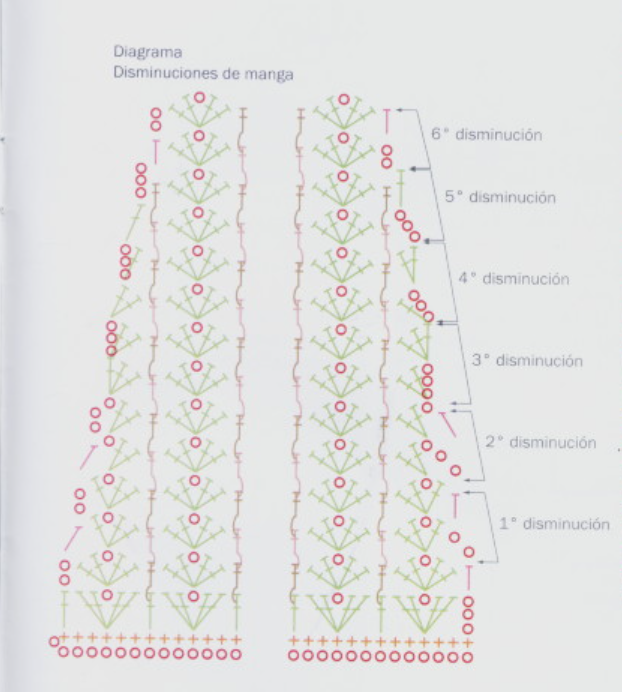
After 4 rows straight, decrease 1 st each side every 2 rows (as shown in the diagram) — 6 times — until 55 sts remain.
When sleeve measures 14 cm, fasten off and weave in ends.
Sleeve decreasese
Assembly and Finishing
- Sew shoulder seams and side seams, leaving a 2 cm opening at the top for the sleeve cap.
- Sew the sleeves, matching the center of the sleeve top to the shoulder seam, and matching the 2 cm opening with the closed stitches at the armhole to form a right angle.
Edging:
Work 1 row of single crochet around both fronts and neckline, then work the edging pattern from the diagram, including the lower edge.
Flowers:
Make a magic ring and work following the flower diagram in the round until the 2nd row is complete, joining each round with a slip stitch. Fasten off and weave in ends. Make several identical flowers.
Sew flowers onto the cardigan:
- 1 on each cuff
- 2 on the right front
- 3 on the left front
Sew 1 bead in the center of each flower.
On the left front, sew on the buttons, using the openwork of the stitch pattern as buttonholes.
Жакет крючком с цветами для девочки
Размер: 6–9 месяцев
Сложность: ★★★☆☆
Описание модели
Очаровательный детский жакет, связанный из мерсеризованного хлопка нежно-розового цвета, станет изюминкой гардероба малышки. Лёгкий ажурный узор, изящная обвязка и вязаные цветы с бусинами в центре придают изделию неповторимый шарм. Модель вяжется единым полотном до пройм, с втачными рукавами, связанными сверху вниз. Жакет удобен, лёгок и прекрасно подойдёт как для торжества, так и для повседневной носки.
Материалы
- 100 г мерсеризованного хлопкового шнура (макраме), одинарная нить, розовый цвет
- Крючок № 2,5
- 5 пуговиц в тон
- 7 бусинок
Условные обозначения
- ВП — воздушная петля
- СБН — столбик без накида
- ПССН — полустолбик с накидом
- СС — соединительный столбик
- ССН — столбик с накидом
- РССН — рельефный столбик с накидом
- СС2Н — столбик с двумя накидами
- КА — кольцо амигуруми
Узор «Фантазия»
Вязать по схеме. Количество петель кратно 6 + 1 ВП.
Обвязка
Выполнить по схеме обвязки.
Цветок
Выполнить по схеме цветка.
Плотность вязания
10 × 10 см = 32 п. ПССН крючком № 2,5
Описание работы
Спинка и полочки
Вяжется одной деталью.
Набрать цепочку из 169 ВП + 3 ВП подъёма.
Вязать узором «Фантазия» по схеме, постоянно повторяя 3-й и 4-й ряды.
На высоте 15 см разделить полотно на 3 части:
- первые 37 п. — правая полочка
- следующие 11 п. — пройма
- средние 73 п. — спинка
- следующие 11 п. — пройма
- последние 37 п. — левая полочка
Спинка: вязать прямо 10 см, обрезать нить и закрепить.
Правая полочка: вязать на 37 п. На высоте проймы 6 см выполнить горловину — провязать СС первые 18 п., продолжить на оставшихся 19 п. до высоты проймы 10 см.
Левая полочка: вязать аналогично правой, но в зеркальном виде — для горловины закончить ряд, не довязывая 18 п., повернуть работу и продолжить. Обрезать нить.
Рукава
Набрать 67 ВП + 3 ВП подъёма, вязать узором «Фантазия» начиная с 5-го ряда схемы.
После 4 рядов прямо выполнить убавки: убавлять по 1 п. с каждой стороны в каждом 2-м ряду (всего 6 раз) — останется 55 п.
На высоте 14 см обрезать нить и закрепить.
Сборка и отделка
- Выполнить плечевые швы и швы рукавов, оставив сверху 2 см для оката.
- Втачать рукава, совместив центр оката с плечевым швом, а 2 см открытого участка — с закрытыми петлями проймы.
- Обвязать передние края и горловину 1 рядом СБН, затем выполнить обвязку по схеме, включая нижний край.
Цветы:
Связать кольцо амигуруми, затем по схеме цветка до конца 2-го ряда, соединяя каждый ряд СС. Сделать несколько одинаковых цветов.
Декор:
Пришить:
- по 1 цветку на каждый манжет
- 2 цветка на правую полочку
- 3 цветка на левую полочку
В центр каждого цветка пришить бусинку.
На левую полочку пришить пуговицы, используя отверстия узора в качестве петель.
📌 Схемы узора, обвязки и цветка обязательны для выполнения модели.
Chaqueta de crochet con flores para niña
Talle: 6–9 meses
Dificultad: ★★★☆☆
Descripción del modelo
Encantadora chaqueta infantil tejida en algodón mercerizado rosa suave, ideal para bebés de 6 a 9 meses. El delicado punto calado le da ligereza y frescura, mientras que la prolija puntilla y las flores tejidas con perlitas en el centro aportan un toque especial. Se trabaja el cuerpo en una sola pieza hasta las sisas, con mangas montadas que se tejen de arriba hacia abajo para un acabado impecable. Una prenda cómoda, ligera y perfecta tanto para ocasiones especiales como para uso diario.
Materiales
- 100 g de algodón macramé mercerizado, hebra simple, color rosa
- Aguja de crochet Nº 2,5 mm
- 5 botones al tono
- 7 perlitas
Abreviaturas
- pc — punto cadena
- mp — medio punto (punto bajo)
- m.p.a. — medio punto alto
- pe — punto enano
- pa — punto alto
- paR — punto alto en relieve
- pad — punto alto doble
- anilla mágica — anillo mágico
Punto fantasía
Tejer según el diagrama. Número de puntos múltiplo de 6 + 1 pc.
Borde
Realizar según el diagrama de borde.
Flor
Tejer según el diagrama de flor.
Muestra
10 × 10 cm = 32 puntos en medio punto alto con aguja Nº 2,5 mm
Instrucciones
Cuerpo
Se teje en una sola pieza.
Con aguja Nº 2,5 hacer una cadena base de 169 pc + 3 pc para subir.
Tejer en punto fantasía siguiendo el diagrama, repitiendo siempre la 3ª y 4ª hilera.
Al tener 15 cm de altura, comenzar las sisas dividiendo el tejido en 3 partes:
- Primeros 37 pts: delantera derecha
- 11 pts: sisa
- 73 pts centrales: espalda
- 11 pts: sisa
- Últimos 37 pts: delantera izquierda
Espalda: continuar recto sobre 73 pts durante 10 cm, cortar la hebra y rematar.
Delantera derecha: trabajar sobre los 37 pts iniciales. Cuando la sisa mida 6 cm, formar el escote tejiendo puntos enanos sobre los primeros 18 pts, continuar sobre los 19 pts restantes hasta que la sisa mida 10 cm.
Delantera izquierda: trabajar igual que la derecha pero invertida: para el escote, finalizar la hilera 18 pts antes del final, girar y continuar. Cortar la hebra y rematar.
Mangas
Se tejen de arriba hacia abajo.
Hacer una cadena base de 67 pc + 3 pc para subir y comenzar el punto fantasía desde la 5ª hilera del diagrama.
Después de 4 hileras rectas, disminuir 1 pt a cada lado cada 2 hileras (6 veces) hasta quedar con 55 pts.
Cuando la manga mida 14 cm, cortar la hebra y rematar.
Armado y terminación
- Coser los hombros y los costados, dejando 2 cm abiertos en la parte superior de las sisas.
- Coser las mangas, alineando el centro de la copa con la costura de los hombros y haciendo coincidir los 2 cm de la abertura con los puntos cerrados de la sisa para formar un ángulo recto.
- Bordear delanteras y cuello con 1 hilera de medio punto y luego tejer el borde según el diagrama, incluyendo el borde inferior.
Flores:
Hacer una anilla mágica y tejer según el diagrama de flor hasta completar la 2ª hilera, cerrando cada hilera con punto enano. Cortar la hebra y rematar. Hacer varias flores iguales.
Decoración:
- Colocar 1 flor en cada puño
- 2 flores en la delantera derecha
- 3 flores en la delantera izquierda
- Coser una perlita en el centro de cada flor
En la delantera izquierda coser los botones, utilizando el calado del punto como ojal.
📌 Es imprescindible contar con los diagramas del punto fantasía, el borde y las flores para realizar el modelo correctamente.