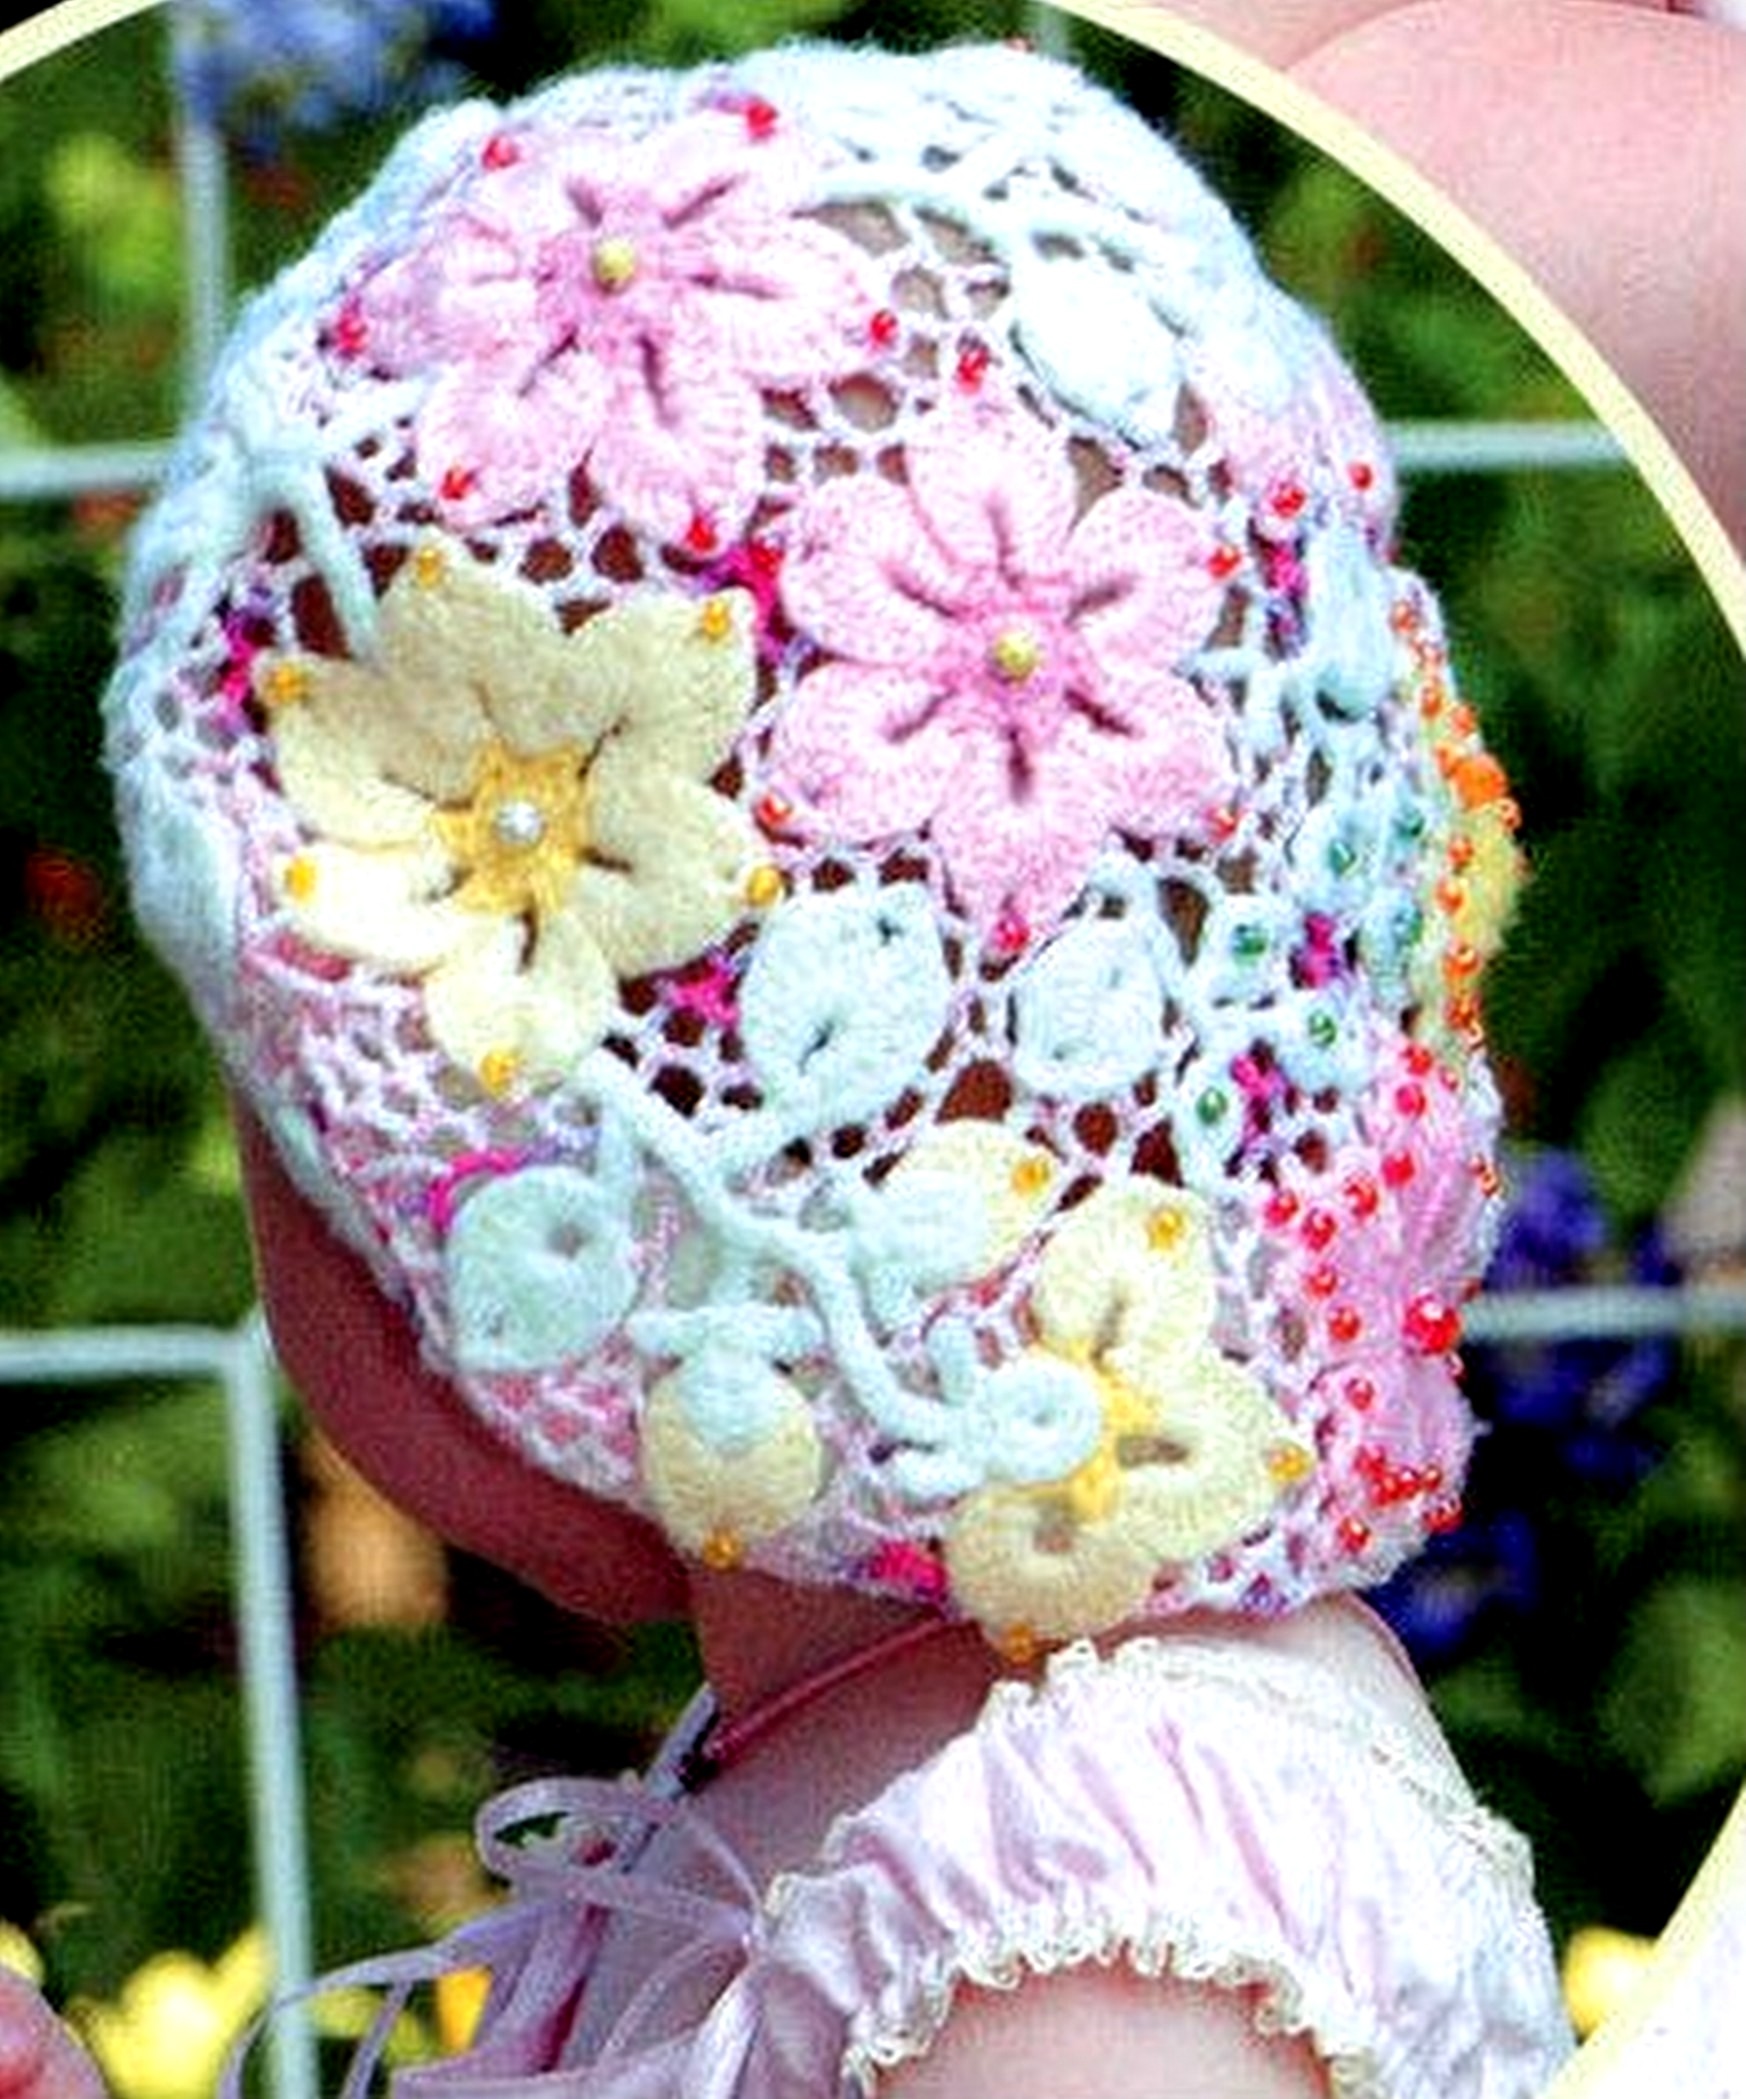
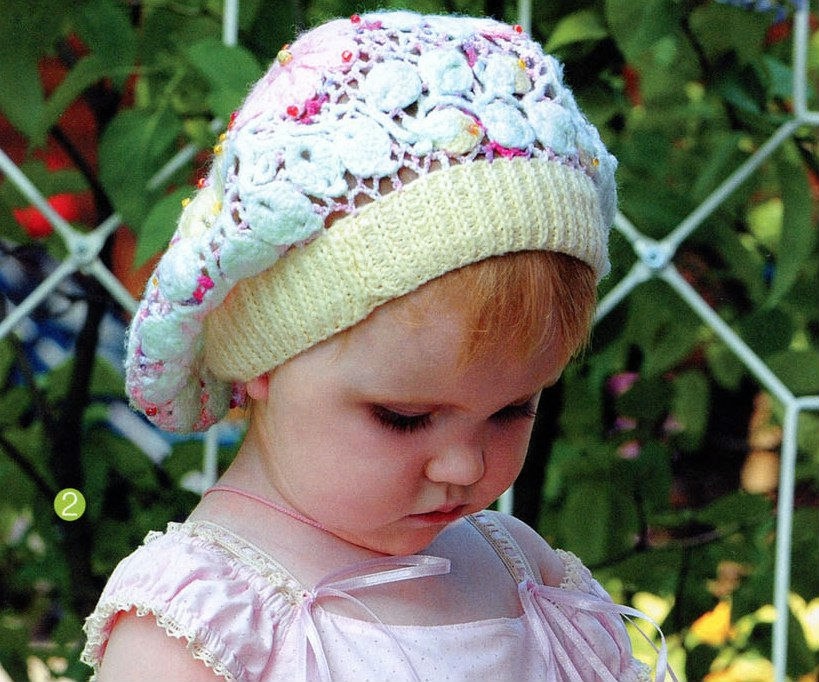
Floral Crochet Beret with Beaded Embellishment For Girls – Free Crochet Pattern.
This delicate and decorative beret combines floral crochet motifs, leafy branches, and a soft openwork mesh background. Finished with a beaded embroidery accent, it’s a light yet expressive accessory — perfect for spring and summer.
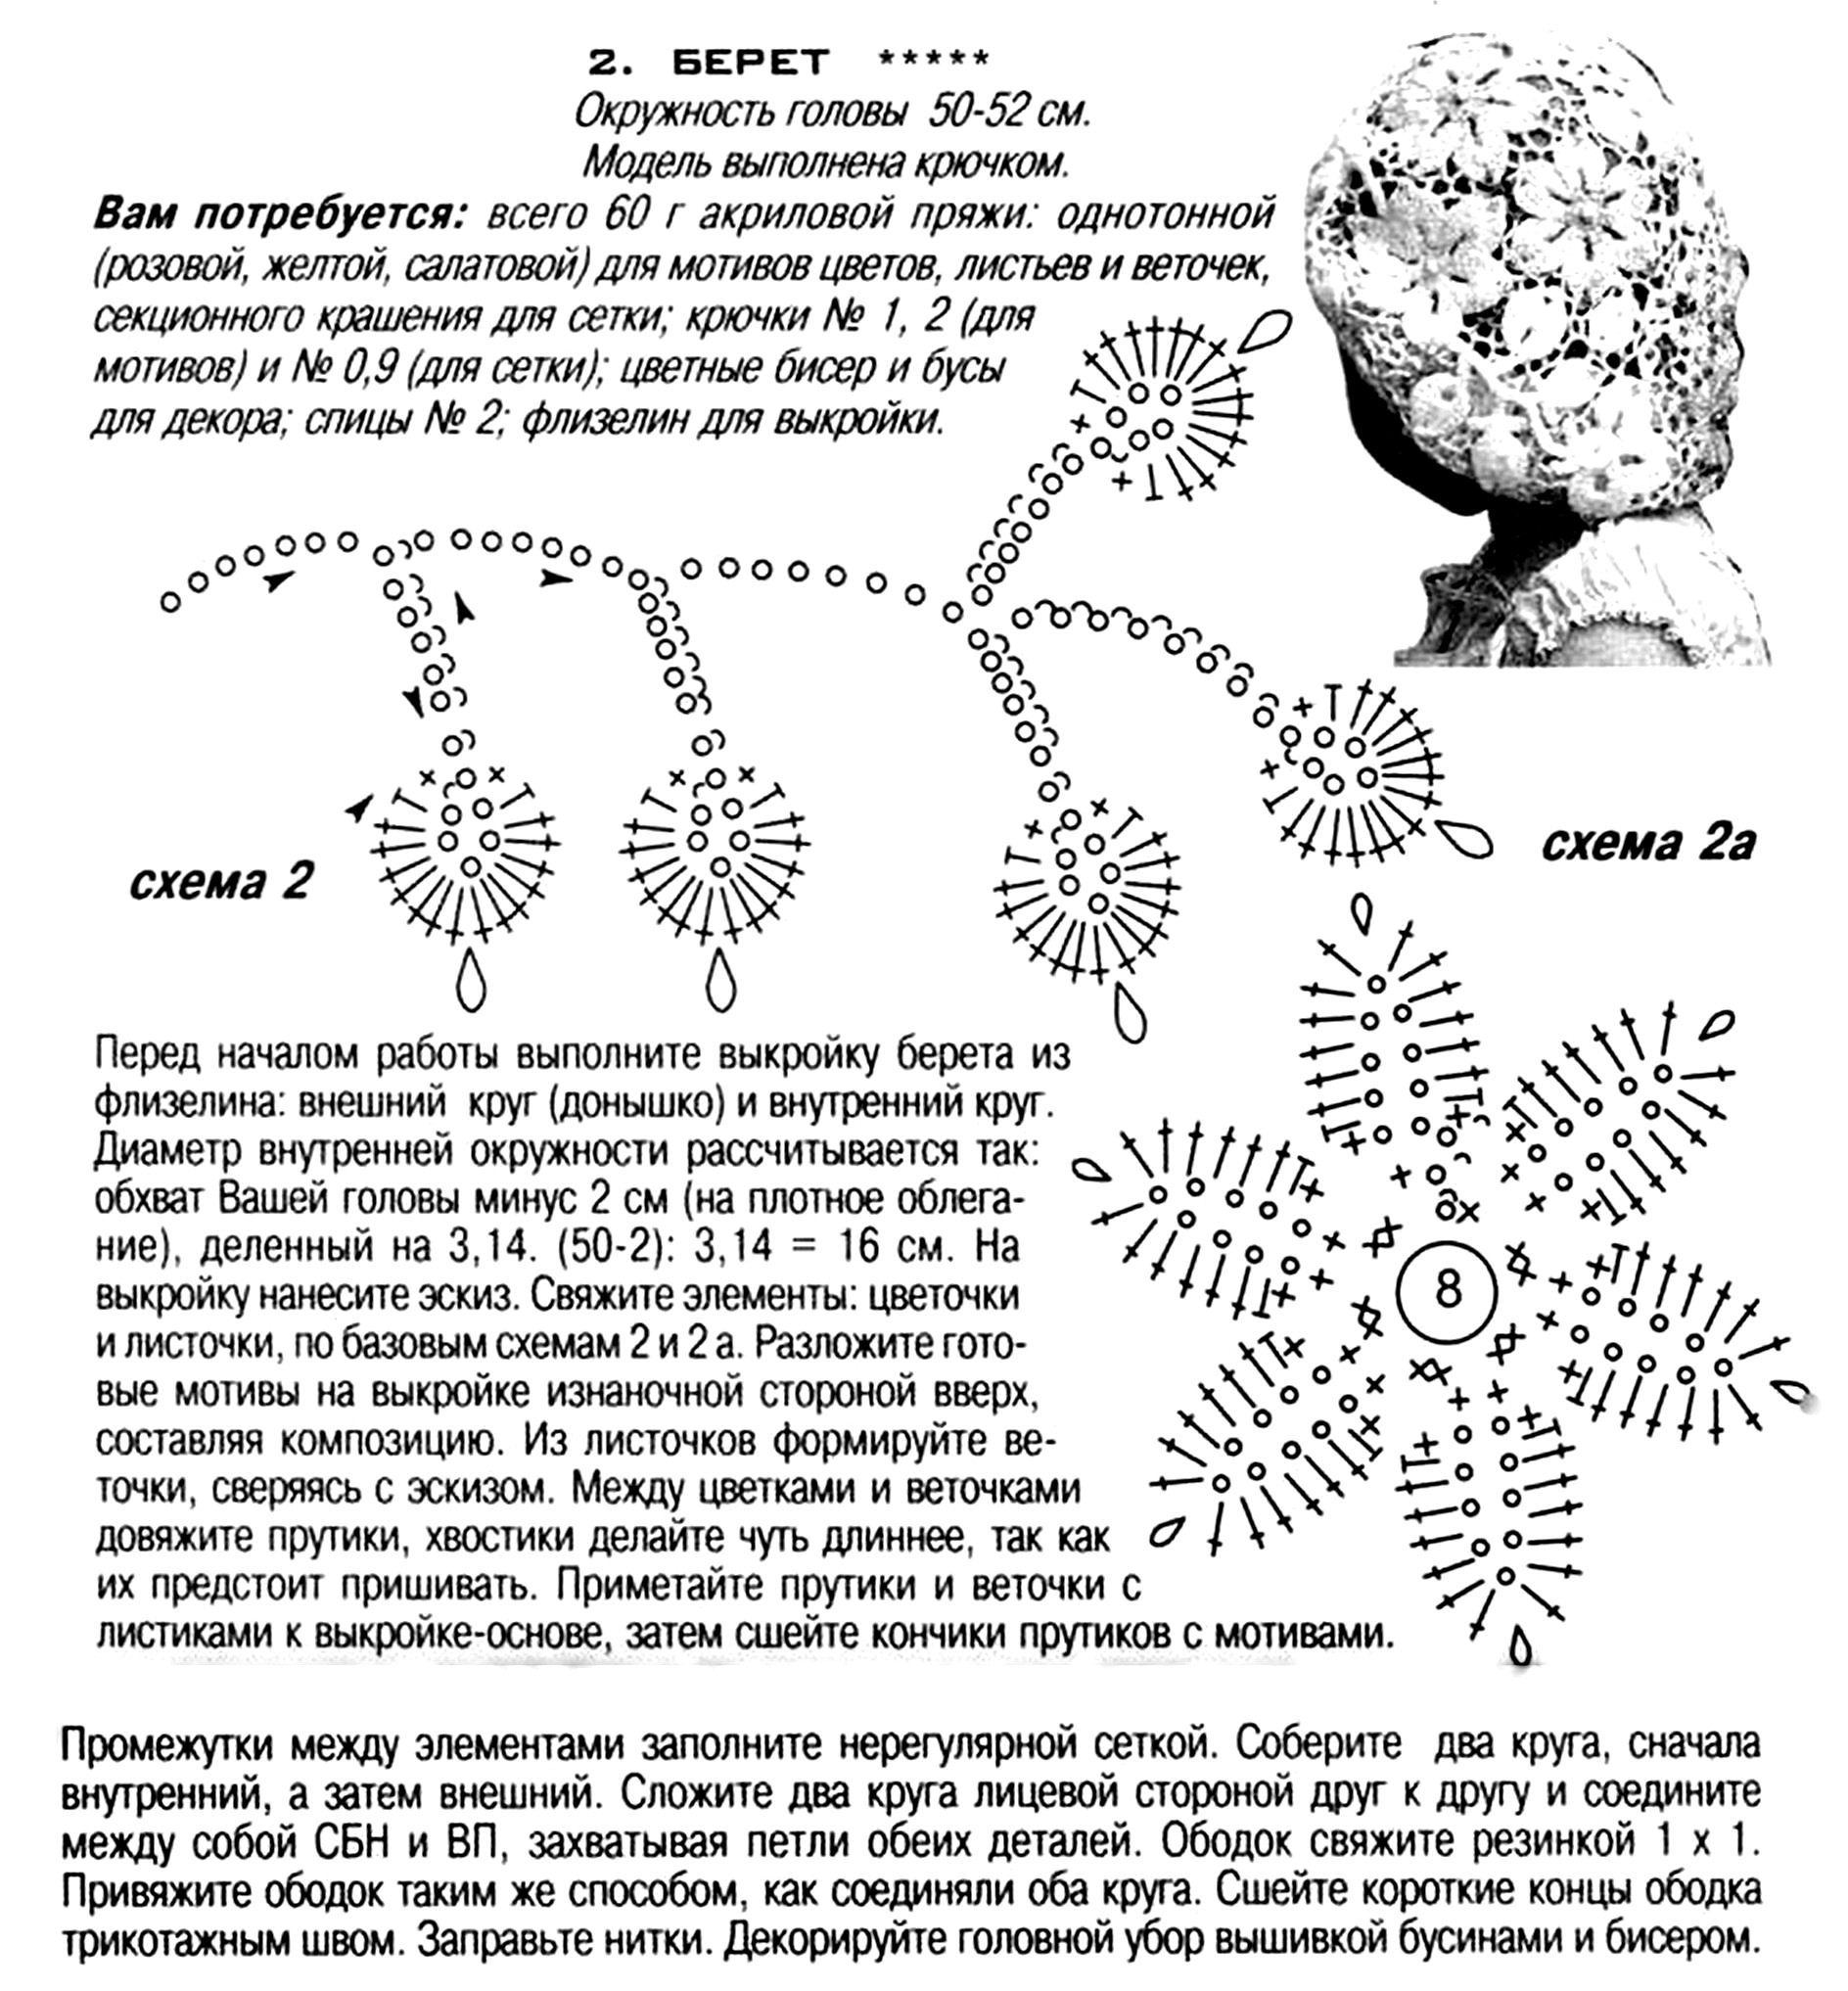
Size: Head circumference 50–52 cm
Materials Needed:
- Total 60 g of acrylic yarn:
- Solid colors (pink, yellow, light green) — for flowers, leaves, and branches
- Variegated (section-dyed) yarn — for the mesh background
- Crochet hooks: 1 mm and 2 mm (for motifs), 0.9 mm (for mesh)
- Knitting needles size 2 (for the band)
- Colored beads and small decorative pearls for embellishment
- Fusible interfacing (flizelin) — for the pattern template
Instructions:
- Make the Pattern Template:
Using fusible interfacing, draw two circles:- Outer circle: forms the crown of the beret.
- Inner circle: forms the head opening.
(Head circumference – 2 cm) ÷ 3.14
Example: (50 – 2) ÷ 3.14 = 16 cm Sketch a rough layout of the floral design directly on the template.
- Crochet the Motifs:
Crochet flowers and leaves following diagrams 2 and 2a.
Arrange the finished motifs face-down on the template, forming a balanced composition.
Use the leaves to build small branches, referring to your sketch. Between the flowers and branches, crochet connecting stems, leaving tails slightly longer — they’ll be sewn later.
Baste (lightly stitch) the stems and leaf branches onto the template base, then join the ends of the stems to the motifs with small stitches.
- Fill the Gaps:
Using variegated yarn and 0.9 mm hook, fill the spaces between motifs with an irregular mesh (freeform lace).
- Assemble the Beret:
Crochet two circular panels — the inner and outer layers of the beret.
Place them right sides together and join along the edges using single crochet (sc) and chain stitches (ch), working through both layers.
- Band (Ribbing):
Using knitting needles size 2, knit the band in 1×1 rib (k1, p1) pattern.
Attach the band to the beret the same way you joined the two circles — by crocheting sc and ch around the edge.
Sew the short edges of the band together with a grafting (mattress) stitch.
- Finishing:
Weave in all yarn ends neatly.
Decorate the finished beret with embroidery using beads and small pearls to enhance the floral motif and add sparkle.
A beautifully crafted crochet beret adorned with colorful flowers, leaves, and shimmering beadwork — lightweight, elegant, and full of handmade charm.
Boina de Ganchillo con Flores y Adornos de Cuentas
Talla: Circunferencia de la cabeza 50–52 cm
Descripción:
Esta delicada boina combina motivos florales de ganchillo, ramas con hojas y un fondo de malla abierta. Terminada con bordado de cuentas y pequeñas perlas, es un accesorio ligero pero muy expresivo, ideal para primavera y verano.
Materiales:
- Total 60 g de hilo acrílico:
- Colores sólidos (rosa, amarillo, verde claro) — para flores, hojas y ramas
- Hilo multicolor o jaspeado — para la malla de fondo
- Ganchillos: 1 mm y 2 mm (para los motivos), 0,9 mm (para la malla)
- Agujas de tejer Nº2 (para la banda)
- Cuentas de colores y pequeñas perlas decorativas
- Entretela adhesiva (fliselina) — para el patrón base
Instrucciones:
- Preparar el patrón base:
Con la entretela adhesiva, dibuja dos círculos:- Círculo exterior: formará la parte superior de la boina.
- Círculo interior: formará la apertura para la cabeza.
(Circunferencia de la cabeza – 2 cm) ÷ 3,14
Ejemplo: (50 – 2) ÷ 3,14 = 16 cm Haz un boceto del diseño floral directamente sobre la plantilla.
- Tejer los motivos:
Tejer flores y hojas siguiendo los diagramas 2 y 2a.
Coloca los motivos terminados con el revés hacia arriba sobre la plantilla formando la composición deseada.
Usa las hojas para formar ramitas, siguiendo el boceto. Entre flores y ramitas, teje pequeños tallos de conexión, dejando un poco de hilo más largo para poder coserlos después.
Sujetar los tallos y ramitas sobre la base de la plantilla, luego unir los extremos de los tallos con los motivos mediante puntadas pequeñas.
- Rellenar los espacios:
Con hilo jaspeado y ganchillo de 0,9 mm, llenar los espacios entre los motivos con una malla irregular (puntada libre).
- Montaje de la boina:
Tejer dos paneles circulares: el interior y el exterior de la boina.
Colocar los derechos enfrentados y unir los bordes con puntos bajos (pb) y cadenetas (ch), trabajando a través de ambas capas.
- Banda (ribete):
Con agujas de tejer Nº2, tejer la banda en punto elástico 1×1 (1 derecho, 1 revés).
Fijar la banda a la boina de la misma manera que se unieron los dos círculos — con pb y ch alrededor del borde.
Coser los extremos cortos de la banda con puntada invisible (costura de colchón).
- Acabado:
Esconder todos los hilos sobrantes.
Decorar la boina terminada con bordado de cuentas y pequeñas perlas para realzar los motivos florales y dar brillo.
Resultado:
Una hermosa boina de ganchillo adornada con flores, hojas y detalles brillantes de cuentas — ligera, elegante y con un encanto artesanal único.
Берет с цветочными мотивами и декором из бисера
Размер: Обхват головы 50–52 см
Описание:
Нежный декоративный берет, связанный крючком, сочетает в себе цветочные мотивы, листовые веточки и лёгкую сетчатую основу. Украшен вышивкой с бисером и маленькими бусинами, этот аксессуар лёгкий, элегантный и выразительный — идеально подходит для весны и лета.
Материалы:
- Всего 60 г акриловой пряжи:
- Однотонная (розовая, жёлтая, светло-зелёная) — для цветов, листьев и веточек
- Пряжа секционного крашения — для сетки
- Крючки: №1 и №2 (для мотивов), №0,9 (для сетки)
- Спицы №2 (для ободка)
- Цветной бисер и маленькие бусины для декора
- Флизелин — для выкройки
Инструкция:
- Подготовка выкройки:
Из флизелина вырежьте два круга:- Внешний круг: для верхней части берета
- Внутренний круг: для окружности головы
(Обхват головы – 2 см) ÷ 3,14
Пример: (50 – 2) ÷ 3,14 = 16 см На выкройке нарисуйте эскиз цветочной композиции.
- Вязание мотивов:
Свяжите цветы и листья по базовым схемам 2 и 2а.
Разложите готовые мотивы изнаночной стороной вверх на выкройке, формируя композицию.
Из листочков формируйте веточки, ориентируясь на эскиз. Между цветами и веточками свяжите соединительные прутики, оставив хвостики немного длиннее для пришивания.
Приметайте прутики и веточки к основе выкройки, затем сшейте кончики прутиков с мотивами мелкими стежками.
- Заполнение промежутков:
Между мотивами свяжите нерегулярную сетку из пряжи секционного крашения с помощью крючка №0,9.
- Сборка берета:
Свяжите два круглых полотна — внутренний и внешний.
Сложите их лицевой стороной друг к другу и соедините по краю, провязывая ст. б/н и возд. п., захватывая обе детали.
- Ободок:
Свяжите ободок спицами №2 резинкой 1×1 (1 лиц., 1 изн.).
Прикрепите ободок к берету тем же способом, что и соединение двух кругов.
Сшейте короткие концы ободка трикотажным швом.
- Окончательная отделка:
Спрячьте все концы нитей.
Украсьте готовый берет вышивкой бисером и бусинами, подчёркивая цветочные мотивы и добавляя блеск.
Результат:
Изысканный вязаный крючком берет с цветами, листьями и блестящими декоративными элементами — лёгкий, элегантный и полный ручного очарования аксессуар.