How to Crochet a Magic Ring: The Easiest Method for Beginners
How to Crochet a Magic Ring: The Easiest Method for Beginners
The magic ring is one of the most important techniques in crochet — and one of the most confusing for beginners.
It’s the starting point for many circular crochet projects, from granny squares to amigurumi. But a lot of tutorials overcomplicate it.
This method keeps it simple.
Think of the yarn like a balloon shape. That visual changes everything.
Once you see it, the magic ring becomes easy.
What is a Magic Ring in Crochet?
A magic ring (also called a magic circle) is a way to start crochet in the round with a tight adjustable center.
Unlike chaining and joining into a circle, the magic ring lets you pull the center closed completely.
That means:
- No hole in the middle
- Cleaner granny squares
- Tighter amigurumi starts
- Better-looking circular motifs
It creates a professional finish from the very first stitch.
Why Beginners Struggle with the Magic Ring
Most magic ring tutorials teach finger wrapping techniques that feel awkward and hard to remember.
That’s the problem.
It’s not the technique — it’s the explanation.
This method simplifies it by giving you a shape to follow.
A balloon.
That makes it visual, repeatable, and much easier to learn.
Learn the Crochet Magic Circle in 1 Minute!
The Easiest Magic Ring Method (Balloon Method)
This is the simplest way to understand it.
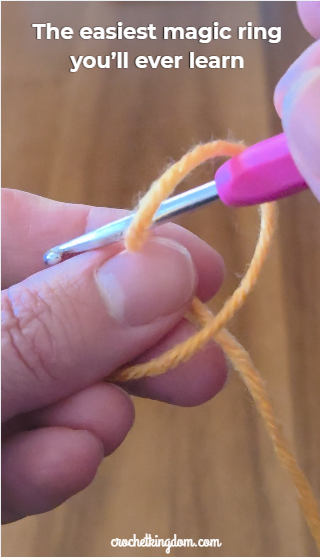
Step 1: Shape the Yarn Like a Balloon
Take your yarn and fold it into a loose balloon shape.
The important detail:
The short tail sits on the right side.
This tail is what you’ll pull later to close the ring.
Step 2: Insert Your Hook into the Center
Push your crochet hook right into the middle of the balloon shape.
Straight through the opening.
Step 3: Pull the Yarn Through
Grab the working yarn and pull it through the center.
This creates your loop.
At this point, your ring is formed.
Step 4: Crochet Your Stitches Into the Ring
Work your stitches directly into the ring.
For example:
- Single crochet for amigurumi
- Double crochet for granny squares
Build all the stitches you need before closing it.
Step 5: Pull the Tail Tight
Once all stitches are complete, pull the short tail firmly.
The center closes up tightly.
No hole. Clean finish.
That’s the magic.
Why This Method Works So Well
This balloon method works because it removes guesswork.
Instead of memorizing wraps and loops, you remember one shape.
That makes it:
- Easier to teach
- Easier to remember
- Faster to repeat
- Better for beginners
Simple systems stick.
What Can You Use a Magic Ring For?
The magic ring is essential for:
- Granny squares
- Amigurumi
- Crochet flowers
- Hats
- Circular motifs
- Mandalas
If it starts in the round, this technique matters.
Common Magic Ring Mistakes
Pulling the wrong end
Always pull the short tail, not the working yarn.
That’s what closes the center.
Making the balloon too tight
Keep it loose enough to insert your hook easily.
Not securing the first stitch
Your first stitch anchors the ring.
Keep it steady.
Magic Ring vs Chain Circle
A chain circle leaves a hole.
A magic ring closes completely.
That’s the biggest difference.
For clean centers, the magic ring wins every time.
Continue Learning Crochet
If you’re building your crochet foundation, learn these next:
- Single Crochet Stitch Tutorial
- Double Crochet Stitch Tutorial
- Half Double Crochet Stitch Tutorial
- Complete Crochet Stitches for Beginners Guide
- Granny Stitch Crochet Guide
The magic ring only feels hard until someone explains it clearly.
Once you see the balloon shape, it becomes obvious.
That’s the shift.
And once you’ve got it, every circular crochet project gets easier from there.