Crochet Pattern for a Baby Bonnet, Sweater and Booties. This crochet pattern, titled “Pretty in Pink” by Linda Rude, is an intermediate-level design for a baby’s sweater, bonnet, and booties set. The pattern offers three sizes: 6 months, 12 months, and 18 months, with corresponding chest measurements of 20½, 23, and 25½ inches, and lengths of 9, 11, and 12½ inches. The required materials include Ply-Spun Super Sport weight yarn (specifically 6, 7, or 9 skeins of No 922 md pink), an F/5 (4.00mm) crochet hook, and a yarn needle. The gauge for the pattern stitch is 10½ stitches and 11½ rows per 4 inches.
The core of the pattern is the “Pattern Stitch,” which consists of two rows: Row 1 uses double crochet (dc) stitches, counting the turning chain as the first dc, worked through both loops. Row 2 introduces a half double crochet (hdc) and triple single crochet (tsc) combination, where the turning chain counts as the first stitch, followed by 2 dc, skipping 2 dc, and ending with an hdc in the turning chain of the previous row.
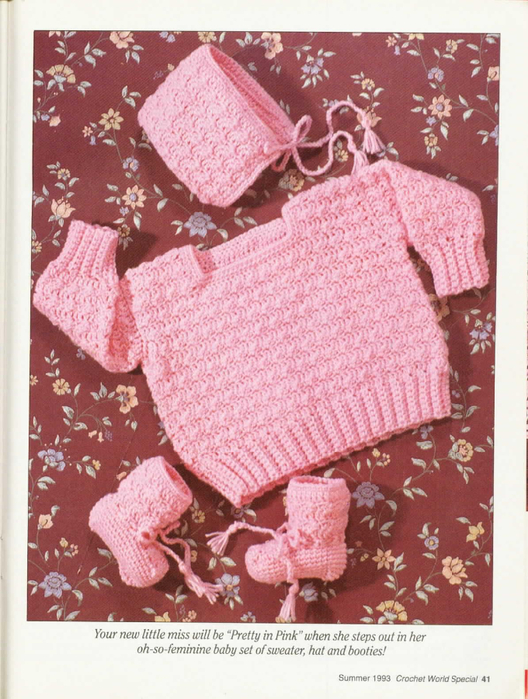
Skill Level: Intermediate
SIZE
Fits 6 months (12 months, 18 months)
Chest: 20½ (23-25½) inches
Length: 9 (11-12½) inches
MATERIALS
Ply-Spun Super Sport weight yarn:
6 (7-9) No 922 md pink
Crochet hook size F/5 (4.00mm)
Yarn needle
“Coats & Clark Red Heart Super Sport™ 3-ply yarn was used in sample project.
GAUGE
10½ sts = 4 inches; 11½ rows of pattern st (starting with Row 1) = 4 inches.
PATTERN STITCH
Row 1: Counting turning ch as first dc, dc through both lps of each st across, ch 2, turn.
Row 2: Counting turning ch as first st, tsc and 2 dc in next dc, sk 2 dc) rep across, ending with hdc in turning ch of previous row, ch 3, turn.
SWEATER
The SWEATER construction begins with the BACK piece. This starts with a ribbed section made by chaining and working single crochet (sc) stitches in the back loops, repeating for 32, 36, or 40 rows. The Body is then worked into the ends of these ribbing rows, starting with 50, 56, or 62 dc stitches. The pattern stitch is then applied for 10, 14, or 18 rows. Bodice shaping involves skipping stitches at the beginning and end of rows and continuing the pattern stitch for 6, 8, or 10 rows from the underarm. Finally, Shoulder shaping is worked on 11, 14, or 17 stitches on each side for 6 rows.
BACK
Ribbing
Row 1: Ch 9 (10-11), sc in 2nd ch from hook, sc in each rem ch across, ch 1, turn. (8-9-10)
Row 2: Working in back lps only, sc in each sc across, ch 1, turn.
Rep Row 2 until a total of 32 (36-40) rows are completed, ch 3, turn to work across ends of ribbing rows.
Body
Row 1: Counting turning ch as first st, work 50 (56-62) dc evenly sp across edge of ribbing.
Starting with Row 2 of pattern stitch, work in pattern stitch, rows 1 and 2 until 10 (14-18) rows are completed. At end of last rep, fasten off.
Bodice shaping
Row 1: Sk 3 (3-3) sts, attach yarn in next ch, ch 3, dc in each st across un-til 3 (3-3) sts rem. ch 2, turn.
Row 2: Rep Row 2 of pattern stitch.
Work pattern stitch rows 1 and a to-tal of 6 (8-10) rows are completed from underarm.
Shoulder shaping
Work in pattern stitch on 11 (14-17) sts of each side for 6 rows (all sizes). Fasten off.
SLEEVES (make 2)
The SLEEVES (two are made) also start with Ribbing, similar to the back, for 16, 18, or 20 rows. The Body of sleeve is then worked into the ribbing, starting with 26, 29, or 32 sc stitches. The pattern stitch is applied for 11, 15, or 19 rows, with increases made every 4th row to shape the sleeve. Joining involves sewing the front, back, and sleeve seams, along with the shoulder and armhole openings, and weaving in ends. The NECKLINE TRIM is worked in three rounds: sc around the neckline edge (Rnd 1), sl st in back loops (Rnd 2), and sc in both loops (Rnd 3).
Ribbing
Work ribbing same as back for 16 (18-20) rows. At the end of last rep, ch 3, turn and work in ends of ribbing rows.
Body of sleeve
Row 1: Counting turning ch as first dc, work 26 (29-32) sc across edge of ribbing rows, ch 1, turn.
Work pattern stitch rows for a total of 11 (15-19) rows, increasing 1 st on each side of sleeve every 4th row in Row 1 of pattern stitch a total of 2 (2-2) times. At the end of last rep, fasten off.
JOINING
Sew front and back sleeve seams, sew shoulder seams, sew sleeve seams and sew sleeve/armhole openings.
Weave in loose ends.
NECKLINE TRIM
Rnd 1: With right side facing, at-tach yarn to center back neckline, ch 1, sc evenly sp around neckline edge, ch 1, turn.
Rnd 2: Working in back lps only, sl st in each sc around, join, ch 1, turn.
Rnd 3: Working in both lps, sc in each sl st around, join, fasten off.
Weave in loose ends.
BONNET
The BONNET begins with a chain of 46, 52, or 58 stitches, followed by double crochet stitches. The pattern stitch (starting from Row 2) is then worked for 8, 10, or 12 rows. The CROWN TRIM involves single crochet stitches across the crown, with decreases. The CAP EDGE consists of two rounds of sc around the outside edges, with 3 sc in each corner, and then the back cap edge is sewn closed. Two TIES are made by chaining 50, 52, or 56 stitches, attached to the bonnet, and finished with small tassels.
Row 1: Ch 46 (52-58), dc in 4th ch from hook, dc in each rem ch across, ch 2, turn.
Beg with pattern stitch Row 2, work pattern stitch Rows 1 and 2 for a total of 8 (10-12) rows.
CROWN TRIM
Working across crown of bonnet, sc in each st across, decreasing 5 (7-7) sc evenly sp across, ch 1, turn pace 4, turn.
CAP EDGE
Work 2 rnds of sc around outside edges of bonnet, with 3 sc in each corner st on each rnd, sl st to join, fasten off.
With yarn needle and length of yarn, sew back cap edge of Rnds 1 and 2 closed.
TIES (make 2)
Ch 50 (52-56), fasten off. Sew each tie to bonnet.
Attach a small tassel to each end of tie.
BOOTIES
The BOOTIES section starts with the ANKLE, created by chaining 28, 31, or 34 stitches and working double crochet for 5 rows in the pattern stitch. An EYELET ROW is then created using sc and ch 1 spaces. The INSTEP is worked in pattern stitch over the center 6, 8, or 8 stitches for 4, 5, or 6 rows, and then the back seam of the ankle is sewn. ANKLE TRIM is worked by single crocheting into the opposite side of the foundation chain. The FOOT is begun at the side of the ankle seam, with 19, 21, or 26 sc to the center toe, and then 11, 21, or 26 sc from the center toe to the ankle seam. This is followed by 3 or 4 rounds of sc, and then 3 or 4 more rounds with decreases for shaping the toe and heel. The bottom of the bootie is folded flat and sewn. Finally, two TIES for the booties are made by chaining 80, 90, or 100 stitches, woven through the eyelet row, and finished with tassels.
ANKLE
Row 1: Ch 28 (31-34), dc in 4th ch from hook, dc in each rem ch across, ch 1, turn. (26-29-32)
Work in pattern stitch row for a total of 5 (5-5) rows.
EYELET ROW
Sc in both lps of first 2 sts, ch 1, sk 1 st, sc in both lps of next st) rep across, ending with sc in both lps of last 2 sts, fasten off.
INSTEP
Work pattern stitch rows, begin-ning with Row 1 across the center 6 (8-8) sts of bootie ankle for 4 (5-6) rows, fasten off. Sew back seam of ankle.
ANKLE TRIM
Working in opposite side of founda-tion ch, sc 1, sc in each ch around, join, fasten off.
FOOT
Beg foot at side of seam on bootie ankle on right side of bootie, work 19 (21-26) sc around to center toe of bootie, work 11 (21-26) sc from center toe to seam of ankle, sl st to join, ch 1. (38-42-46)
Work 3 (4-4) rnds of sc in each sc around, sl st to join, ch 1.
Work 3 (4-4) more rnds of sc, de-creasing 2 sts each at toe and heel evenly sp every rnd, sl st to join, ch 1. At the end of last rep, leaving a length of yarn, fasten off.
Fold bottom of bootie flat across and sew opening closed.
TIES (make 2)
Ch 80 (90-100), fasten off.
Starting at center front, weave chain through eyelet rnd. Attach a small tassel to each end of each tie.